The way we communicate today is dramatically changing with the advent of new technologies. iPad and iPhones are great communication tools in that they allow you to communicate via emails, Messages, Facetime and occasionally even a phone call via VOIP applications that vary from Skype, Whatsapp and others. However, the price we pay for having all these various channels of communication is that it opens us up to even more spam messages as unwanted communication. In this article, we look at some of the basics around how to block unwanted messages and emails.
Contents
Related Articles
- Customize Your iPhone Mail Attachment Options
- Using PDF and Notes in email
- iOS Mail Tips for your iPhone & iPad
- Best Third-Party Mail Apps for iPhones and iPads
Blocking Unwanted Emails
Emails have been around forever and are one of the commonly used methods for communication. There’s no easy way to blocking specific email addresses on your iPad, but by marking spam emails as junk on the email rules, you can train your iPad to move these into the junk folder automatically. Google recently made changes in their Gmail application to help users with blocking specific email addresses. If you use Yahoo mail, there are also a few options that we will highlight in this article.
First, let’s cover the basics:
Step ->1
The most important thing to do is not to open emails from senders that you don’t recognize. And be wary of attachments in these emails and refrain from clicking on any of the attachments. When you see the spam email on your Mail app on your iPad, swipe it to the left. You will see three options: “More | Flag | Trash.”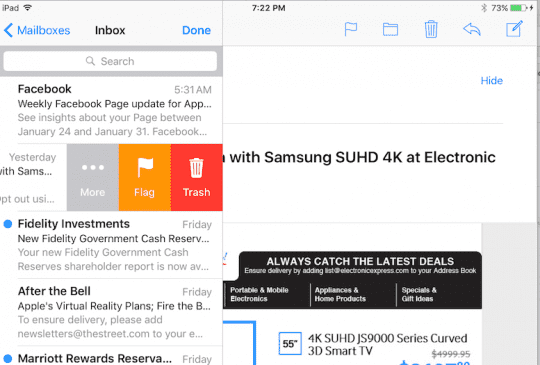
Step ->2
Tap on the “More” option. You will see various options that show up on the right-hand side. We will use the last option marked “Move Message..” Tap on this, and you will see a new panel on the left showing all the various folders to which you can move this message to. Tap on the Junk folder, and the email moves to Junk.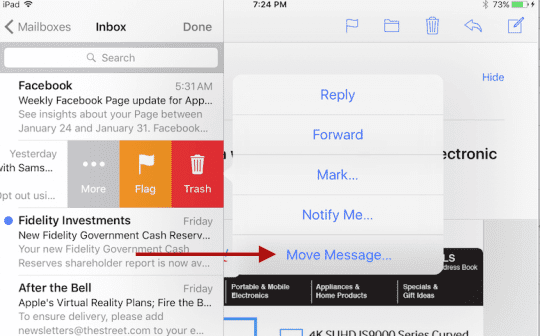
Moving the message to Junk Folder.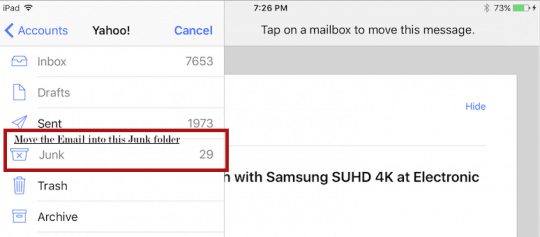
Step –>3
If you have already opened the email, you can very quickly move it to the Junk folder by clicking on the little “Folder” icon on top right hand and then choosing the “Junk” folder on the subsequent screen.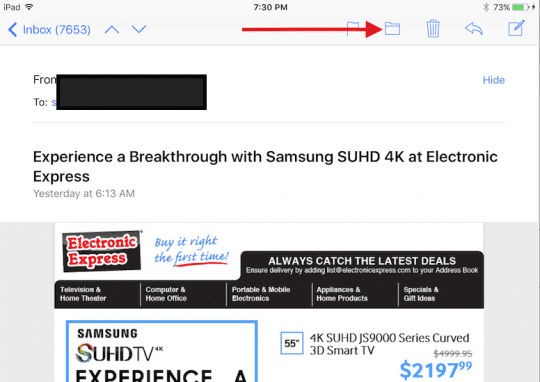
Set Up a Rule for your Mac’s Mail
Luckily, Apple’s Mac Mail App makes it simple to set up rules! And we can quickly setup a rule to automatically put emails in the Trash or Spam folders. Rules don’t block an email from being sent, BUT it does prevent an email from being read! Unfortunately, this function is only available on Macs–not yet on iDevices.
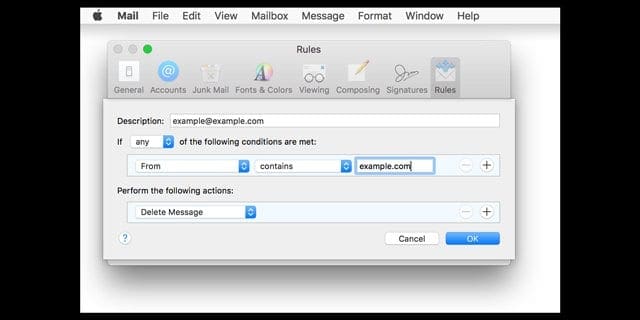
Setting up a “Block” Rule for Mac Mail
- Open your Mail App
- In the Top Menu choose Mail > Preferences
- Select the Rules Tab
- Choose Add Rule
- Name Your Rule
- If blocking a particular email address, use this as the rule name
- Select your parameters
- Choose Delete Message from Perform the following actions:
Email Blocking Options for iPhones and other iDevices
Google Gmail 
Since Gmail is one of the most popular email applications that is used by our users, let’s explore the new “Block” feature from Google that announced in Sept 2015. “Blocking” sends an email from a particular email address to the spam folder. The email continues to live on in the spam folder.
It may be a better option to just delete the email when it arrives by setting up an automated filter so that it moves to “Trash.” Please follow the steps below:
Step -> 1. Log into your Gmail account on your computer. In your Inbox, select the message by clicking on the little checkbox and then click on “More.” You will see a list of dropdowns. Choose “Filter Messages like These.”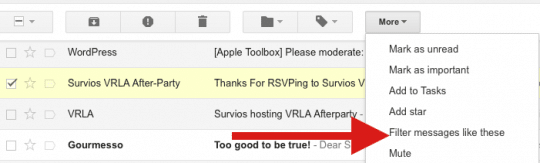
Step->2. You will see a new window with the email address in the From field. At the bottom of this window, please click on “Create Filter with this Search” and choose the “Delete” option in the next screen as shown below. When an email arrives from this particular sender in the future, it will automatically get deleted and go to your “Trash” folder.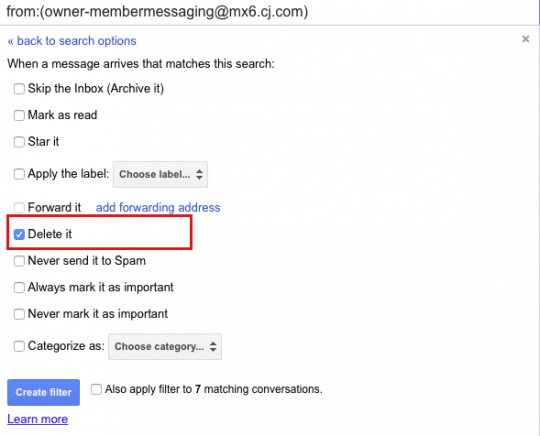
Step->3 Blocking the Sender in Gmail
If you have opened the email, click on the down arrow and you will see a list of options as shown in the image below. You can choose to Block the Sender by selecting the Block Option.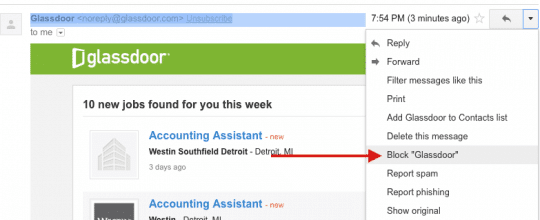
Step->4 You can periodically review your blocked and Automated Filter Settings for Gmail. You can do this by clicking on the gear icon on your Gmail at the top right side and then choose Settings > Filters and blocked Addresses.
Yahoo Mail 
If you are using Yahoo Mail, please check this article. Yahoo allows up to 500 different senders to be blocked.
By configuring the blocking and filtering rules on your favorite email service provider, you can limit the number of unwanted emails coming into your inbox on your iPad and iPhone. By using the Move to Junk option on your iPad, your iPad will keep track of these senders and will move them into junk.
AOL Mail 
1. Log in to your AOL account
2. Go to AOL Keyword: Mail Controls. For versions 10.1 and higher, click on the “Mail” icon followed by “Settings” and then “Spam Controls.” Click “Edit Spam Controls” to launch AOL Desktop 10.1’s mail controls
2. In Sender Filter, click the Block mail from addresses I specify option
3. In the text box, type the email address that you want to block. Add multiple email addresses by separating each email address with a comma
4. Click Save
With AOL, you can block a maximum of 1000 email addresses and domain names.
Blocking Unwanted Text Messages
Getting harassed by unwanted text messages can be a major nuisance. Sometimes these are adverts from companies while there could also be those occasional contacts that you don’t want to be social with any longer. Here’s how to add these gentle souls into your blocked list:
Step ->1 If the message is open, tap the Details link in the top right corner of the message.
Step->2 On the following screen, tap the “i” icon. You will see a list of options. Select the last one, “Block this Caller.”
Step->3 You will be asked to confirm on the next pop-up window. Once confirmed, you will no longer receive phone calls, messages or FaceTimes from this contact.
Step->4 You can periodically review and edit the list of numbers you have blocked by going to Settings > Messages > Blocked.
There is also another option in iOS that merits mention in this section.
You can also filter out iMessages from people not listed in your contacts.
Go to Settings > Messages and turn on Filter Unknown Senders. When you open Messages, you’ll see a new tab for Unknown Senders. When you turn on this option, you won’t get notifications for iMessages from Unknown Senders.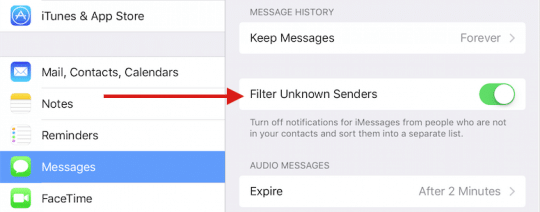
Blocking from FaceTime
Facebook blocking is very similar to the prior step. In the App, you will see each of the calls received is listed and has an “I” icon next to it. Tap the “I” next to the person you want to block and confirm your action on the subsequent pop-up window.
You can review and edit your blocked list in your Settings by Settings > FaceTime >Blocked.
Summary
Certain carriers also provide for additional features when it comes to spam control and blocking “Restricted” numbers et al. Please feel free to check with your carrier. We have provided the link to Verizon here as an example. Although the multitude of options that we have provided in the article may seem to be a little daunting for the newbie, we certainly think that it is worth exploring these options. A cluttered email inbox not only appears less appealing but it can also hinder your productivity. By choosing to use some of the Automated Filter options on your email, you can easily organize your emails and make the best of your time.