Some Mac users experience slow performance after updating their Mac’s OS to macOS Sierra. No one knows exactly why this happens. But there are ways to find out if the performance of your Mac is slow after macOS upgrade. And, if slow performance is an issue on your Mac, this article provides tips to help solve that problem.
First, make sure you have sufficient RAM for your system and macOS Sierra. Often, we upgrade our Macs to the latest OS version and forget that our machines might now need more memory. Remember that Sierra needs more physical memory (RAM) to make everything move fast. So check that before you do anything else. Unfortunately, if problems continue, sluggish performance is one of the first signs of hardware problems. So if your Mac’s slow performance is a result of faulty equipment, the wisest thing to do is backup your system now.
Related Articles
- Factory Reset MacBooks & Macs
- Apps Crashing on Mac?
- How to Download Apps from Anywhere
- Mac Not Starting After macOS update
Contents
fast track
- Take a look at what’s going on using Activity Monitor
- See what your own Mac recommends using macOS Recommendations (About this Mac > Storage > Manage >Recommendations)
- Check Your Mouse in Accessibility Settings (System Preferences > Accessibility > Mouse & Trackpad > Set to Fast)
- Boot in Safe Mode
- Check User Login Items (System Preferences > Users&Groups > Login Items)
- Create New Admin User Account
- Use Third-Party Utilities (such as EtreCheck)
- Contact Apple Support
First Things First, Always Backup Using Time Machine (or similar)
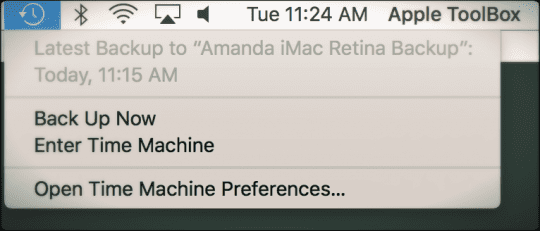
To save your data from a possible hard drive failure, it’s important you routinely use Mac’s Time Machine (or a similar backup/cloning app) to backup and store all your Mac’s data onto an external hard drive. With Time Machine, backing up your Mac is simple. Just connect an external hard drive or a Time Capsule, your Mac automatically asks if you want to back up your system on that drive. Click on Use as Backup Disk. Or manually select a disk using Time Machine Preferences if you are not prompted or if you ignored the prompt.
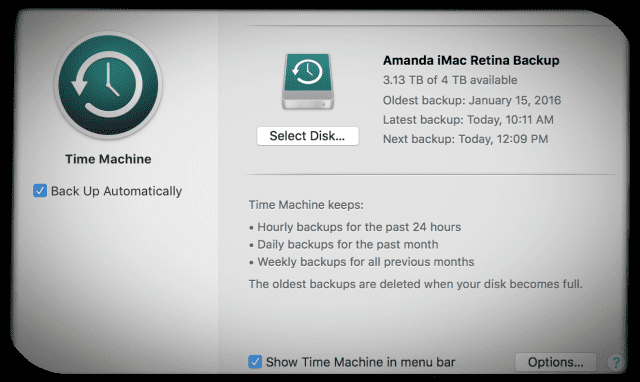
Go to System Preferences > Time Machine > Select Disk. Choose the disk that’s connected and that you want to backup to. Once selected, click on Use Disk and tick the checkbox backup Automatically. Automatic Time Machine Backups are kept hourly for past 24 hours, daily for past month, and weekly for all previous months. There’s also a Back Up Now option to back up everything at the moment instead of waiting for Automatic backup.
Take a sneak peek into CPU Usage
Activity Monitor is a great little utility that comes with every Mac. It’s almost hidden away in your Utilities folder in Applications. At first launch, it looks pretty intimidating and developer-ish, but if you look for targeted information, Activity Monitor may just become your best friend or at least a prized tool. I use it so much that it now resides in my Dock, so access is quick and easy.

Using Activity Monitor for Slow Performance
- Locate Activity Monitor from /Applications/Utilities/ and open it
- Click on the CPU tab and then click again on the %CPU field to sort highest to lowest percentages
- Check for apps are using the high percentage of CPU
- When a third-party app is taking up a lot of your CPU, delete it and reinstall it
- If unsure how much %CPU is normal, open a similar app and see what percentage is uses
- When there’s a significant discrepancy between similar apps, delete and reinstall the one using a lot more %CPU

Similarly, you can also check for Memory by clicking on Memory tab on top. It shows you how much memory each process uses. You can go through each to locate which process is causing slow performance.
A good indicator of a process slowing down the CPU is the idle time. If idle time is less than 50%, then the process is burdening the CPU and using most of its time and causing things to run slow. A Mac with an SDD should perform well even with heavy processes that take up a lot of CPU time and consume memory. Learn more about your Mac’s energy, disk, and network processes in that same Activity Monitor window.
Do Your (Mac) Chores!
macOS Sierra has some pretty amazing storage managements tools for keeping your Mac clean and tidy. Our Macs now offer recommendations for storage and clutter control, including features like Store in iCloud, Optimize Storage, Empty Trash Automatically, and even a Reduce Clutter option.
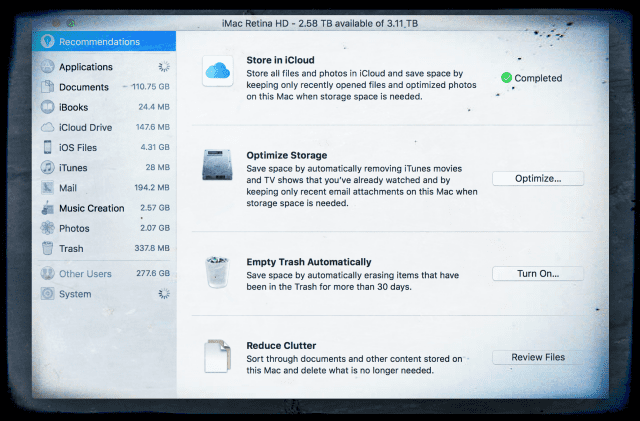
Find your recommendations by clicking on your Mac’s Apple logo ( ) at the top-left of your screen. Select About This Mac. Select the Storage Tab from the pop-up menu and then choose the Manage… button.
Store in iCloud & Optimize Storage
If your Mac is getting close to full capacity on its internal drive (10% or less total space available), consider turning on the Store in iCloud and the Optimize Storage recommendations. Both of these features save space by automatically moving files and photos to the iCloud or removing movies, TV shows, and email attachments when storage space is needed.
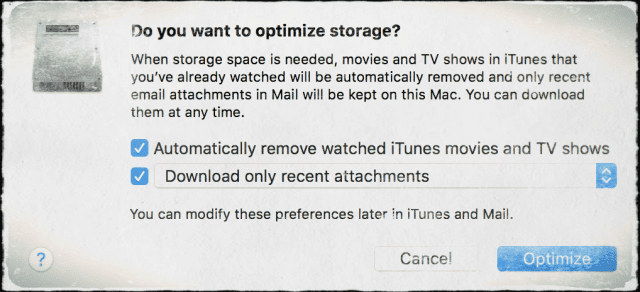
When you’re not short on space, no files are moved to iCloud or removed. These features are set to work ONLY in circumstances when your drive space is needed.
Auto-Empty Trash
Empty Trash Automatically is my personal recommendation. How many of us dump files into the Trash with the intention of deleting, only never to Empty the Trash?

When turned on, Empty Trash Automatically erases any items that are in your Mac’s Trash for more than 30 days. Unless you are vigilant about dumping the Trash, you’d probably be surprised to find out just how much drive space your trash is taking up. To check how big (or small) your Trash is, double-click the trash icon to open its contents. With the content window open, don’t select (highlight) anything and press command+I. Make sure it lists Kind: Trash and then look at the size.
If you don’t see Kind: Trash, chances are you selected (highlighted) a single file in the Trash window and the information you see is about that single file rather than the Trash Can as a whole.
Reduce Clutter
Reduce Clutter identifies large files, downloads, and other files that you might not need anymore. Clicking the Review Files button, opens a window with three tabs: Large Files, Downloads, and File Browser. Sort through the documents in Large Files and Downloads to determine which you no longer need and can erase.
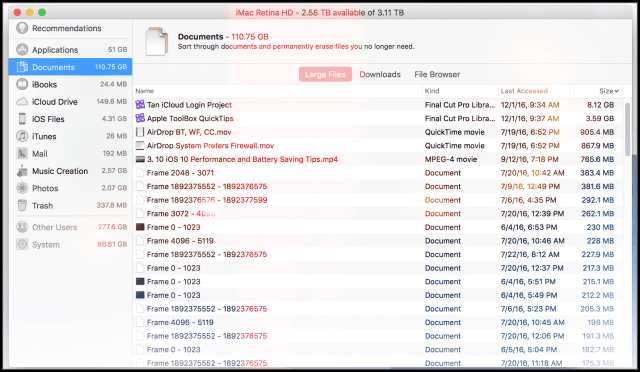
For some categories, you delete files directly and permanently by moving over the file name and clicking the “x.” Other groups show the total storage space used by the files in each app. Open the app and then you decide whether to delete those files or not.
Use your Mac in Safe Mode
Try running your Mac in Safe Mode to see if the performance is any better in the Safe Mode or when it does not Start up. If any third-party software is loading automatically and causing a delayed start up or slow performance, safe mode checks your system and helps with the following things.
Safe Mode Duties
- Repairs any directory issues
- Uses required kernels only
- Prevents any start-up items from launching automatically
- Deletes caches files like application caches and font caches
Start up in Safe Mode
- Turn on your Mac AND press and hold the Shift key until you see the Apple logo
- Log in
- To ensure you started up in Safe Mode, go to System Information, and you locate Boot Mode, it should list as Safe
- Also, some features like iMovie or any other video apps do not work in Safe Mode
- To exit Safe Mode, press any key during start up or restart once Safe Mode boots
During Safe Mode, your Mac’s performance should be healthy and NOT LAGGY or SLOW. After restarting, many of the performance issue with macOS Sierra resolve. If your performance issues went away, there most likely was some problem with your directory or cache that caused your Mac to perform very slow.
If your system still performs slowly, let’s check for any incompatible login items
So let’s get rid of such login items from your system.
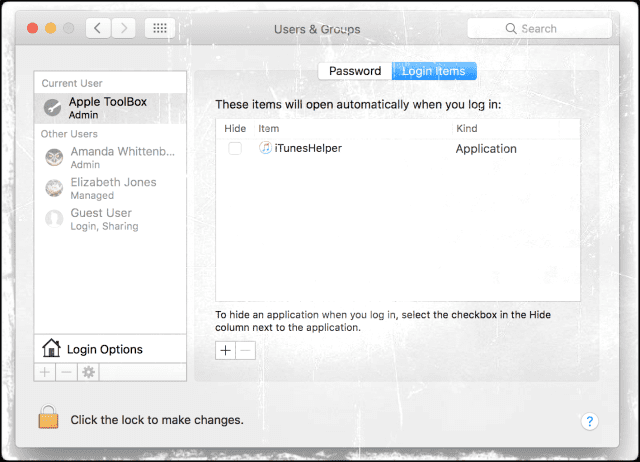
Here is how you do that:
- Go to Apple Menu > System> Preferences > Users & Groups
- Click on the account name you use
- Now click on Login Items
- You can make a list of these login items and save it somewhere or email yourself to remember
- Select all of these login items and click Remove
- Now restart your Mac
- Add these login items back one by one and restart Mac after each addition
- If a problem occurs during startup, then you know which login application or item is causing your performance problem
Create a New Admin User Account
Creating a new temporary Admin User account is an excellent way to check if your system behaves any differently. A new user account verifies if the problem is systemic (impacting your entire system and ALL users) or user-related to the settings or files on a particular current user account. One possible cause of slow performance is a corrupt user account, so this check for that.
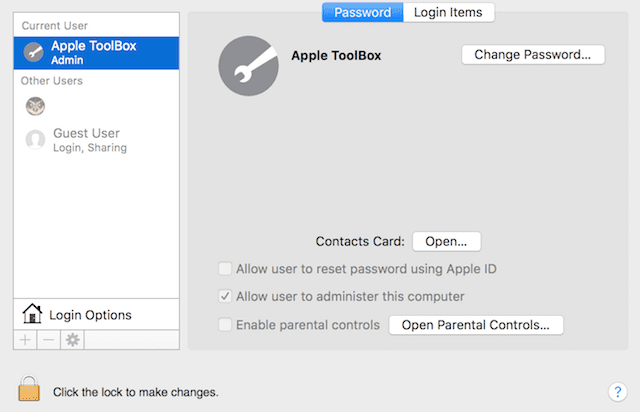
Creating another account is pretty simple
- Go to Apple Menu > System Preferences > User & Groups
- Click on the lock icon
- Enter an administrator name and password and click on Add (+)
- Select Administrator from the New Account drop-down menu
- Fill in details: name, account name and password and click OK
You then log out of your current account and login with the new account. If you see that the system speed is normal as before the update to macOS Sierra, then there is some issue with your settings or files. You will have to run a diagnostic test to find out about it.
Later, if you want to delete this account, you can do so by following the same steps for logging into Administrator and then clicking on the sure name you created and click on Remove. The user has to be logged out for this to happen.
Use Third Party Software to Diagnose Issue
If all of above fails, try to diagnose the problem using third party software like EtreCheck. EtreCheck runs over 50 diagnostic tasks to check your Mac’s performance and creates a report about it. If the problem is a hard disk failure, it lets you know specific details. Additionally, it also removes adware can contribute to do to a slow running Mac.

It’s difficult for most of us that aren’t programmers to fully comprehend the report EtreCheck produces. But this information does help you recognize features and possibly the source of the problem. If you need to take your Mac into Apple Support or to an Apple Authorized Service Provider, creating an EtreCheck report helps save them time and probably saves you money too! The software does not ask for any passwords nor affects or removes any of your files from your system. Download the software for free from EtreCheck directly and run a diagnostic check.
Apple Support
If everything fails and you are still not sure about what is causing your Mac to behave this slowly, your last resort is to visit an Apple Store and get help from Apple’s representatives. At this point, the problem is likely related to hardware in your Mac. Slow performance is common when you upgrade to a new OS just as it happens on iPhone or iPad. However, if it persists beyond a few days, then it is a chronic issue that needs immediate diagnosis and repair.
It is a good idea to conduct your own internet search for information about an OS update before installing it. Make sure you check Apple’s site for information about minimum hardware requirements. Then, look for the problems (and solutions) that developers, public beta users, and early adopters reported. Armed with this information, you can make an informed decision about upgrading your system or not. And if you do a macOS update, you’ll be in the know about next steps should any problems occur.
- Go to the System Preferences and turn off the iCloud Drive. Once you do this, everything worked fine and then restart iCloud services
- I unplugged my external Thunderbolt Display, and now Sierra runs beautifully
- Turn off the SIRI (which I do personally do not use anyway), and now my MacBook Pro operates as fast as it did in El Cap
- Navigate to the Finder Menu > Go > Go To Folder. In the Go To Folder dialog, type /Library. Click Go. Throw Cache folder’s content in Trash (remove what’s inside the cache folder but not the folder itself.) Restart. Empty trash. Restart. Now do the same for your user Library.In the Go To Folder dialog, type /Library/Caches and follow same steps. MacBook is super fast!
- Check your Mac’s Accessibility Preferences. Go to System Preferences > Accessibility > Mouse & Track Pad > Set Double-click speed to Fast. Reader Michael learned that when the Double-click speed for your mouse is set to Slow in Accessibility Preferences, it slows down the Finder overall, not just the double-click speed
