When you try to restart or shut down your Mac, is your computer getting stuck and your Mac will not shut down? Does your Finder Menu disappear and all your apps quit, BUT still your Mac get stuck on its Desktop and won’t shut down properly? Do you frequently unplug your Mac or remove the battery to get your computer to shut down and power off fully? Did all these problems occur after an OS, hardware, or application upgrade?
If so, you are not alone. For users that migrated from Windows PC to Mac, this problem may seem all too familiar. You try to switch off your Windows PC, and it doesn’t shut down or shuts down slowly. Unfortunately, issues with shutting down aren’t just for Windows PC owners! Sometimes our beautiful “it just works” Macs shows the same problem and won’t shut down.
For folks on the Windows platform, this issue is related to power issues, a faulty device driver or CMOS problems. For Windows PCs, this issue typically takes a while to troubleshoot. Fortunately, on Macs and MacBooks, most of these problems are solved by a quick two-step process.
If your Mac or MacBook won’t shut down when you use the > Shut Down from the Apple menu and the only way you close the machine down is to press the power button on your Mac, then perform both an SMC and an NVRAM reset to clear out the root problem.
Contents
Quick Tips 
Try These Quick Tips To Shut Down Your Mac Properly
- Close all open apps, then try shutting down
- Reset both SMC and NVRAM
- Run Apple Diagnostics or Apple Hardware Test
- Perform a Safe Boot
- Use Some Terminal Commands (check below for specific commands)
Related Articles
- Factory Reset MacBooks & Macs
- MacBook Apps Crashing, How-To Fix
- Ten Things Every Mac Owner Should Know
Close All Open Apps
Apple requires that you Mac closes all apps before it can shut down. When you experience problems when trying to shut down your Mac, it’s often caused by an app that failed to close.
So before anything else, check if there are any open apps. An app won’t officially close without your input if there’s an unsaved document in it.
To quit a Mac app normally, choose Quit from the app’s menu in the menu bar, or press Command (⌘)+ the Q key.
Is An App Frozen or Crashed?
If you’re unable to close an app normally, you may need to force quit that app.
To force quit a Mac App, do one of the following:
- Command-Click (right-click) on the app’s icon in the Dock and choose Force Quit
- Press these three keys together: Option, Command, and Escape and select the app in the Force Quit window, then click Force Quit
- Choose Force Quit from the Apple menu in the upper-left corner of your screen and choose the app from the Force Quit window, then click Force Quit
- Command-Click (right-click) on the app’s icon in the Dock and press down the Alt key and the Quit option changes to Force Quit
- Open Activity Monitor and quit the app from there
What the heck is the SMC?
Your Mac’s system management controller (SMC for short) is a chip inside your Mac that runs most of the physical parts of the computer. This includes things like keyboards, LED indicators, cooling fans, and power button response.
The SMC is responsible for these and other low-level functions including:
- Responding to your MacBook’s display lid opening and closing
- Battery management
- Thermal management
- SMS (Sudden Motion Sensor)
- Ambient light sensing
- Keyboard backlighting
- Status indicator light (SIL) management
- Battery status indicator lights

Reset Your Mac’s SMC
Perform an SMC reset procedure on Mac desktops
- Shut Down your Macbook
- Unplug the power cord and wait for 15 seconds
- Plug the power cord back
- Wait for 5 seconds and then turn on your Mac
Perform an SMC reset procedure on MacBooks with Non-Removable batteries
- Shut down your Mac
- Unplug the battery charger from your MacBook
- Using the built-in keyboard, press Shift-Control-Option on the left side of the keyboard, then press the power button at the same time. Hold these keys and the power button for 10 seconds
- For MacBooks with Touch ID, the Touch ID button is your power button
- Release all keys and connect the power adapter
- Press the power button and turn on your MacBook
Perform an SMC reset procedure on MacBooks with Removable batteries
- Shut down your MacBook
- Disconnect the battery charger
- Remove the battery
- Press and hold the power button for 10 seconds
- Replace the battery
- Plug MacBook back into the charger
- Push the power button to turn on your MacBook
Next, reset NVRAM
Nonvolatile Random-Access Memory (or NVRAM for short) is a tiny bit of system memory that’s set aside to store specific settings on your Mac. These are typically settings that our Macs and its users need to access quickly, including audio volume, display resolution, startup disk selection, time zone, and recent kernel panic information.
Resetting NVRAM often helps when experiencing problems related to these types of settings. If your Mac is confused about which disk to starts up from or you see a question mark icon as your Mac starts up, resetting NVRAM might resolve the issue.
NVRAM reset on your Mac
- Restart
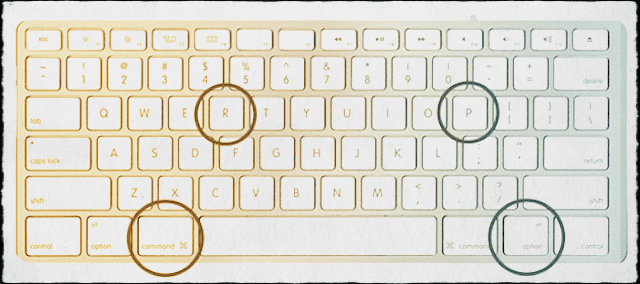
- Press and hold the Command-Option-P-R keys immediately after you hear the startup sound
- Hold these keys until the computer restarts, and you hear the startup chime for the second time
- Release the keys
After resetting your Mac’s NVRAM, open System Preferences and check and adjust if needed those settings that were reset, including sound volume, display resolution, startup disk selection, and time zone.
What’s a kernel panic?
Some shutdown issues are related to recent kernel panic events and resetting your NVRAM helps remedy those problems. Kernel panics tend to lead to system-wide crashes, sudden restarting, and shutdowns.
They are computer errors where the operating system (your Mac’s macOS or OS X) cannot quickly or easily recover. Kernel panic events are often triggered when the operating system attempts to access or write to memory erroneously. The most likely causes of kernel panic are faulty software, software bugs, or malware. A kernel panic is also caused by damaged, defective, or incompatible hardware, including external devices attached to your Mac.

Investigate with Apple Diagnostics or Apple Hardware Test
Apple Diagnostics and Apple Hardware Test are tools that help you diagnose problems with your Mac’s internal hardware. This includes things like your logic board, system memory, and wireless components. Even if your Mac doesn’t start up, you still might be able to access Apple Diagnostics or Apple Hardware Test. These apps tell you if the hardware you installed, such as additional memory, is incompatible, improperly installed, or defective.
Both Apple Diagnostics and Apple Hardware Test don’t check any external hardware components, like USB, or any non-Apple devices. And since these are hardware tools, they do not check your Mac’s operating system (macOS or MAC OS X) or any application problems such as app or extension conflicts.
Using Apple Diagnostics or Apple Hardware Test is easy. But first, you need to figure out which tool is appropriate for your model and macOS version. To find your Mac’s specs, go to the Apple menu and choose About This Mac.
- For Macs from 2013 or later, use Apple Diagnostics, already built into your Mac
- If your Mac is from 2012 or earlier and has OS X v10.8.4 or later, use Apple Hardware Test, already on your Mac
- If your Mac is from 2012 or earlier and has OS X v10.8.3 or earlier, use the system software disc or USB flash drive that came with your Mac
Use Apple Diagnostics
- Unplug all external components except the keyboard, mouse/trackpad, & display. Everything else, disconnect from your Mac
- Select Apple menu > Restart, then press and hold the D key while the Mac restarts
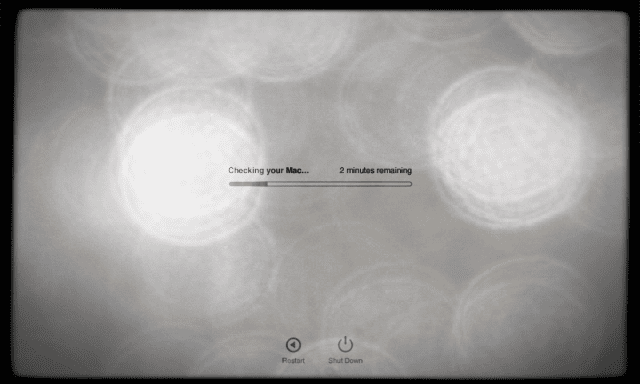
- Apple Diagnostics starts automatically, just follow the on-screen instructions
- When Apple Diagnostics is finished, it lists any problems it finds
Use Apple Hardware Test
- Disconnect all external devices except the keyboard, mouse/trackpad, & display. Everything else, disconnect them from your Mac
- Choose Apple menu > Restart, then press and hold the D key while the Mac restarts
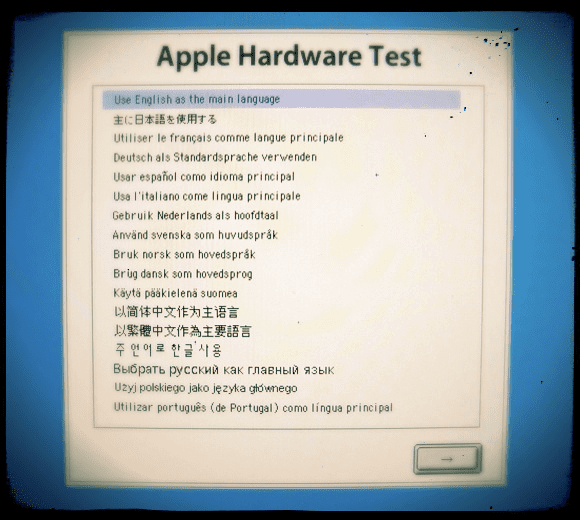
- When the Apple Hardware Test chooser screen appears, select the language you want to use, then press Return or click the right arrow
- If you don’t see the chooser screen, try starting Apple Hardware Test from the Internet
- Reconnect your Mac to your network via WiFi or Ethernet and restart your Mac while pressing and holding both the Option and D keys.
- When the Apple Hardware Test main screen appears, follow the on-screen instructions
- If Apple Hardware Test detects a problem, a message appears. Take note of that message–it’s helpful if you seek further assistance with Apple Support or a service provider
Try a Safe Boot
A Safe Mode boot deletes system caches, and that may help after a macOS or Mac OS X update or upgrade. Safe Mode is also only a way to check if the issue is global or limited to your User folder. So it’s worth a try to restart in Safe Mode. If any third-party software is loading automatically and causing problems, safe mode checks your system and helps with the following things.
Safe Mode Checks
- Repair any directory issues
- Use required kernels only
- Prevent any start-up items from launching
- Delete caches files
Entering Safe Mode
- Shut Down your Mac anyway you can
- After your Mac shuts down, wait 10 seconds, then press the power button
- Immediately after you hear the startup tone, hold down the Shift key
- Push the shift key as soon as possible after you hear the startup tone, but not before
- Release the Shift key when you see the gray Apple logo and progress indicator
This starts it into Safe Mode, with all extensions turned off. Safe Mode is slow to start, so give it time. It takes longer than usual to reach the login screen or your desktop because your Mac performs a directory check of your startup disk as part of safe mode. If your Mac works alright in Safe Mode, go back to the Apple menu. From the drop-down menu and choose Restart.
Give Terminal a Spin
Terminal just plain helps out with a lot of tasks and problems. So let’s put it to use in clearing out all that cache data and font maintenance resolved the issue.
Open a Terminal session ( MacintoshHD>Applications > Utilities) and type in the following commands one-by-one
- rm -rf /Library/Caches/*
- rm -rf /Library/Saved\ Application\ State/*
- sudo rm -rf /Library/Caches/*
- sudo rm -rf /System/Library/Caches/*
- atsutil databases -removeUser
- sudo atsutil databases -remove
- sudo atsutil server -shutdown
- sudo atsutil server -ping
- sudo rm -rf /var/folders/*
After performing the last Terminal command, Restart.
Reader Rick suggests these steps in Terminal as an alternative
- Open Terminal and run these commands:
- sudo /System/Library/Frameworks/CoreServices.framework/Frameworks/LaunchServices.framework/Support/lsregister -kill -seed -lint -r -f -v -dump -domain local -domain system -domain user -domain network
- killall Dock
- sudo mdutil -E /
- Restart your Mac

Reader Tips
- Go to System Preferences > Users&Groups and then to Login Items for your user. Now remove everything from Login Items. And then shut down using the power button. After rebooting, shutdown and restart, check and see how your Mac functions. If all looks good, shut down again, but this time using Apple Menu > Shut Down
- I shut down my Mac by holding down the power button. Then I used Recovery Mode ( turn it on holding Cmd + R keys.) Then chose Disk Utility, selected my Mac’s main hard drive and clicked on Repair Disk. When it finished, restarted the Mac. For me, no more problems with my Mac shutting down normally after repairing my HDD
- Delete all the printers in the System Preferences > Printers & Scanners and then add them in again. After a Restart, Shut Down, Sleep, and Restart all work again!
- What I did: before I select ‘restart’ or ‘shut down,’ I open the force quit window and force quit any app that had not managed to quit. Then I hit ‘restart’ or ‘shut down.’ I haven’t had the hanging problem since doing this additional step!
- Relaunch Finder before you completely shut down your computer by pushing option + command + escape. It should be work.
- My only workaround is to make sure the trash is empty before I shut down. I can’t explain why this works for me, but it just does
- Type “sudo shutdown -r now” in Terminal to shut down. Then power up and see if the problem resolves. It did for me
- Delete everything out of the System Library Cache folder. This worked for me. I can now restart, logoff and shutdown
- Go to your Finder “Go” menu hold the option key and choose Library. Then go to Preferences folder and trash these 2 files: com.apple.finder.plist & com.apple.sidebarlists.plist. Then Restart.
- Shutdown holding the power button. Then turn it on holding Cmd + R keys to enter into Recovery Mode. After that choose “Disk Utility,” select your HDD and press “Repair Disk.” When it finishes, restart your Mac. Done.
Summary
Most of the Power System related issues on your Mac are addressed by the SMC procedure (steps 1 through 4). If your shutdown issues are related to recent kernel panic events, the NVRAM process( Steps 5 through 9) addresses those problems. Since it is hard to figure out the cause of the problem, we usually do both the SMC and NVRAM reset and check our system using Apple Diagnostics or Apple Hardware Test when faced with this issue of Mac Not Shutting Down.
And if those steps don’t do the trick, try a Safe Boot and see if that isolates the problem.
We hope you find these simple steps helpful in tackling this issue so that you will not have to press the ON/OFF button on your Mac every time you want your Mac to shut down.