Transfering your photos and videos from your iPhone, iPad, or iPod Touch to your Mac or Windows PC should be easy. But it’s often not!
Apple prefers us to use iCloud Photo Library to keep our Photos synced between our iDevices and Mac. But that often means purchasing additional iCloud Storage! And many folks don’t want to pay that monthly service fee or don’t want to use iCloud at all.
So for those of us that want to steer clear of iCloud Photo Library, this article’s for you!
On iPhone, iPad, and iPod touch, you can take photos and videos or save images from texts, emails, and other apps such as Safari, Instagram, or Facebook to your device. For these photos and videos, you may want to use your Mac’s Photos App, Image Capture or Photo Stream.
Contents
Transfer Photos and Videos to your Mac
You can use the Photos app to import photos from your iPhone, iPad, or iPod touch to your Mac without using iCloud Photo Library.
- Check that you have the latest version of iTunes on your Mac
- Importing photos to your Mac requires iTunes 12.5.1 or later
- Connect your iPhone, iPad, iPod touch with the lightning cable (your iDevice’s charging cable)
- If needed, enter your device’s password to unlock it
- Seeing a prompt on the iDevice asking you to Trust This Computer?
- Tap Trust to continue

- Tap Trust to continue
- The Photos app should automatically open
- If it doesn’t, navigate to your Applications folder and launch the Photos App from there
- If the Photos app shows an Import screen
- Select what photos and videos you want on your Mac then tap Import Selected
- Or select Import All New Photos to save all unsaved pictures from your device to your Mac
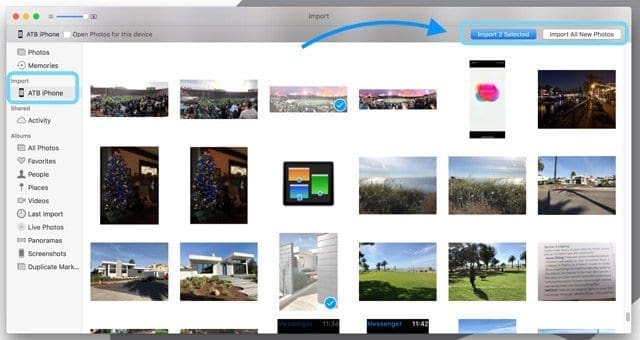
- If the Import screen doesn’t automatically appear in Photos, tap File > Import or click the device’s name in the sidebar
- If requested, unlock your device via Face ID, Touch ID, or your passcode
- To import a selection of photos, click the pictures or videos you want, then tap Import Selected.
- Or select Import All New Photos to save all unsaved photos from your device to your Mac
- Imported photos appear in the Photos app’s Import album for macOS High Sierra and above
- In macOS Sierra and Mac OS X, find those photos in your Last Import album
These steps also work for importing images from digital cameras and SD cards.
Can’t Transfer Your Photos?
- Try a different lightning cable
- Check for updates to the Photos App
- Verify you are running the latest version of iTunes
- Update your iDevice’s iOS
- Update your Mac
- Use Image Capture from the Applications folder instead of Photos App
Use Your Mac’s Image Capture Tool
If you do not have the Photos App or don’t want to use it, then you can import photos and videos using Image Capture.
Find Image Capture in your Applications Folder or use Spotlight Search to locate it
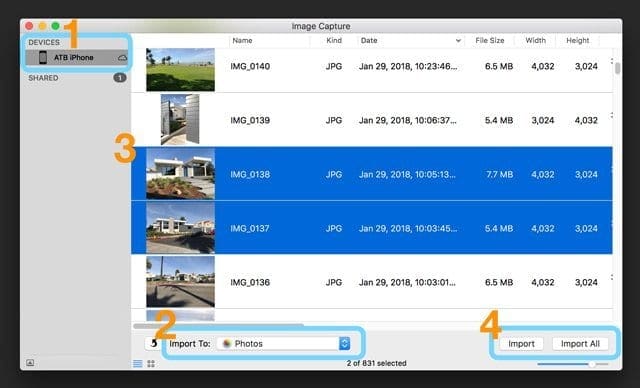
- Select your iDevice from the left sidebar’s Devices category
- Select the location where you want to save your photos to (such as your user’s Pictures or Movies folder or select Photos/iPhoto to save directly into those applications)
- Choose the pictures and videos you want to save to your Mac and tap import
- Use the Command or Shift keys to select multiple photos
- Or tap Import All to save all your iDevice’s media
Want to transfer just a few photos to your Mac from your iPhone?

Use AirDrop to quickly and wirelessly send photos and videos from your iDevice to your Mac.
Make sure your Mac and iDevice are on the same WiFi network and have Bluetooth turned on.
Import Photos and Videos to your Windows PC
- Install or update to the latest version of iTunes on your PC.
- Importing photos to your PC requires iTunes 12.5.1 or later.
- Connect your iPhone, iPad, or iPod touch to your PC with the lightning cable
- If required, enter your device’s password to unlock it
- Seeing a prompt on the iDevice asking you to Trust This Computer?
- Tap Trust to continue
- For Windows 8-10
- Open the Photos app on your PC via the Start button and then Photos
- Choose Import (right-click within the app if you don’t see the import option)
- Tap From a USB device and follow the on-screen instructions to connect to your iDevice
- By default, your photos and videos are saved in the Pictures folder in a subfolder named with the date (for example, 2018-12-12)
- Or select the pictures you want to import and choose where you want to save them
- For Windows 7
- Connect your iDevice to your computer
- When the AutoPlay dialog box appears, select Import pictures and videos using Windows
- Click Import
- By default, your photos and videos are saved in the Pictures folder in a subfolder named with the date (for example, 2018-12-12)
- If AutoPlay doesn’t launch, go to Start button and select Computer. In the left navigation pane, right-click your iDevice and then click Import pictures and videos
If your videos are rotated incorrectly in Windows Photos app, add these videos to iTunes to play them in the correct orientation.
Can’t Transfer Photos from iPhone to Windows PC?
- Try a different lightning cable
- Check for updates to your photo software
- Verify you are running the latest version of iTunes
- Update your iDevice’s iOS
- Update your Windows software
Find additional tips in this article “What to Do if You Can’t Transfer Photos from iPhone to PC.”
Use Photo Stream Instead of iCloud Photo Library
Another option is to use Photo Stream to transfer your photos. With My Photo Stream, your newest photos (within the last 30 days only) automatically appear on all iDevices, Macs, Windows PCs, and Apple TVs you set up with My Photo Stream.
Use My Photo Stream to import photos from devices that don’t use iCloud Photo Library. My Photo Stream keeps your last 30 days of photos in iCloud so that you can transfer them to your Mac, Apple TV, another iDevice, or even your Windows PC.
And the best news?
My Photo Stream does NOT count against your iCloud Storage plan! So there’s no need to upgrade to a paid iCloud Storage plan.
To use Photo Stream, you need to have an Apple ID and iCloud account.
The Downside to My Photo Stream?
My Photo Stream imports photos only, no videos. And your Live Photos transfer as still images only–no movement.
Set-Up My Photo Stream on an iPhone, iPad, or iPod Touch
- For iOS 10.3 or later: Go to Settings > Apple ID Profile > iCloud > Photos, then turn on Upload to My Photo Stream
- iOS 10.2 or earlier: Go to Settings > iCloud > Photos (or Settings > Photos & Camera), then turn on Upload to My Photo Stream
- Look for your photos in the My Photo Stream Albums in the sidebar
- If you turned on iCloud Photo Library, you don’t have a My Photo Stream album—all your photos are automatically added to your All Photos album
Set-Up My Photo Stream on a Mac
- Choose Photos > Preferences, then click iCloud
- Select the My Photo Stream checkbox to turn on My Photo Stream
- Look for your photos in the My Photo Stream Albums in the sidebar
- If you turned on iCloud Photo Library, you don’t have a My Photo Stream album—all your photos are automatically added to your All Photos album
Set-Up My Photo Stream on Apple TV
On Apple TV (4th generation or later)
- Go to Settings > Accounts > iCloud and turn on My Photo Stream
On Apple TV (3rd generation and earlier)
- Go to Settings > iCloud
- Select Sign In, press the center button on your remote, then follow the onscreen instructions to enter the Apple ID and password you use with iCloud
- Select iCloud Photo Settings, press the center button on your remote, select Turn On My Photo Stream, then press the center button on your remote again
Set-Up My Photo Stream on Windows PC
- Install iCloud for Windows
- Open iCloud for Windows, then turn on Photos
- Click Options, then turn on My Photo Stream
- Click Apply