Have checked the settings for your keyboard? First, hold down the Globe Key on your on-screen keyboard to show you a list of active keyboards–change to your preferred language if possible and if it’s listed. See if that works.
Contents
Don’t see the globe?
If you don’t see the globe symbol on your keyboard, it means you only have one language installed on your iDevice.
Change Your Keyboard Settings
You may have accidentally added a wrong keyboard or you may have no need for your international keyboard and you want to turn off a keyboard. Although adding a new keyboard is pretty straight forward, deleting is not. To disable an international keyboard that you added, tap Settings > General > Keyboard> Keyboards. There is an Edit button on the upper right corner. Tap on that and red circles will appear next to each keyboard name. Tap on the circle that is next to the keyboard that you want to get rid of and a “Delete” button appears to the right of the keyboard so that you can swipe and delete it.
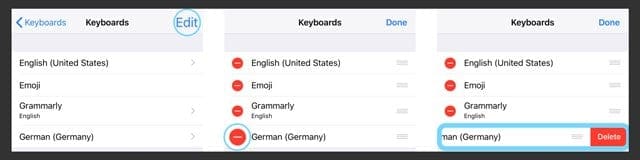
Tap on the minus sign ( – ) for each language keyboard you want to remove. When complete, press Done.
Stuck on a particular language on your international keyboard?
Sometimes, adding a new language (like English US) and then force restarting helps solve these types of problems. To force a restart on most devices with a Home Button, press and hold both the Home and Power buttons at the same time–keep holding both keys down until you see the Apple Logo on-screen. Then release. See instructions for different models here:
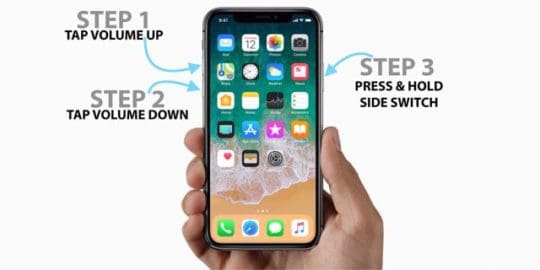
Perform a Forced Restart
- On an iPhone 6S or below plus all iPads & iPod Touches, press Home and Power at the same time until you see the Apple logo
- For iPhone 7 or iPhone 7 Plus: Press and hold both the Side and Volume Down buttons for at least 10 seconds, until you see the Apple logo
- On an iPhone X or iPhone 8 or iPhone 8 Plus: Press and quickly release the Volume Up button. Then press and quickly release the Volume Down button. Finally, press and hold the Side button until you see the Apple logo
Reset All Settings to fix international keyboard problems
If that doesn’t help, there may be some strange setting getting in the way–so let’s reset all settings. This sets all your setting preferences, like accessibility settings, wallpapers, and WiFi passcodes, back to defaults. For times like this, when things go awry for no apparent reason, resetting all your iPad’s settings back to defaults usually solves the issue. And don’t worry, none of your data (like photos, texts, or other docs/data) is removed. To reset all settings, go to Settings > General > Reset > Reset All Settings. 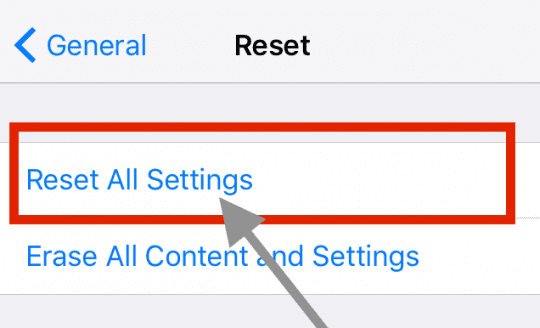
Verify Your iTunes & App Store Region or Country
Another possible culprit is your iTunes and App Store location–check to make sure you are purchasing from the your current country’s Store (and not another nation or region).
When you change your country or region
- Your store credit is associated with the individual country’s or regions’s store, so spend any remaining credit before changing your country
- Download all your past purchases to your device(s)
- Cancel any subscriptions, including Apple Music! These must be subscribed to again in the new country’s store
- Back up your iPhone, iPad, or iPod touch to iTunes (your iCloud account is tied to your country, so it’s safer to trust iTunes for this backup)
- If you’re a part of a Family Sharing group, you might not be able to change your country or region until you leave that Family Sharing group
On your iPhone, iPad, or iPod touch
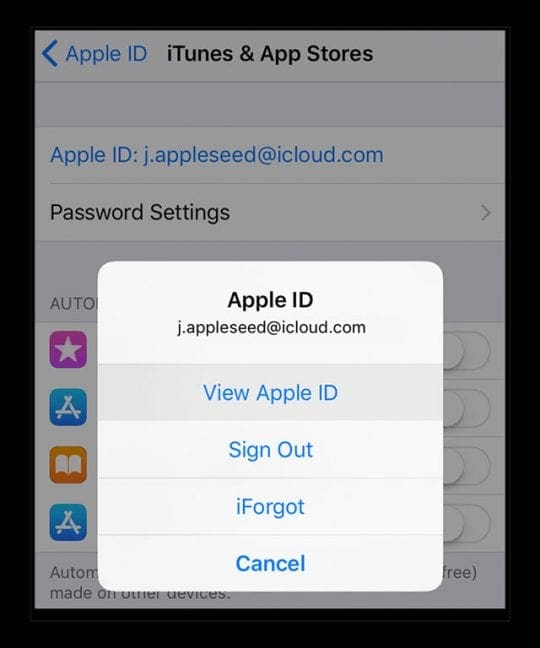
- On your device, tap Settings > Apple ID Profile > iTunes & App Store
- Tap your Apple ID. Make sure you sign in with the Apple ID and password that you use with the iTunes Store and App Store
- Tap View Apple ID. Enter your Apple ID password to authenticate
- Scroll down and tap Country/Region and verify the information listed is correct
- If it’s listing an incorrect country or region
- Tap your current country or region then tap Next
- Review the Terms and Conditions and Apple Privacy Policy and tap Agree
- In the prompt, tap Agree again
- Select a payment method and enter your new payment information–you must update this when changing location
- Enter your billing address and tap Next
- Your Apple ID country/region updates for all of your Apple services connected to that same Apple ID
 You can also check this information on iTunes from the top menu bar of the iTunes window by choosing Account > View My Account. This information is also available when you sign in to your Apple ID account’s webpage in the Account section. Choose Edit and from the Country/Region menu, select your new country or region.