Adding notes to a PDF, or annotating, can be a difficult task when using Photoshop or Gimp for this purpose. However, you can make this task much easier by using Preview, a built-in Mac App. A little known feature of Preview is that it can help you annotate PDF files.
In this tutorial we will be showing you how to annotate PDF’s using Preview. This tutorial does not require any additional software.
Annotating PDFs In Preview
To start, open the Preview app on your Mac. After Preview has completely launched, open a PDF document by looking at the Apple Toolbar. Look towards the left-hand side of the toolbar. Click on the File option. When you do this, a drop down menu will appear. From this menu, simply click on the Open option. You will now be prompted to open a PDF document from your hard drive.

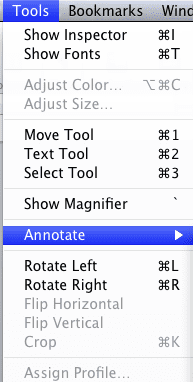
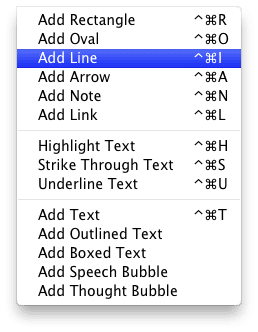
Once the PDF has opened in Preview, look towards the middle of the Apple Toolbar. Find the option labeled Tools and click on this. When you do this, a drop-down menu will appear. Look towards the bottom of the menu, where you will see an option labeled Annotate. Hover your mouse over this option to view the annotation tools.

You can now choose how you would like to annotate your PDF file. For instance, you can add text to your PDF using the text tool, or use the oval tool to add an oval. It’s up to you!

Once you have selected a tool, simply click on the PDF to add the annotation. You can add annotations anywhere on the PDF, so feel free to be creative!
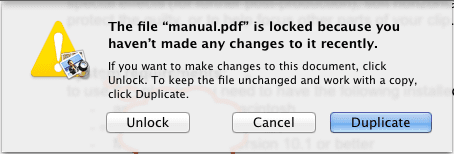
NOTE: When adding annotations, you may be asked to unlock the PDF. To unlock the PDF, simply click the button labeled Unlock. This button is located towards the left-hand side of the window. If you would rather duplicate the file, simply click the duplicate button which is located towards the right-hand side of the window.

We hope you enjoyed this Apple Tool Box tutorial. Check back soon for more Mac and iOS tips, tricks and more!