All Macs except Mac Mini come with a built-in camera. These webcams are known as iSight Cameras. You may also find people referring to them as FaceTime Camera but this is an unofficial name. The iSight camera has many uses; you can use it for more official purposes like meetings and updates using Skype or FaceTime or simply use it for some fun time with Photo Booth or other 3rd party apps. As we all know, Apple doesn’t like to mess around too much with the design and placement, so you can always find this cute little guy (camera) at the top center of the screen.
Despite being fun and useful, many users would like to disable the iSight Camera for various reasons. Privacy is one of those top reasons that push users to get rid of their cameras. Some network administrators even go on to remove the part entirely from the machines. Luckily, there are many ways that can disable the built-in camera on your Mac or MacBook without having to physically take it off.
Follow these simple steps below:
Let us start with a few non-technical and easy ways
Disable Built-in MacBook Camera via Non-Technical Ways
Tape it up:
Now, this might sound a little funny but it serves the purpose. When trying to disable your camera, you actually want it to stop taking pictures or recording videos, so placing a tape over webcam can achieve the end result. Your machine might look a little patched up but the best thing about this method is that it is quick. You can put a tape on the camera when you don’t want it and simply remove it to put it back to use.
You would be surprised to know that people like Mark Zuckerberg of Facebook and James Comey, the former director at FBI are fond of this quick tip.
Note: You can also disable the microphones on your Macbooks using the same technique. These little hole at the side of the chases are the actual microphones.
Use a Proven Third Party App:

Disable Built in MacBook Camera via Terminal Utility
Disabling the Hardware of the Camera:
Through this method, the hardware is completely disabled, which means that you won’t be able to use the camera for any purpose. No application, whether built in or 3rd party would be able to access the camera until you reverse the process.
1- In this step we will create a backup of the file. Open the terminal and type in the following command. Remember that you can skip this step if you don’t want a backup created. But it is advisable to keep a backup so that you can reverse the process in case you want to use the camera again.
mkdir /System/Library/QuickTime/ .iSightBackup
2- It’s now time to move the Quick Time component of the iSight camera (which enables apps to access it) to the backup folder we created in step 1. Use the following command:
sudo mv
/System/Library/QuickTime/QuickTimeUSBVDCDigitizer.component
/System/Library/QuickTime/ .SightBackup/
3. Reboot and you are done!
In case you want to use the camera again, just put the file QuickTimeUSBVDCDIgitizer.component in the following directory /system/library/quicktime and reboot.
Using New Safari Controls to Prevent Camera Access
If and when you upgrade your Mac/Macbook to macOS High Sierra, you will be also able to use the new Privacy features in Safari. Apple has made some interesting upgrades to benefit the users.
Two of these updates pertain to preventing camera and microphone access to external sites. You can prevent external sites from accessing your MacBook’s camera and microphone. Setting up is quick and easy.

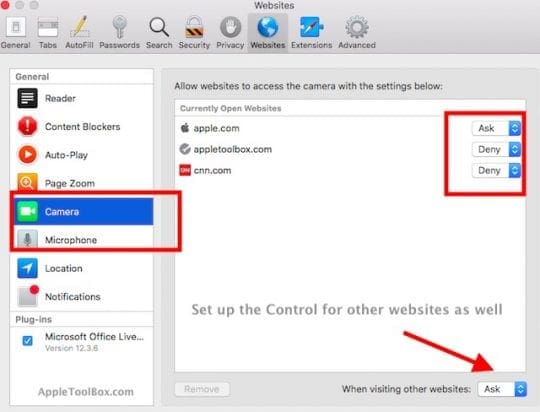
Open your Safari and click on the Safari Menu > Preferences. Click on the Websites tab on the top. Here you can setup permissions by each website as well as your overall browsing session. Click on Camera on the left panel and choose ‘Deny’ to disable camera access. The same holds true for Microphone access.
We hope that you find these tips helpful in protecting your Privacy. Please feel free to share the article with your fellow MacBook users!