With numerous cybercrime related incidents on rise, we all worry about the safety of our iPhone and more importantly privacy of our browsing activity. When you are browsing online, advertisers can track your iPhone. Many readers worry about the effects this can have on their privacy. Most Browsers today offer some sort of Do-Not-Track option that will protect your iPhone from advertisers.
In this post, we will show you how to enable this option on your iPhone along with other tips to protect your privacy while you are browsing on your iPhone or iPad.
How To Setup Do-Not-Track in Safari
Apple has included the do not track feature in their iOS operating system. You can use this on your iPhone and iPad. In order to set this up on your iDevice,
- Tap on Settings > Safari
- Scroll down to the section under Privacy and Security and enable Do Not Track here.
- By default, your Safari browser enables cookies. By disabling cookies you can prevent websites from storing data. Simply choose the ‘Always Block’ option for Block cookies in this section
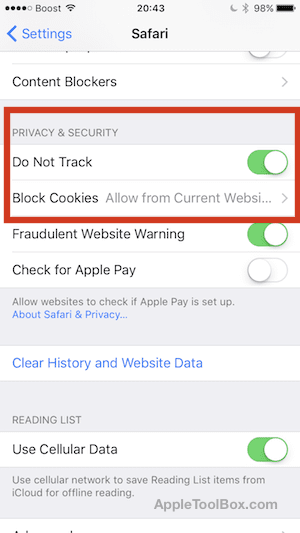
These simple 3 steps will go a long way to protect your iPhone from advertisers if you use Safari as your primary browser.
Setting up Do Not Track in Chrome
Many of our readers also use Chrome as their web browser on their iPhone and iPad. Google used to make this feature available on Chrome for iOS but it has now been dropped. Safari is the only browser that currently provides the Do-Not-Track (DNT) option.
There are however a few settings around privacy that one needs to consider when using Chrome. While browsing using Chrome, the default option sends some of your usage data back to Google. You can choose to remove this option so that none of your browsing/on-line data is send back to Google. In order to do so,
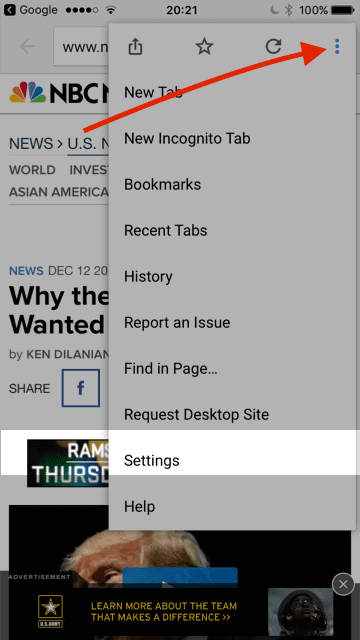
- When browsing a site in Chrome, tap on the three dots on the top right corner to access Settings. Tap on Settings > Scroll down to Advanced section and choose Privacy. Under Web Services, you will find the option ‘Send Usage Data’. Choose the Never option for this setting and it will stop chrome for sending your data to Google.

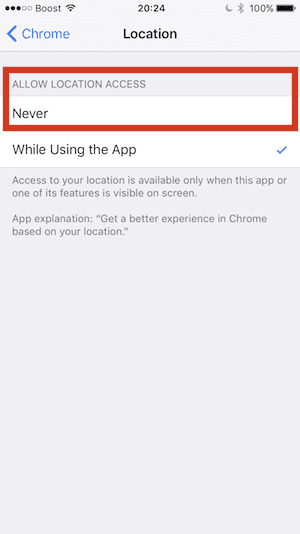
- The second option to check while using Chrome is if you want Google to track your location in order to provide you better browsing experience. If you want to stop location tracking while using Chrome, Simply tap on Settings > Chrome > Location and choose Never
Although it may sound like Google decided to sacrifice privacy when it comes to using Chrome for its iOS users, but that’s not accurate. DNT (Do Not Touch) was poorly implemented by the industry to begin with. DNT is essentially a message to advertisers that says “please don’t track this browser.” But advertisers are free to disregard this request, and many do.
Use Private Browsing on Your iPhone
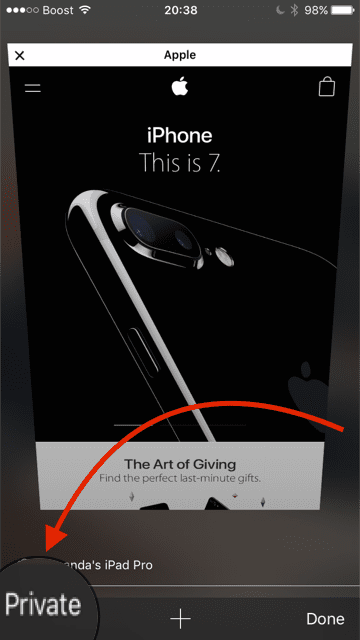
Your best bet is to leverage Private browsing in Safari. According to Apple, private Browsing protects your private information and blocks some websites from tracking your search behavior. Safari won’t remember the pages you visit, your search history, or your AutoFill information.
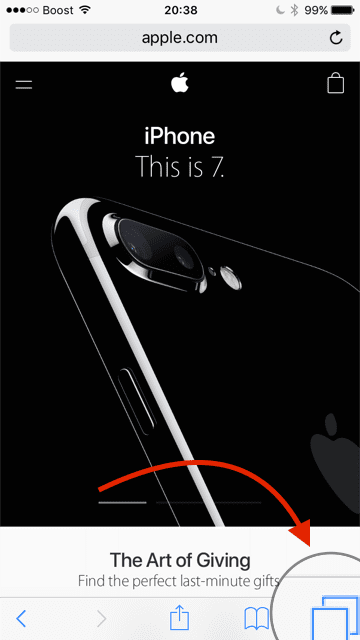
It is easy to use the Private browsing feature on your iPhone. While browsing a site on Safari, simply tap on the right most icon at the bottom (two squares together) and then select Private and you are done.
Most of the options discussed in this article are painless to switch on and can be done in matter of minutes and hopefully should give you some peace of mind.
If your iPhone is continuously getting spam text messages and spam voicemails from marketers, you may want to consider trying out a third party app which integrates with Callkit and works very well on iOS 10.