macOS Sierra brings a lot of new features to our old Macs. Although Apple has not released the new line of Macbook Pro models in quite some time, running macOS Sierra adds in some newness to your Mac experience. Majority of the macOS features are working as per Apple’s guidance. There are however some annoying problems that require manual intervention. One of these annoying problems related to instances when you cannot print using macOS Sierra.

In this post we will walk you through some of the key aspects to examine while you try to troubleshoot this problem on your Macbook/Macs. Please follow the steps below to troubleshoot.
Contents
- 1 Step – 1 Check for macOS Sierra device compatibility
- 2 Step – 2 Check to make sure that your Printer allows Airprint
- 3 Step – 3 Does your printer manufacturer have apps?
- 4 Step – 4 Turn Your Printer Off
- 5 Step – 5 Printer is Connected to the USB Port
- 6 Step – 6 Printer Connected via Network
- 7 Step – 7 Resetting Printer Systems
- 8 Step – 8 Update/Reset Printers Folder on your Mac
Step – 1 Check for macOS Sierra device compatibility
With every new OS update, it is important to check the compatibility especially if you haven’t upgraded your printers in a while. In order to check for the device compatibility for your printer, please click on this Apple’s list to see if your printer is impacted.
Make sure to upgrade your Mac to the latest OS.
Step – 2 Check to make sure that your Printer allows Airprint
Apple provides a list of Printer manufacturers and their products that are compatible with Airprint. Click here and make sure that your printer model is covered in the latest list from Apple.
Step – 3 Does your printer manufacturer have apps?
Some printer manufacturers such as HP and Epson have published their apps in the Apple store. Downloading the manufacturer’s app from the Apple store and trying it with your macOS Sierra can sometimes help in resolving your printer related issues particularly if you are having scanning related issues.
Step – 4 Turn Your Printer Off
Sometimes the old fashioned restart can be handy in fixing the issue. Simply turn off your printer, wait for 30 seconds and turn it back on. Once it starts check to see if the print function works.
Step – 5 Printer is Connected to the USB Port
If you have configured your printer in a setup where it is connected to the USB port of your Mac, disconnect it.
- Turn both computer and printer OFF, wait 30 seconds
- Turn computer ON wait until it fully boots
- Now turn printer ON, wait until it fully boots
- reconnect your printer from the USB port
- From the Finder, choose Apple menu > System Preferences, then click Printers & Scanners.
- Select your printer in the list of devices. You might need to wait a moment for it to appear.
Once you are connected, try to print again.
Step – 6 Printer Connected via Network
If your printer is connected via network, try resetting the network settings on your printer.
- Make sure that your printer and computer are on same WiFi network or if connected via Ethernet SAME network
- Next, Open System Preferences
- Select Printers&Scanners
- If Printer shows up in left column, select it and remove it using the minus (-) sign
- Confirm Delete Printer

- Restart your computer
- Open System Preferences&Scanners
- Select plus (+) sign to add your printer
- Default:Choose Default to display the list of printers connected to your Mac or discoverable on your local network. You can use the search field at the top of the window to narrow your search.
- IP: Choose IP if your device is connected to your network and you know the device’s IP address (or host name) and protocol. If you don’t have this information, check the network settings on your printer to see if this information is available
Once you have completed the set-up, please try to print and test to see if you problem is resolved.
Step – 7 Resetting Printer Systems
Sometimes, Reset Printing system can solve the printer related issues. In order to do this,
- Control-click anywhere in the list of devices in Printers & Scanners preferences
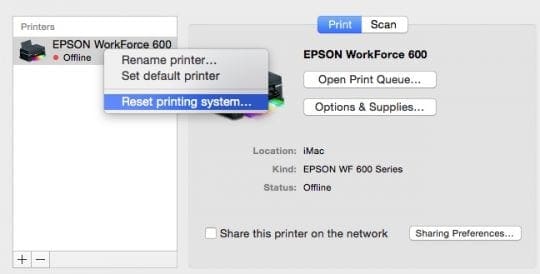
- Choose “Reset printing system” from the shortcut menu that appears
- Resetting the printing system causes all printers and scanners—including their queues, jobs, and custom settings—to be removed from Printers & Scanners preferences
Follow the step 6 above to add your printer again and test out your printing.
Step – 8 Update/Reset Printers Folder on your Mac
From the Finder, choose Go > Go to Folder
Type /Library/Printers/ and click Go
Your Printers folder opens
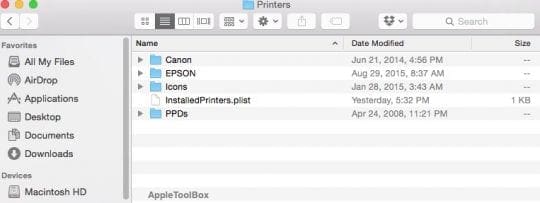
- Choose Edit > Select All to select all items in the folder
- Choose File > New Folder with Selection to put all of the selected items into a new folder named New Folder With Items
Follow the step 6 above to add your printer again and give it a try.
If your device is compatible and the firmware is up to date, the steps above to reset the printer settings should help in resolving your issue.
Please let us know if you were able to solve your Printing issues or if you have a tip that you would like to share.