I have a confession to make. Yes, I am one of “those people” who fear that what-ifs of the digital world—what if my iPad crashes, what if my iMac dies, what if my iPhone fails, what if the iCloud disappears?? What will happen to all my precious data? All my photographs, family/friend/vacation videos, all my music, all my everything? How could I ever recover should such a disaster strike?
These nightmare scenarios finally overcame my reluctance (and yes, a tad bit of laziness) to backup my information. So, over the past few weeks I’ve backed up everything (I MEAN EVERYTHING) so the fear that I might never see my photo collection or listen to my beloved 1995 Austin, TX music mix does not become my reality. By backing up, all my data will live in my digital world in perpetuity (or at least until I stop living).
Thankfully, backing up data is easier and a lot less time consuming than it used to be. Having backups of all your important data is a must-have in our digital lives—it will save all those photos (I’m really talking about memories here) that you probably cannot retrieve or recreate. Backing up our iTunes libraries and our iDevices will save the potentially endless hours needed to manually rebuild (or worse, repurchase) our music library.
Backing up our data is like an insurance policy. We hope we don’t ever need it but boy are we glad it’s there just in case! Backing up will give us that “Om” moment, relaxing our mind and finding serenity in that our data is tucked away and easily retrievable, should we ever need it.
So let’s get to it!
Related Articles
Contents
The Broad Backup Approach
First thing, despite the advice to backup on iCloud OR iTunes, we at Apple ToolBox recommend doing both. Why? Well, it’s an insurance policy so let’s play it conservatively cause…you never know. And we really REALLY don’t want to learn the hard way.
We also recommend having a backup on an external drive. If you use Time Machine then you already back up everything so you can check this off your list. If you don’t use Time Machine then it’s probably time to start using it. But if you are Time Machine adverse, you can use a different cloud based or drive based backup system (examples include Retrospect, Paragon Drive Copy, CarbonCopyCloner, and SuperDuper among many others.) If you are the DIY-type or simply don’t trust your data with Apple and others, you can also manually back-up to an external drive. We’ll discuss this last option in more detail later.
One thing people all too often overlook is that if your computer, external backup drive, and iDevices all “live” in the same place (like your home or office) you are placing it all at the same risk. If there is a fire or a burglary (I hope not) then all your iDevices and your backups are potentially destroyed or stolen. For this reason, we at Apple ToolBox encourage (I mean really encourage) you to backup to iCloud or any Cloud service AND backup in at least two separate locations (like home and office—home office doesn’t count).
Please consider doing it all—iCloud/Cloud backup AND two separate locations. Alternatively, you could backup to TWO DIFFERENT Cloud Services. If expense is an issue, consider at least backing up your most important data (like photos, personal videos, and music) to multiple places. At Apple ToolBox, we call this the 2X2 backup rule. In the tech world, it’s called redundancy but having multiple backups is anything but redundant, it’s essential.
Back Up iPhone Using iCloud
This is pretty straightforward for all iDevices. The downside is your free iCloud account includes a minuscule 5 GB. These days iPhones are 16 GB minimum and iPads even larger so the free iCloud 5GB won’t backup everything, so you’ll need to pick and choose what to backup and what not to. Not ideal. So, if you are one of those iFolks who likes to take a lot of pictures, videos, or both (and keep them on your iDevice) then we recommend spending that USD$.99/month (USD $11.88 per year) for the 50GB iCloud storage plan, $2.99/month ($35.88/year) for the 200GB plan, or $9.99/month ($119.88/year) for the 1 TB plan (this is probably overkill if you are only backing up your iDevices).
Set your iCloud backup with the following steps:
1. Connect your iDevice to Wi-Fi
2. In iOS 8 or later, tap Settings > iCloud > Backup. In iOS 7 or earlier, tap Settings > iCloud > Storage & Backup
3. Turn ON iCloud Drive, Photos, and iCloud Backup 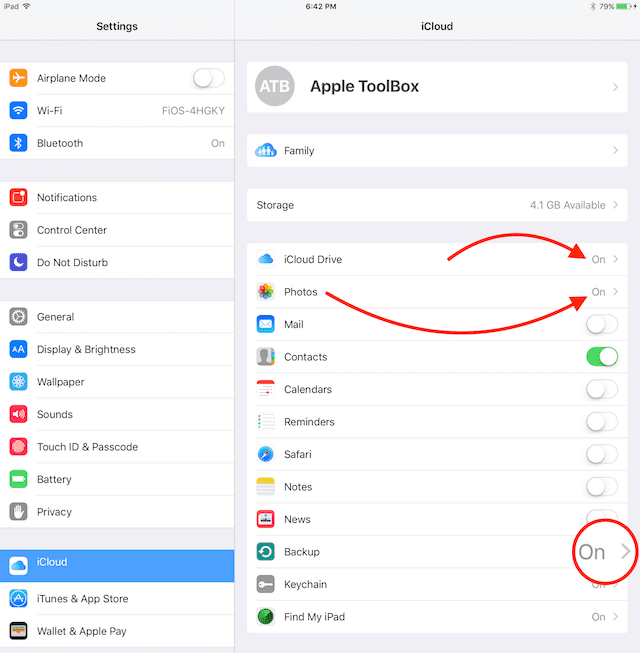
4. Tap Back Up Now (you must stay connected to your WiFi network until backup completes) 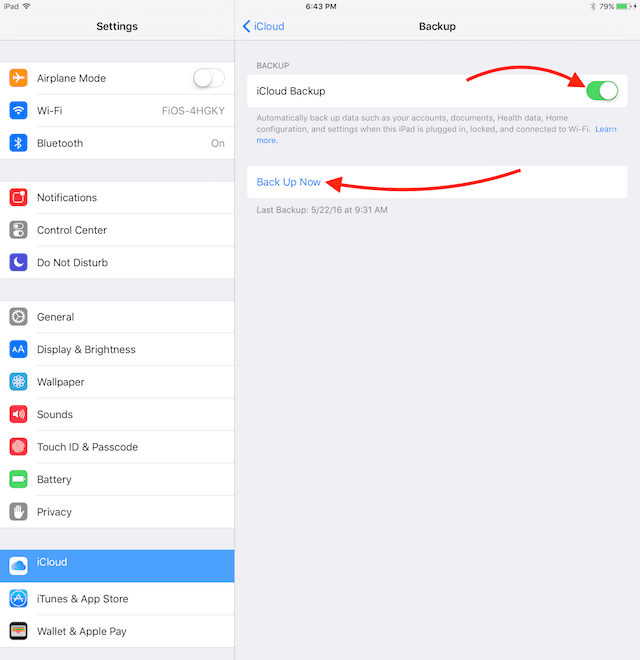
5. Verify the backup finished by tapping Settings > iCloud > Storage > Manage Storage 
6. Select the iDevice you just backed up. The backup you made should appear in the details with the time and backup size 
Once iCloud is turned on, it will automatically back up your iDevice every day as long as your iPhone/iPad is connected to a power source (so not just the battery), you are connected via WiFi, your iDevice’s screen is locked, and of course you have enough space available via iCloud (did I mention the 50GB plan?? It’s basically a necessity if you want to have a comprehensive backup of your data.)
Back Up iPhone Using iTunes
This is a bit more complicated and requires you to connect your iDevice to your computer. But you are not as limited in terms of storage space (unless you have a very old computer.) Using this method, your storage space is determined by the amount of free space available on your computer—for most of us, that’s way more than 5GB and no monthly fee.
To make a backup using iTunes:
1. If you created an iCloud backup, you will have to temporarily turn off your iCloud before making the iTunes backup. Just remember to turn it back on once you are done with the iTunes backup (and unfortunately you’ll need to do this with every iTunes backup IF you also backup to iCloud)
2. Open iTunes and connect your device to your computer
3. Save your downloaded content from the iTunes Store and App Store by clicking File > Devices > Transfer Purchases. For Windows users, if you don’t see a File menu, hold down the Control and B keys 
4. If you are saving Health and Activity data from your iOS device or Apple Watch, you’ll need to encrypt your backup:
a. Select the box called Encrypt local backup and create a password
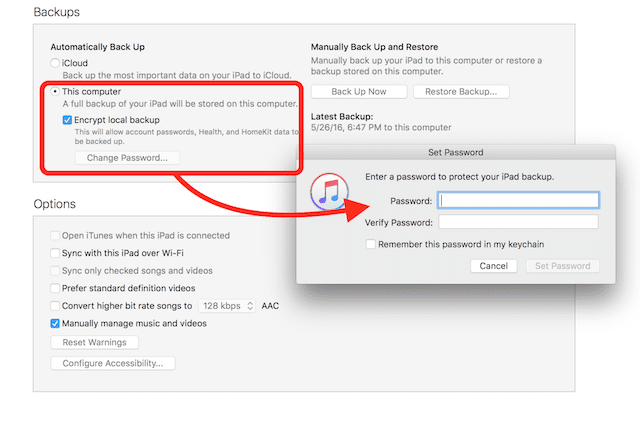
b. Write down that password and store it somewhere safe. There is no way to recover your iTunes Encrypted backups without this password
5. If you’re not saving Health and Activity data, click Back Up Now. For Windows users, click File > Devices > Back up. If you don’t see a File menu, hold down the Control and B keys 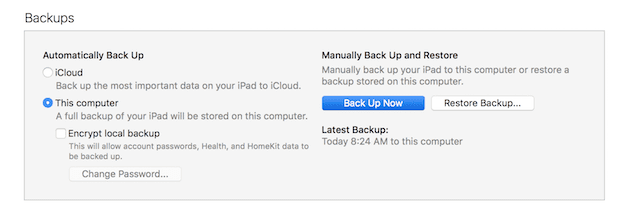
6. When the backup completes, verify your backup finished by selecting Preferences > Devices. You should see the name of your device with the date and time that iTunes created the backup. If you encrypted your backup, you should also see the lock icon beside the name of your device 
7. For those with iCloud backups, be sure to turn iCloud back on your iDevice so it continues to backup automatically
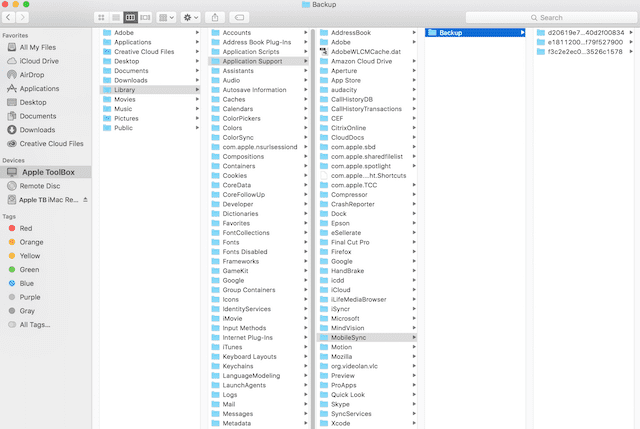
8. Your iTunes backups reside in the following locations
a. Mac: /Users/YOURUSERNAME /Library/Application Support/MobileSync/Backup/
b. Windows XP: \Documents and Settings\(username)\Application Data\Apple Computer\MobileSync\Backup\
c. Windows Vista or 7: \Users\(username)\AppData\Roaming\Apple Computer\MobileSync\Backup\
For more information around locating your iTunes backups, check out our article.
Back up your Apple Watch
If you own an Apple Watch, the good news is that your iPhone backs up and stores most of your Apple Watch data. And this process is pretty much behind the scenes as content from your Apple Watch backs up automatically to its companion iPhone. That means you can restore your Apple Watch from your iPhone’s backup. So, when you back up your iPhone to iCloud or iTunes, your iPhone backup will also automatically include your Apple Watch data. Nice and easy.

Your Apple Watch backup will include:
- App-specific data (for built-in apps) and settings (for built-in and third-party apps), such as Maps, distance, and units
- General system settings, such as your watch face, known Wi-Fi networks, brightness, sound, and haptic settings
- Health and Fitness data, such as history, achievements, Workout and Activity calibration data from your Apple Watch, and user-entered data
- Just so you know, to back up Health and Fitness data, you must use iCloud or an encrypted iTunes backup
- Language
- Settings for Mail, Calendar, Stocks, and Weather
- Time Zone
Your Apple Watch backup won’t include:
- Bluetooth pairings
- Credit/Debit cards used for Apple Pay on your Apple Watch
- Passcode for your Apple Watch
- Playlists synced to your Apple Watch
If you unpair your Apple Watch from your iPhone:
- Make sure you are in range of your iPhone
- Your iPhone automatically creates a backup of your Apple Watch
- Unpairing will erase all data from your Apple Watch
- You can pair your Apple Watch again at any time and set it up from the latest backup
Please note that if your Apple Watch is unpaired while out of range of your iPhone, it’s quite possible that your recent backup might not have the latest data from the Apple Watch. For further in-depth guide on how to backup your Apple Watch, click here.
Back Up iTunes Library Using An External Hard Drive
If you are anything like me, you have different music files spread across different devices so first we’ll need to collect all those files into a central library on one computer. To do this, we’ll use iCloud Music Library.
1. Open iTunes on the one computer that will house our central library
2. Enable Show Apple Music via iTunes>Preferences>General
3. Ensure that all our music is added to the same folder by setting the folder location
a. iTunes>Preferences>Advanced
b. Check the boxes for “Copy files to iTunes Media folder when adding to library” and “Keep iTunes Media folder organized” and click the OK button 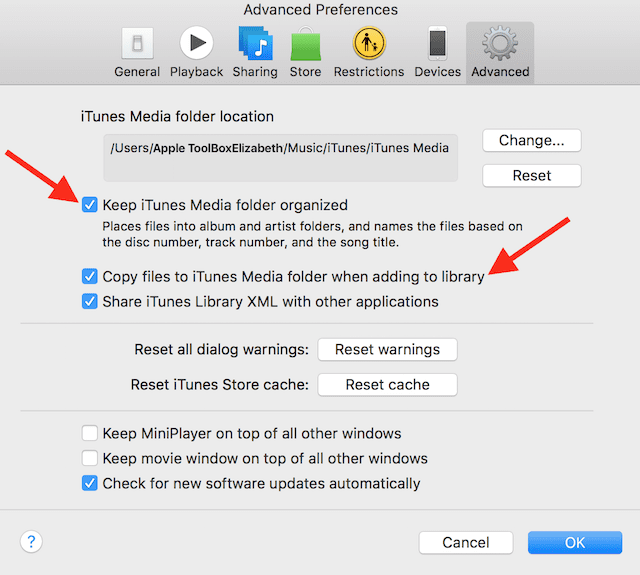
4. Go to the My Music tab
5. Click View Menu>Show Sidebar or option-command-S
6. Select Songs from the Sidebar
7. Click View>Show View Options or command-J 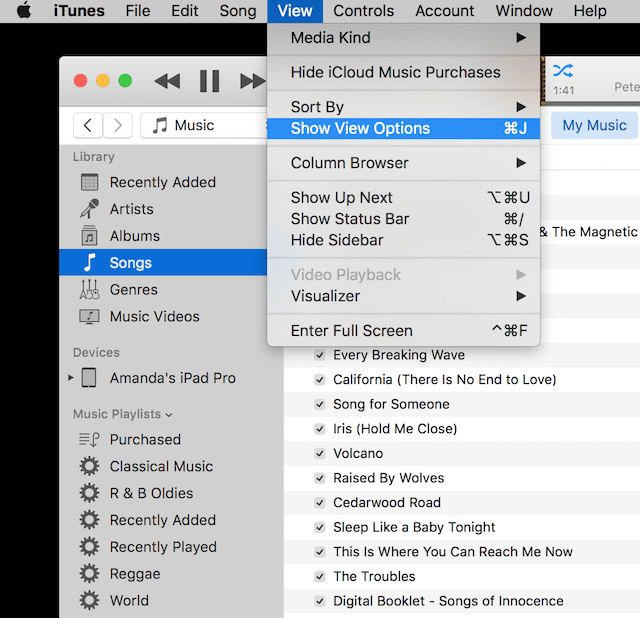
8. Select the iCloud Download option and any other options that you want 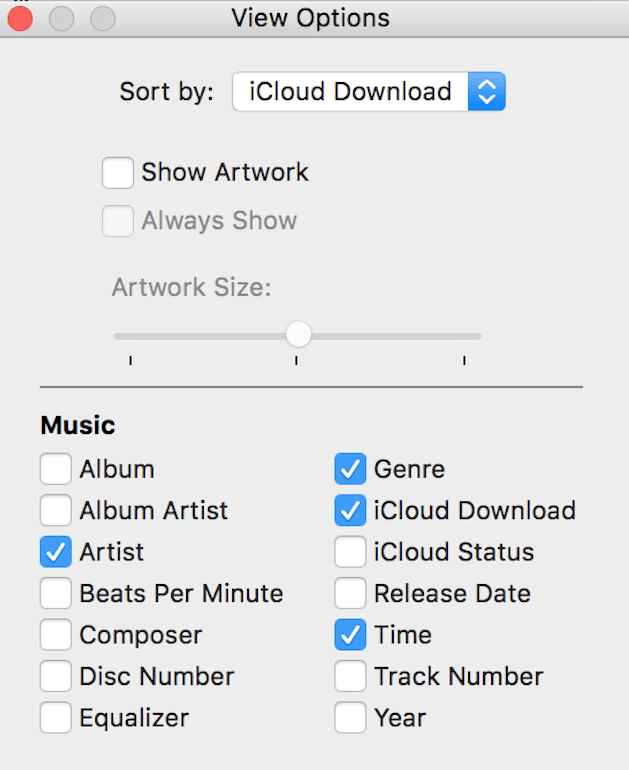
9. The iCloud icon with a downward arrow appears next to songs that are NOT downloaded locally 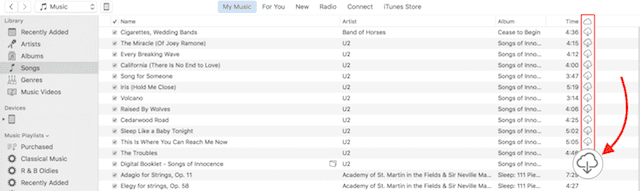
a. To download a single track, click the Cloud icon
b. To download multiple tracks, select them then control-click and select Download
Find and Remove Duplicates
I find that I have a lot of duplicates of tracks in my iTunes Library—mainly from importing the same songs or albums to different devices over the years and then dumping them into my Central iTunes Library. So the next step in preparing our iTunes Library for backup is to get rid of all those duplicates. First, we need to find them!
Open iTunes if not already opened
- Select My Music from options below center apple logo
- Click Songs from the Left Side Bar Menu
- Arrange columns so you view Name, Artist, Album, and Time. You can ensure that these columns are displayed by holding down the Control key and clicking on the columns
- Click File Menu>Library>Show Duplicate Items
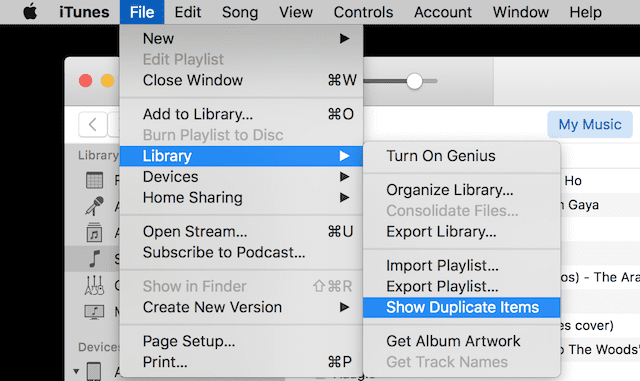
- If you have multiple versions of the same song (like Live/Studio or a rare version), hold the alt/option key first and then Click File Menu>Library>Show Exact Duplicate Items
- Sort by Artist or Name to group duplicates together
- Select the duplicate(s) you want to delete
- Press the Delete key or Click Song Menu>Delete
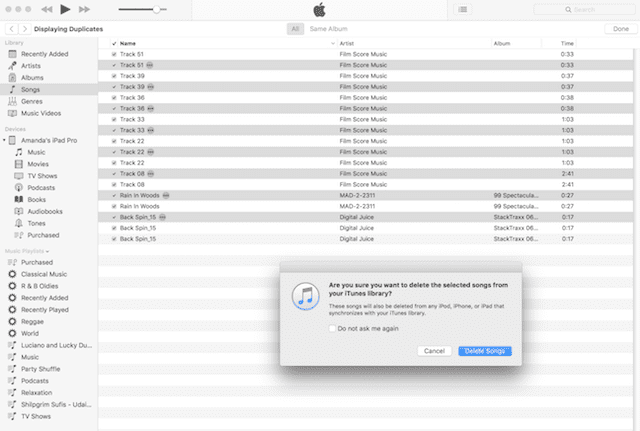
10. Press the Done button on upper right to return to your full music library
Once you’ve removed all the duplicates, it’s a good time to reset your iTunes Preferences so that iTunes no longer imports any duplicates. If you followed the steps above for downloading your iCloud Music, some of this will already be done, but just in case…
Preventing iTunes from Importing Duplicates
1. Open iTunes if not already opened
2. Click iTunes>Preferences
3. Click Advanced
4. Check “Keep iTunes Music folder organized”
5. Check “Copy files to iTunes Media folder when adding to library”
6. Click “Reset all dialog warnings”
7. Click “Reset iTunes Store cache”
Organize iTunes Library
Sometimes we have music that is in iTunes but is not stored in that iTunes Media Folder. So before we backup to an external drive, we’ll need to collect all those files and place them into that main folder. The good news is you should only have to do this once and it’s fairly painless.
Open iTunes if not already opened
- Click on the File Menu>Library>Organize Library
- Check the boxes for Consolidate files and Reorganize files and press OK
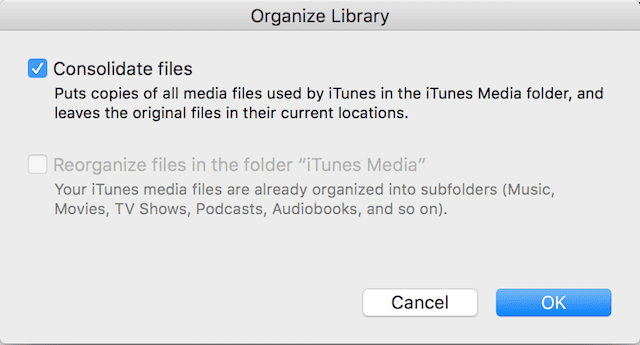
- Note that Reorganize files may be disabled (as it is in the above example)—that’s good news in that iTunes has already optimally structured your files
- Please note that Consolidate Files makes duplicates and does not move the originals so you will have multiple copies of these files on your computer. Once you verify your new consolidated library, have performed and tested the backup, you may want to delete the original files to save space
Back Up iTunes Library onto the external hard drive
1. Quit iTunes if opened
2. Connect the external drive to your computer
3. Ensure your external drive has sufficient free space to store your entire library
a. Check the capacity of the hard drive by selecting the drive icon and pressing command plus I or File>Get Info
b. Check the size of your iTunes Folder at /Users/YOURUSERNAME/Music/iTunes
4. Select the iTunes folder 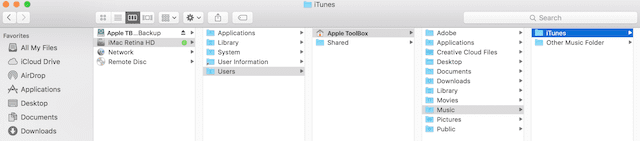
5. Drag the iTunes folder to the External Drive
Back Up Photos Library Using An External Hard Drive
Unfortunately, when you backup iTunes to your external drive it does not include your photos. So we’ll need to back those up to the external drive as well. Backing up your Photos Library is similar to backing up iTunes. Remember that if you use Time Machine or a similar product, this process is done automatically for you.
First, let’s make sure all your photos are actually in the Photos Application. This naming thing is going to get a bit tricky so when I write photos NO CAP I’m talking about photographs and when I write Photos with CAP I’m talking about the application.
1. Open Photos
2. Click Photos>Preferences
3. Click iCloud
4. Check the “Download Originals to this Mac” box 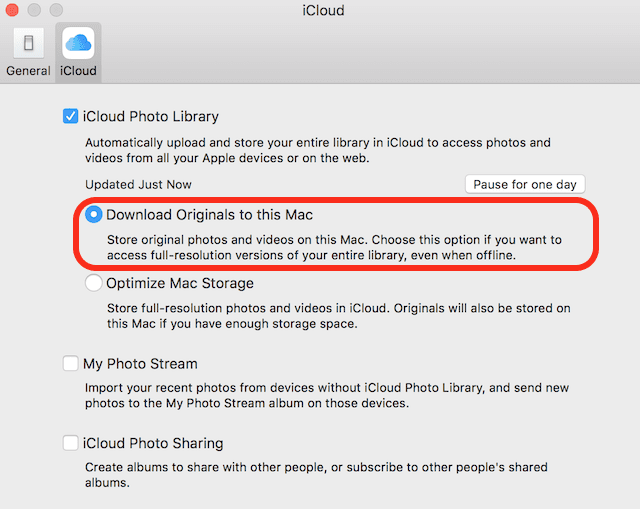
Import into Photos Library
Just like iTunes and music, if you are anything like me, you have photos that are not in the Photos application, so we’re going to have to move those too. Depending on how many photos you have, this could take quite a bit of your time.
1. Open Photos
2. Click Photos>Preferences
3. Click General
4. Check “Copy items to the Photos library” 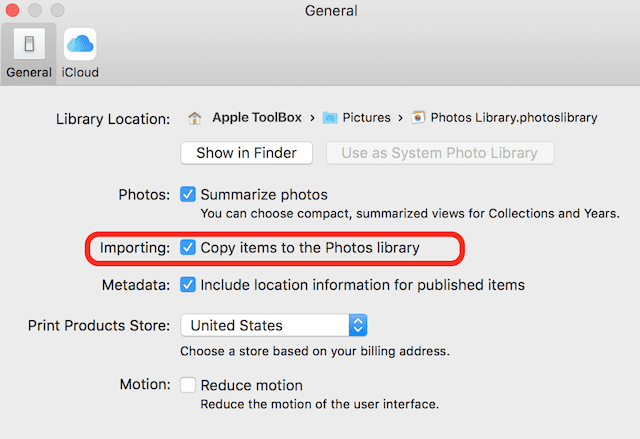
5. Close Preference window
6. Click File>Import or Shift-Command-S
7. Select Folders or Files you want to import into your Photos library (these are usually in your Pictures folder but could be anywhere—so check!) 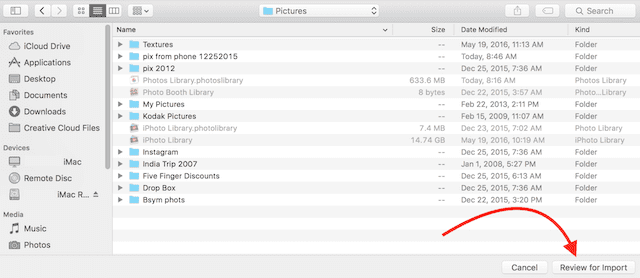
8. Click Review for Import
9. Select the thumbnails you want to import OR select Import All New Photos 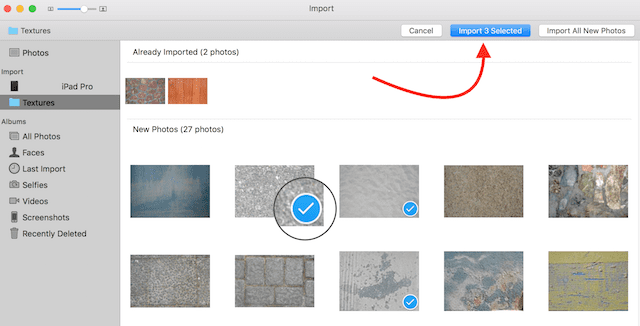
Be aware that Photos is copying your photos into its library and does not move the originals so you will have multiple copies of these photos on your computer. Once you verify your new Photos library, have performed and tested the backup, you may want to delete the original photo files to save space.
Organize Photos Library
The final step is to consolidate your Photos library. This ensures that any photos that are showing up in the viewer are also in your Photos library. Any photos that are NOT in your Photos library will feature a small icon (square and arrow) in the lower left corner of the photo. This indicates that the photo is a Referenced File and its master is not stored in Photos.
1. Open Photos if not already open
2. Select the photo(s) that have the Referenced File icon or you can Select ALL (Edit>Select All or Command-A) 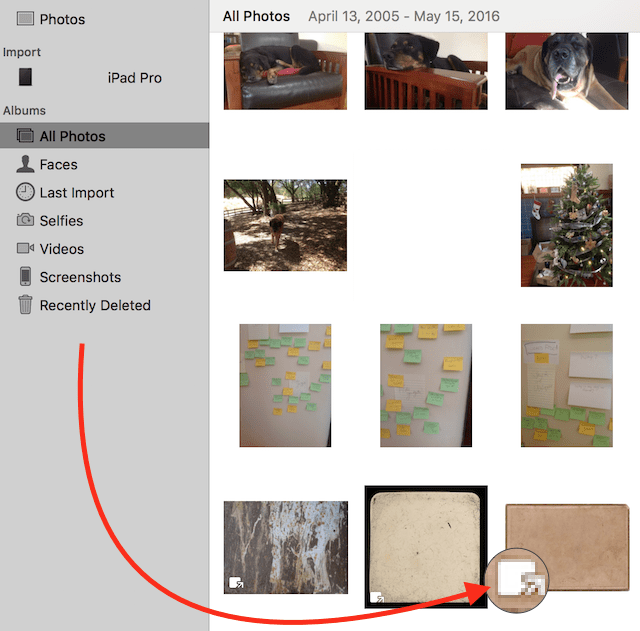
3. Click File>Consolidate 
4. A message appears letting you know that Photos will copy the original file(s) into the library
5. Click Copy
6. The selected photo(s) should no longer display the Referenced File icon. They are now in your Photos Library!
One note, if you choose Select All only those photos displaying the Referenced File icon will copy to the Library—all the others are already in the Library. Photos will NOT make any additional copies. Yipppee!
Also note that any video files will show a small movie camera icon in the lower left corner, helping you identify videos from photos. 
Remember that Photos is copying your photos that displayed the Referenced File icon into its library and does not move the originals so you will have multiple copies of these photos on your computer. Once you verify your new Photos library, have performed and tested the backup, you may want to delete the original photo files to save space.
Back Up Photos Library onto the external hard drive
Okay, so we’ve made it! All of our photos are in the Photos Library, and we are ready to make our big backup.
1. Quit Photos if opened
2. Connect the external drive to your computer
3. Ensure your external drive has sufficient free space to store your entire library
a. Check the capacity of the hard drive by selecting the drive icon and pressing command-I or File>Get Info
b. Check the size of your Photos Library at /Users/YOURUSERNAME/Pictures/Photos Library.photoslibrary
4. Select Photos Library.photoslibrary 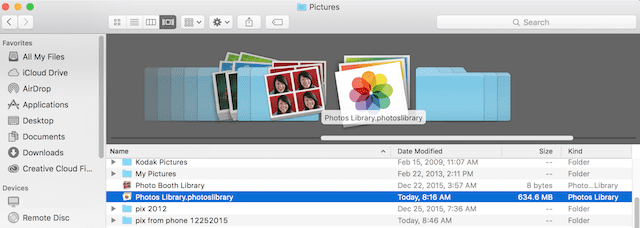
5. Drag Photos Library.photoslibrary to the External Drive
Yup, performing the back up to the external drive is the easy part. Getting ready for the backup is the work (and the time). But so worth it.
Summary
Backing up all your information (or at least all your important information) from all your iDevices and from your computer is critical in our digital lives. Backing up brings harmony and peace of mind, knowing that all that important data is tucked away…just in case. We definitely DO NOT want to play out the nightmare where our iDevice(s) crash and burn, leaving the body (the physical device) but losing its’ soul (all its information.)
Just ask James Pinkstone how important backing up is when he discovered that 122 GB of his music filed were missing from his laptop after he signed up for Apple Music. Check out his post “Apple Stole My Music. No, Seriously.”
James actually lived through my nightmare—realizing that all his music, including tracks he’d written and composed, had vanished. And he learned that he was not alone.
James discovered some interesting things about Apple Music including:
1. Apple Music may kidnap your music, placing it on Apple Servers and deleting it from your own hard drive
2. If you don’t have WiFi access, you can’t listen to your music.
3. Apple Music’s matching isn’t very precise. Many of James’ rare versions of songs were replaced by mainstream versions. (This is serious iFolks—we love our rare one of a kind versions)
4. Though you can get back most of your music by downloading it again, it takes a lot of time…and frustration. (And those rare tracks—gone for good)
5. Apple Music converted James’ WAV files to AAC or MP3—a huge loss of quality
6. Apple acknowledges that this can happen and kind of hides it in the iTunes Terms of Use for Apple Music
Luckily, James is a backup believer and had access to a backup he made before he subscribed to Apple Music. He was able to fully recover his music library and all those one of a kind tracks. And as a final act, he canceled his Apple Music subscription.
Yes, the big takeaway from James’ story and from this article is to BACKUP and don’t just rely on iCloud to do it all for you. The good practice is to backup with iCloud (or whatever your cloud service) AND with external drives using Time Machine or a similar product. That way you have a backup locally (like James) and a back up remotely. And of course, we highly recommend backing up following our 2X2 rule, two cloud, and two disc backups. Think of it as your insurance policy, providing peace of mind that your information is available even if the sky should fall. So let the light in by backing up your iDevices, iTunes, and all your iData (important data)!
An update on James’ story: two Apple MIB (Men in Black–of sorts) visited with James to try and figure out what the heck went wrong!