Is your Mac running low on space and you want to move your iPhone, iPad, or iPod backups to an external drive instead of your Mac’s internal drive? Are you wondering if it’s possible to back up iPhone to an external drive?
Well, the good news is that it is indeed possible. Learn how to change your storage location today!
Contents
Quick Tips 
Follow These Quick Tips To Move Your iTunes iPhone Backups To An External Drive
- For macOS Mojave and above, make sure you grant the Terminal Utility Full Disk Access in System Preferences > Security & Privacy > Privacy
- Create a folder named MobileSync at the root directory on the external drive
- Copy your iTunes iDevice backup folder (MobileSync) to your external drive and then rename your internal folder
- Use Terminal to create a symbolic link to your external drive’s new iTunes backup folder using the command: ln -s /Volumes/[Your External Drive’s Name]/MobileSync/Backup /Library/Application\ Support/MobileSync/Backup

You can always back up to iCloud–and we recommend doing it. But we also think backing up to another location via iTunes is a good idea.
The chances are that your iPhone or other iDevice is larger than the paltry 5GB iCloud account Apple offers for free.
You could upgrade your iCloud account to the larger plans starting at USD .99/month (USD 11.88/year) for 50GB.
So why not utilize all that free space you probably have on an external hard drive to backup your iPhone, iPad, or another iDevice instead? Or should I say, use an external drive in addition to that free or paid iCloud account!

At Apple ToolBox, we recommend always having multiple backups of your iDevices. Ideally, we all should have at least two backups minimum—1 on the cloud and one on an internal or external drive.
The best of all approach is to have two local and two clouds.
Why? Because you never know—like humans, things fall apart and fail, a crisis happens, disasters strike. So let’s be proactive and take an eyes-wide-open approach by backing up 2X2.
Related Articles
- How To Fix Time Machine When It Freezes on Preparing Backup
- Triple Protect Yourself By Creating Backups of Your iCloud Files
- Upgrading To a New iPhone, Should I Encrypt Backups?
- Backup Photos with iCloud Photo Library
- Who’s Afraid of Losing Data? A Comprehensive Guide to iOS Backing Up
- Find Your iTunes Backups on Windows and Macs
Backing Up Your iPhone with iTunes
I always back up my iPhone and iPad locally via iTunes. But it drives me crazy that I don’t get to decide which folder to use for my backup.
And since I don’t get to control that, I don’t have the option to save it to an external drive. And that just darn buggers me!
You can, of course, manually backup your iTunes backup by finding the backup folder and dragging it to your external HD each time you backup.
But what a pain! If you find yourself annoyed enough, like I am, then Apple Terminal is here to the rescue.
So let’s get to it!
Are you Using macOS Mojave or Above?
Before you use Terminal in macOS Mojave, you need to grant it full access to change administrative settings.
This new process is due to Apple changing its level of security in macOS.
When you grant an App (or Utility like Terminal) Full Disk Access, your OS adds it to a “whitelist” of applications that you determine are safe to work with sensitive data and system data.
How to Grant Terminal Full Disk Access
- Open System Preferences > Security & Privacy > Privacy Tab
- Select Full Disk Access from the left sidebar
- If you can’t make changes, unlock your disk and enter your admin password if needed
- Tap the + symbol to add Terminal to your approved apps with Full Access
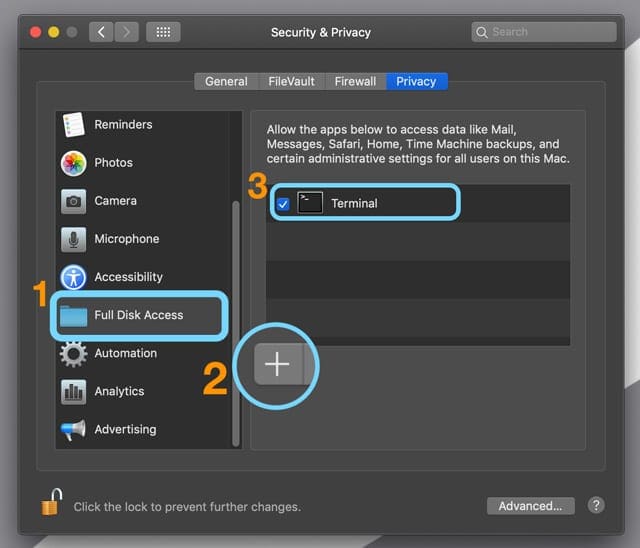
Once you grant Terminal Full Access, restart Terminal. You should good to go at this point!
How to Set Your iPhone Backup to an External Drive
1. Open your external drive and create a new folder for the backup. Name it MobileSync, or in a way you remember, such as “MyiPhoneBackUp.” Some macOS users found they HAD to name that folder MobileSync for this to work!
2. Open a new Finder window via File > New Finder Window or Command-N
3. Select Go to Folder via Go > Go to Folder or Command+Shift+G.
4. In the box that appears enter /Library/Application Support/MobileSync/ and select Go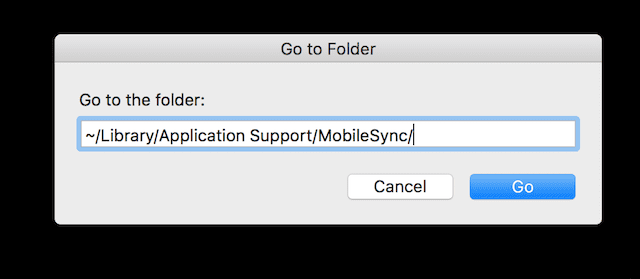
5. Locate the folder named “Backup.”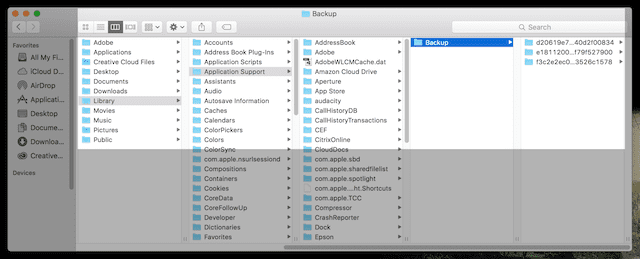
6. Drag the “Backup” folder to the folder on the external drive that you created in Step 1
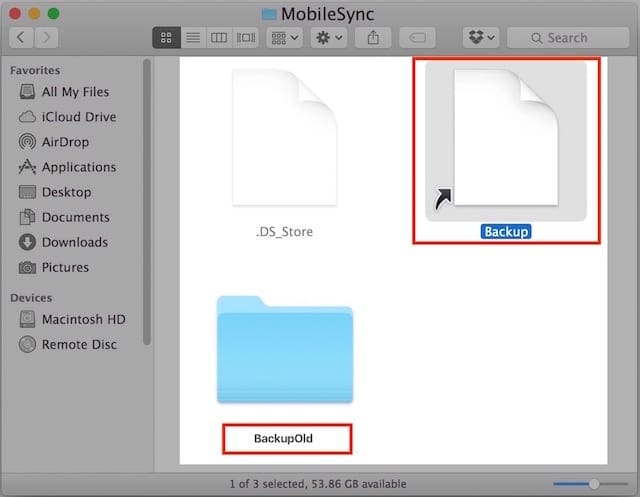
7. Rename the original Backup folder (the one on your internal drive) to “BackupOld” (located here: /Library/Application Support/MobileSync/)
8. Launch Terminal (Applications>Utilities)
9. Type in this command, replacing the “ExternalDriveName” with the exact name of your external drive and replacing “MobileSync” or “MyiPhoneBackUp” with the name of the folder you created from step 1: ln -s /Volumes/ExternalDriveName/ MobileSync /Backup/ /Library/Application\ Support/MobileSync
10. Press Return
11. Verify that the link was established by
- Select Go to Folder via Go > Go to Folder or Command+Shift+G
- In the box that appears enter: /Library/Application Support/MobileSync/
- You should see a shortcut (symbolic link) to the Backup folder in the Mobile Sync window letting you know that the link to the external drive’s Backup folder is established. You should also see the BackupOld folder you created in step 7
12. Open iTunes, connect your iOS device and back up normally selecting “This computer” as the backup location as you did previously
13. Select the Back Up Now button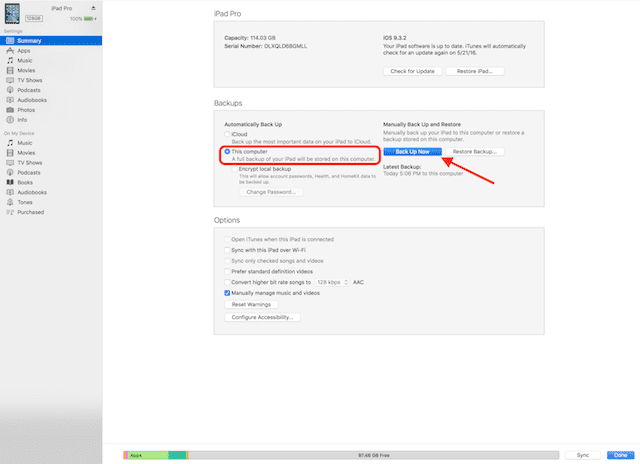
If all goes well, the backup file should now be on your designated external drive. Verify it is indeed there.
It’s a good idea to test this several times. And if you have multiple iPhones, iPads, or iPods, try backing them all up to your external drive!
From now on, iTunes backs up your iDevice(s) to the external drive so remember to connect it to your computer before you do a backup.
If you do not have the external drive connected, the backup fails. And if you need to restore your device from the backup, you’ll need to connect this external drive.
When to Delete the Old Backup Folder
Once you confirm that iTunes is backing up your iDevice to that external drive, we suggest you wait a few days or weeks before deleting that “BackupOld” folder to ensure that everything is working as expected.
It’s crucial that you back up your iDevice(s) a few times and verify those backups before you delete that old backup folder. Once verified, go ahead and delete that BackupOld folder to save space on your Mac.
Remember your old backup folder is located in your user library: /Library/Application Support/MobileSync/
Seeing Error “Operation Not Permitted” in Terminal?
If your terminal commands are not working, you need to grant the Terminal app Full Disk Access. See the section above or this article on how to give Terminal this access. 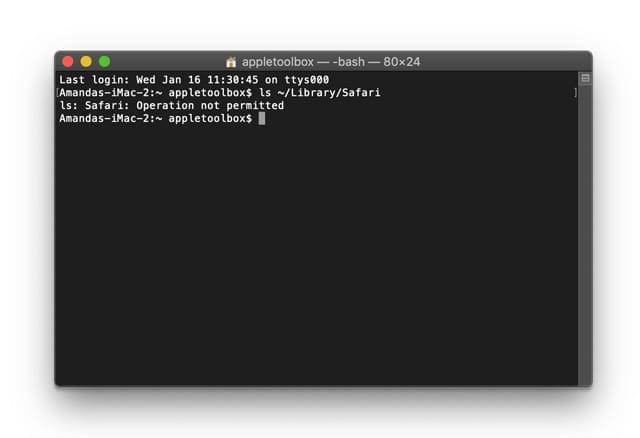
How to Return Backup to the Internal Drive
If for some reason you want to go back to backing up on your internal drive, it’s a pretty straightforward process
1. Delete the Backup Shortcut (symbolic link)
2. Copy the Backup folder from the external drive back to the user library location: /Library/Application Support/MobileSync/
Backup to External Drive Not Working?
If you cannot modify where your iPhone or other iDevice backup saves, there is another option.
Instead of using Terminal, manually move your iTunes backup file to your external after iTunes creates it.
Remember, that when you move this backup file, iTunes does not see it and creates an entirely new backup file each time.
Find your iTunes backup file in this location: /Users/yourusername/Library/Application Support/MobileSync
Summary
As always, at Apple ToolBox we recommend you retain a backup to the iCloud in addition to your iTunes backup, just in case something goes wrong. And preferably, you follow the 2X2 rule with 2 cloud backups and 2 local backups.
It feels like a lot of unnecessary storage I know, but should the day ever arrive when you need it; you’ll be thankful you have those backups at the ready. Remember, this is your insurance policy, and we want comprehensive coverage.
Reader Tips 
Reader Tips For Folks Having Problems
- Sami remind folks that if you name your external hard drive’s name with spaces between words, be sure to use the proper coding. So, if you name your external hard drive “My Passport,” make sure you use a backslash after My, then the space, then Passport. Like this: My\ Passport. And remember to capitalize when necessary
- If the method above didn’t work for you, try redoing the process following reader Jingshao’s tips.
- Remember to substitute your external drive’s name and the folder’s name (if you created a unique folder for the backup)
- Open Terminal and type these commands (one-by-one with Return in between)
- cd /Library/Application\ Support/MobileSync/
- rm Backup
- mkdir /Volumes/ExternalDriveName/ MyiPhoneBackUp/Backup
- ln -s /Volumes/ExternalDriveName/ MyiPhoneBackUp/Backup
- cd /Library/Application\ Support/MobileSync/Backup
- Some readers need to add another terminal command between steps 10 & 11: 12.
- In Terminal add the command: cd /Library/Application\ Support/MobileSync/Backup
- Locate your iPhone backup folder in /Library/Application Support/MobileSync and copy it to a new root folder called MobileSync on the external drive
- Once copied to the external drive, rename the internal Backup folder
- Open terminal and type this: ln -s /Volumes/[Your External Drive’s Name]/MobileSync/Backup /Library/Application\ Support/MobileSync/Backup
- Close terminal
- Return to iTunes and try an iPhone backup and see if it works
- If you’re using Windows 10, try these steps:
- Make a regular iPhone backup using iTunes to its default location
- Navigate to C:\Users\[Your Windows Username]\AppData\Roaming\Apple Computer\MobileSync\Backup
- Copy that folder to your new backup location
- Rename the original Backup folder. We recommend renaming it to something like BackupOld
- Press the shift key and right-click your mouse button to open a command window
- In command, enter the following: mklink /J “%APPDATA%\Apple Computer\MobileSync\Backup” “[Your External Drive]:\iTunes Backup”‘
- Close the command prompt window
- Open iTunes and back up your iPhone to see if it works