Older versions of OS X provided screen sharing capability that was built into the iChat application, and worked with AIM and Jabber accounts. When iChat was replaced by Messages in OS X Mountain Lion, the feature was still available but in Yosemite, Apple makes it even easier to share your computer’s screen with another Mac user, right from the Messages application.
Contents
Before you begin screen sharing
In order to share your screen with other Mac users there are several things you need to check first, as follows:
- Ensure that both you and the other person are running OS X Yosemite
- Both users must be signed in to the Messages app. However, Messages does not have to be open to receive a request
- You must have already started a conversation in Messages with the other party, so that you can see the screen sharing icon!
How to use screen sharing
Step 1: open Messages
To get started, the person that wants to start sharing must open Messages (it’s located in the Dock by default). Note that as long as the other person has signed in previously, they don’t need to have Messages open at all, as they will receive an onscreen notification.

In Messages, select the person that you want to screen share with, then click the Details button in the upper right.
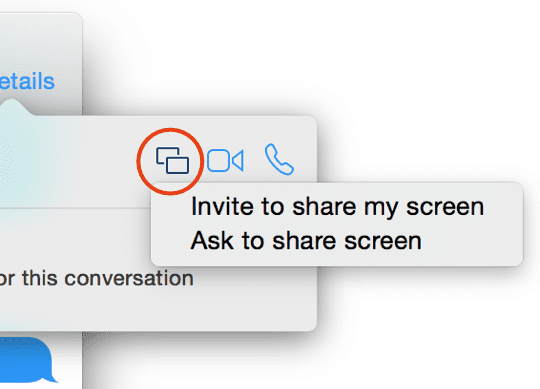
Click the screen share button, as shown circled in red below.
There are now two options: you can invite someone to share your screen or you can ask to share their screen.
Step 4 – start sharing
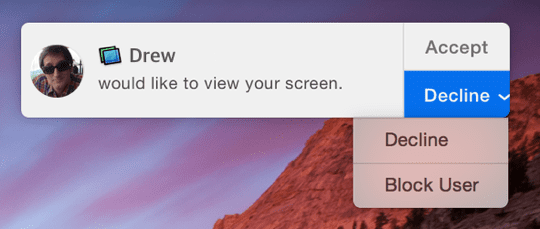
In this example, my friend Drew has requested to share my MacBook Pro’s screen. I can either choose Accept to start, or the Decline menu which contains two options – Decline or Block User.
If you decline the request, the other person sees a message stating that you are unavailable. In this case, since I know Drew and had already arranged for a screen share, I’ll just Accept the request. Note that in the unlikely event that someone you don’t know tries to share your screen, it’s possible to block them using the Block User option.
Screen sharing will start in view mode to begin with, but the other person can click and drag the screen to create a highlighted circle on your computer screen.
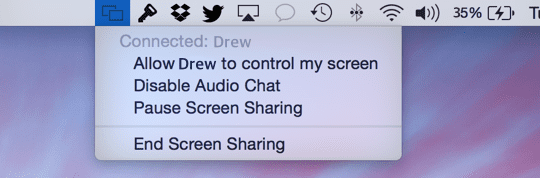
Once you are connected to the other person’s Mac, look at your title bar and you’ll see the screen sharing icon and its status (e.g. Connected).
You can pause or end the screen share from this menu, as well as allowing the other person to control your screen. Voice chat is enabled by default, but can be turned off in this menu too.
Final words
That’s really all there is to using screen sharing on OS X Yosemite. It’s extremely easy and intuitive to use, and seems to work well without any noticeable delay. For friends that both have Macs, it’s a really great feature that is particularly useful if you want to share a presentation, or help the other person with something on their computer. There are other tools available (such as Skype), but since it’s already built into the Mac it’s a much more seamless experience.
We hope you enjoy using the new screen sharing feature in Yosemite!
To learn more about sending and receiving SMS’s using Messages on your Mac check out our earlier article, or by using the command line here.