Trying to manage your Mail App’s Inbox, but getting a message “unable to move message” when trying to delete email?
It’s just like any other day in your digital life with one major exception. For some unknown reason, today you get the dreaded “Unable to Move Message” error message when moving or deleting an email on your iPhone, iPad, or another iDevice.
“Unable to Move Message: The message could not be moved to the mailbox trash.”
But you didn’t change any settings or perform any recent updates, so what’s the deal??? And it’s super frustrating when you can’t delete emails, especially all those junk emails that we all get every day.
Contents
- 1 Quick Tips
- 2 The Symptoms of Unable to Move Message
- 3 The Causes
- 4 The Solutions for Unable to Move Message
- 4.1 Move The Message to Junk
- 4.2 Force Mail to Sync With Your Accounts
- 4.3 Change Your Data Connection From WiFi to Mobile Data or Vice-versa
- 4.4 Toggle Mail Off Then Restart And Turn Back On
- 4.5 Try Deleting and Then Re-added the Email Account
- 4.6 Use Your Mail Accounts’ Advanced Settings
- 4.7 Delete the Mail App & Restore it
- 5 Unable to Move Message: A Reader’s Suggestion
- 6 Unable to Move Message: Reader Tip for Push Mail Accounts
- 7 No Time? Check Out Our Quick Video Tips
- 8 Reader Tips
Related Articles
- How to Create Custom Notifications for VIPs in the Mail App
- How To Delete Emails Completely from iPhone and Save Storage
- “Problem Turning On Mail” when Creating an iCloud Email Address
- How to fix “This Message has no content” in the Mail App
- Yahoo Mail Not Updating on iPhone X/XS/XR, Tips to Consider
- Unable to Delete Mail in iOS
- Customize iOS Mail Gestures
Quick Tips 
Follow These Quick Tips For Fixing iOS Mail App “Unable to Move Message” Errors
- Force the Mail App to sync and update with your accounts
- Switch WiFi Off and use Cellular Data or Vise-Verse
- Toggle Mail OFF, Wait 20 seconds and Toggle Back ON
- Delete Problem Account and then Add it Back
- Update some of the Advanced Settings for your mailbox accounts
- Delete the Mail App and add it back via the App Store
The Symptoms of Unable to Move Message
Readers report seeing these alerts when trying to delete messages.
While it seems to disappear temporarily, Mail then shows this error that the message could not be moved into Trash.
And of course, all those messages now reappear in your mailbox.
If you have multiple accounts configured in Mail, then this may happen to only one or two of those accounts.
And sometimes this error occurs at random on messages in those accounts as opposed to all the time.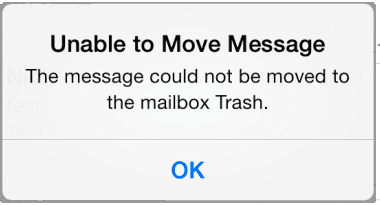
The Causes
The most common reason this error occurs is when you’re in an area with weak WiFi or cellular data signals, and your iDevice cannot communicate with the email Server.
Sometimes, what causes this is that the IMAP Path Prefix hasn’t been set up correctly. This sitaution happens with IMAP accounts that require that the Path Prefix be set to INBOX.
This Unable to Move Message also shows up when your iDevice is unable to make contact with the email server. If you are using anything other than POP mail, then your email needs to contact its Server to make ANY mail moves.
That means your iDevice must have a stable internet and data connection to communicate back and forth between the email Server and your iDevice.
The Solutions for Unable to Move Message
Test Out Each Tip One At A Time
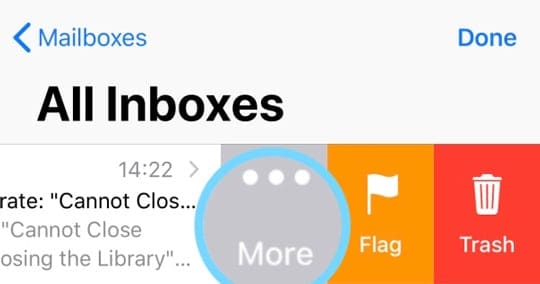
Move The Message to Junk
- Tap on the email causing the error and swipe right
- Choose the More button
- From the pop-up menu, select Mark
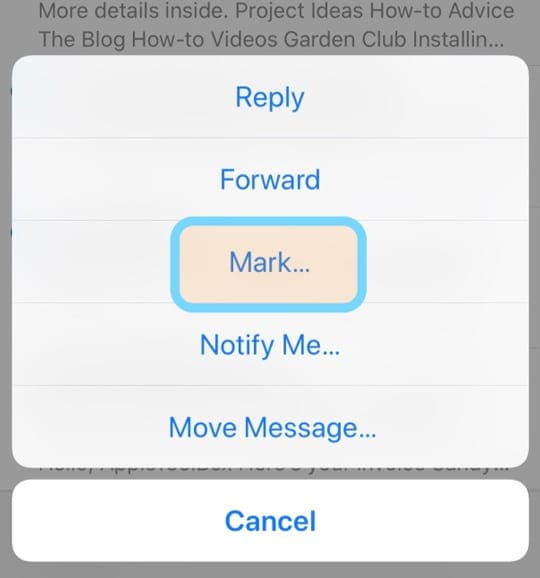
- Tap Move to Junk
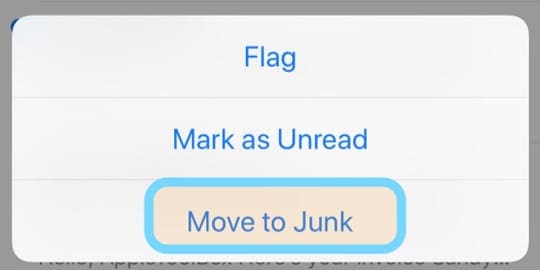
- iOS immediately removes the email from your Inbox (or current folder) to your Junk Folder
Force Mail to Sync With Your Accounts
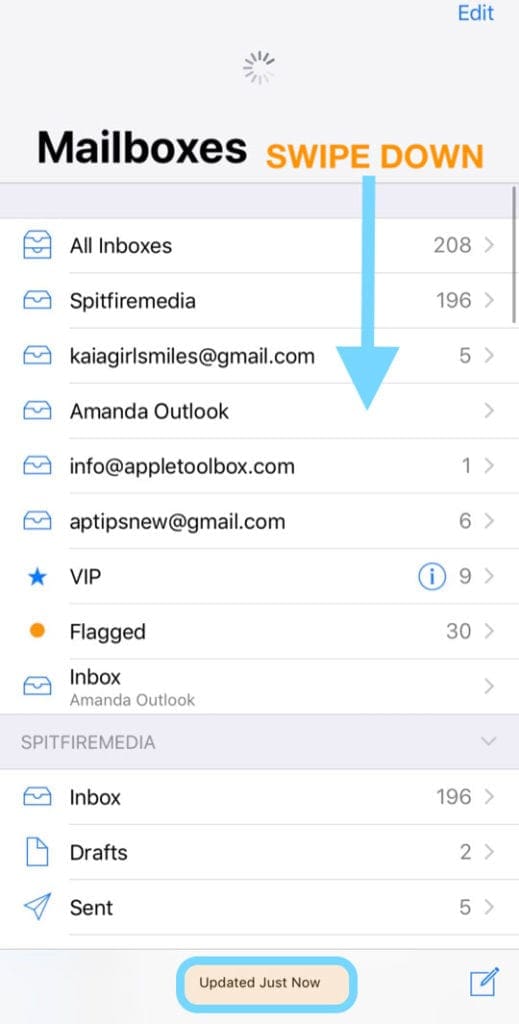
- Open the Mail App
- Tap Mailboxes
- Swipe down from the middle of the screen
- You should see a spinning circle indicating the Mail App is trying to sync
- Look for a message at the bottom that it has Updated Just Now
Change Your Data Connection From WiFi to Mobile Data or Vice-versa
- Go to Settings > WiFi and toggle ON or OFF
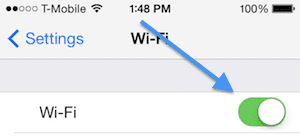
- The important thing here is to have a stable data connection
Toggle Mail Off Then Restart And Turn Back On
- Go to Settings > Passwords & Accounts > Accounts
- Select the problematic email account
- Toggle Mail OFF
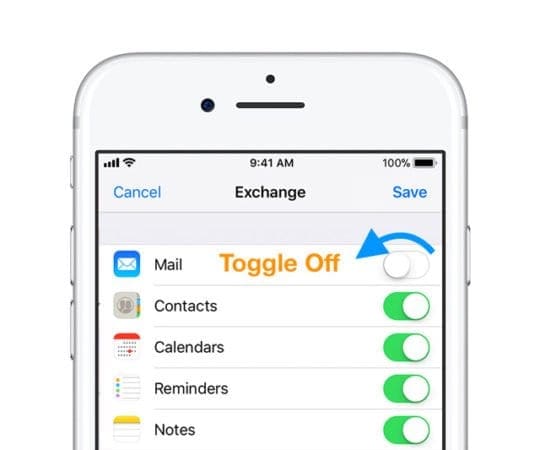
- Close Settings App
- Restart iPhone
- Go to Settings > Passwords & Accounts > Accounts
- Select the problematic email account
- Toggle Mail BACK ON
- Toggle Mail OFF
Try Deleting and Then Re-added the Email Account
- Just tap Settings > Passwords & Accounts >Accounts
- Select Your Account and Tap Delete Account
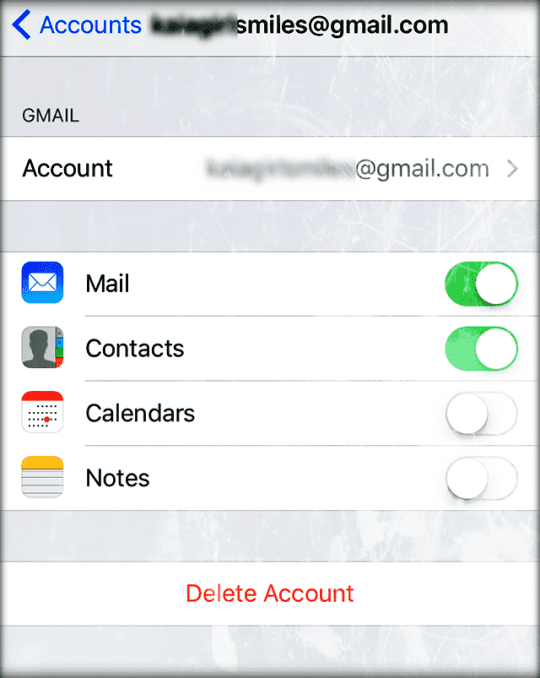
- Now add your account again by going to Settings > Passwords & Accounts >Accounts > Add Account
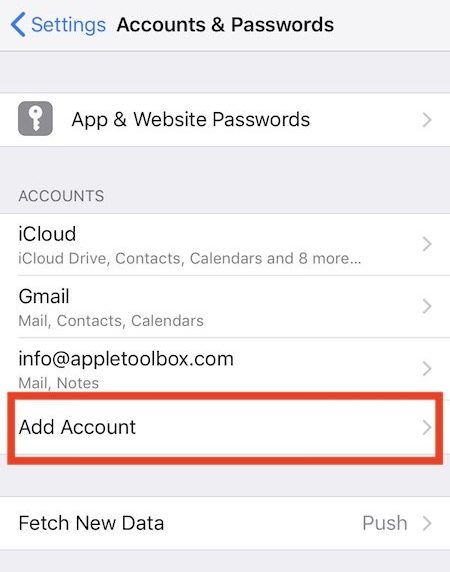
- Deleting an email account from your device does not delete your emails. All your emails remain on the server (unless you have a POP email account)
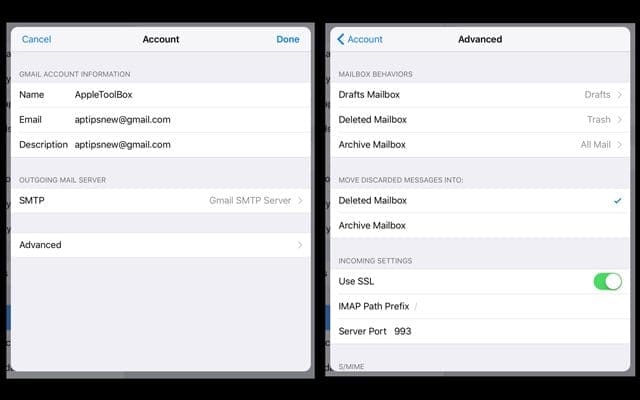
Use Your Mail Accounts’ Advanced Settings
Change Mailbox Behaviors
- Tap Settings > Passwords & Accounts >Accounts
- Select the problematic email account
- Tap on your email address
- Choose Advanced
- If you do not see the Advanced button, then you have to delete your IMAP email account and add it again manually as outlined in #2
- Under Mailbox Behaviors, select Deleted Mailbox
- Scroll Down to the section “On the Server”
- Set this to Trash
- Tap Back to Advanced and then Back to Account
- And Select Done
- Scroll Down to the section “On the Server”
- Return to your Home Screen and then reopen Mail
Change Move Discarded Messages Location
- Go to Settings > Passwords & Accounts > Accounts
- Select the problematic email account
- Tap on your email address
- Choose Advanced
- If you do not see the Advanced button, then you have to delete your IMAP email account and add it again manually as outlined in #2
- Under Move Discarded Messages Into, Select Deleted Mailbox
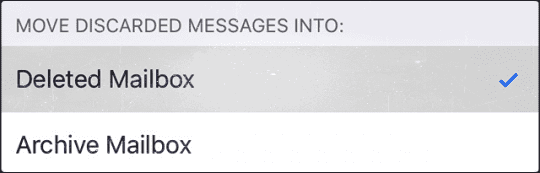
- Tap Back to Advanced and then Back to Account
- Select Done
- Return to your Home Screen and then reopen Mail
Change IMAP Path Prefix
- Tap Settings > Passwords & Accounts > Accounts
- Select the problematic email account
- Tap on your email address
- Select Advanced
- Tap IMAP Path Prefix, then enter INBOX (in capitals)
- If you do not see the IMAP prefix, then you have to delete your IMAP email account and add it again manually as outlined in #2
- Tap Back to Account
- And Select Done
- Return to your Home Screen and then reopen Mail
Delete the Mail App & Restore it
- On your iDevice, touch and hold the Mail App until it jiggles
- If the app doesn’t jiggle, you’re probably pressing too hard
- Tap on the app, then tap Delete at the prompt message
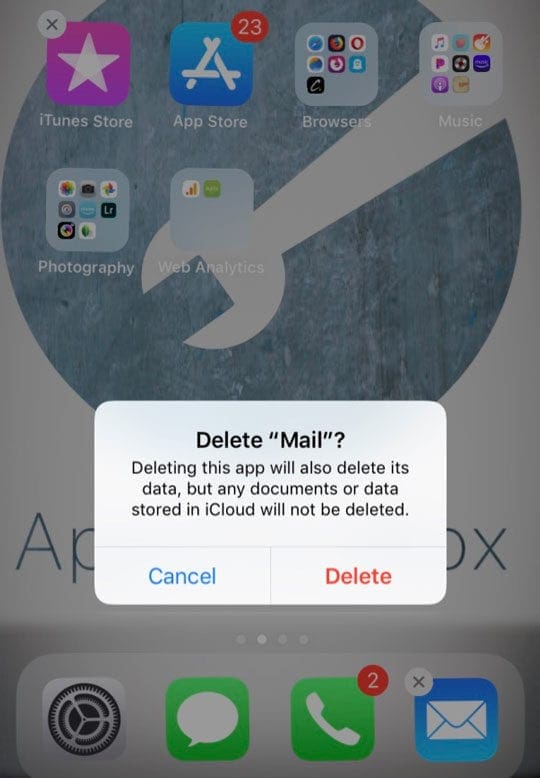
- Press the Home button or the Done Button in the top corner to finish
- Restart your device
- Open the App Store
- Search for the Mail App
- Tap the cloud or the Get button to download and install the app again
- Reconnect your accounts by adding them to Settings > Passwords & Accounts
Unable to Move Message: A Reader’s Suggestion
One of our readers had good luck with the following steps. See if these work for you to fix your iOS Unable to Move Message.
Take a Look Inside Your Mail App
- Open your iOS Mail App
- Tap on Upper Left Mailboxes option or Accounts
- You see a quick listing of all connected accounts
- In the gray section, tap each account (listed in capitals) to open account details fully
- You should see a list of folders for each account like “Inbox,” “Drafts,” “Sent,” “Junk,” “Trash,” and so forth
- If an account has more than 1 “Trash” folder
- Open each Trash folder and check for a folder named “Error.”
- If you locate an “Error” folder
- Click “Edit” at top right,
- Click the “Error” folder
- Choose the option to “Delete Mailbox.”
- You get a warning that deleting the mailbox “Trash” removes all messages in it.
- Tap Continue
- Now try to delete your unwanted mail
- Open each Trash folder and check for a folder named “Error.”
- If it still doesn’t work, remove the other Trash folder
Unable to Move Message: Reader Tip for Push Mail Accounts
Our reader Eggiebirdie provided some great help for those of you who have G Suite, or Google apps paid accounts that push mail to your Apple Mail app.
Google Sync only works with G Suite, Drive for Work, Government, and Education. Google Sync uses Microsoft Exchange ActiveSync to synchronize customer’s G Suite mail, contacts, and calendars to their mobile devices.
To set-up and make modifications, use Google’s Sync site for desktop access or use Google’s mobile Sync site to access on mobile devices.
When you use Google Sync, some Gmail actions behave differently
When you delete a message from your iPhone’s or iDevice’s Inbox, Gmail defaults to archiving the message and not removing it.
To delete your message, you must change your Google Sync mobile settings and select the option Enable “Delete Email As Trash” for this device.
Look At Some Browser Settings
- Open Google’s mobile sync site in your iDevice browser of choice
- Under Manage devices, select your current iDevice
- A mobile Google Sync settings menu appears
- Tap the checkbox Enable “Delete Email As Trash” for this device

- Update any other settings you want to sync, under My Calendars and Shared Calendars
- Now save
- Tap the checkbox Enable “Delete Email As Trash” for this device
- Perform this settings adjustment for each of your devices that use this email account
- Select Choose another device and follow steps 2&3 for each device
- Now, for each device, clear your local mail cache
- Go to Settings > Passwords & Accounts > Select your G Suite account
- Delete your current G Suite account
- Restart your iDevice
- Press and hold the Sleep/Wake button until the red slider appears
- Drag the slider to turn your device completely off
- After the device turns off, press and hold the Sleep/Wake button again until you see the Apple logo
- Once restarted, go to Settings > Passwords & Accounts > Accounts > Add Account
- Select Exchange
- Type in your G Suite account or Google Apps account information, ID & password
- Select Next at top right of the screen
- Manually type in m.google.com as the server
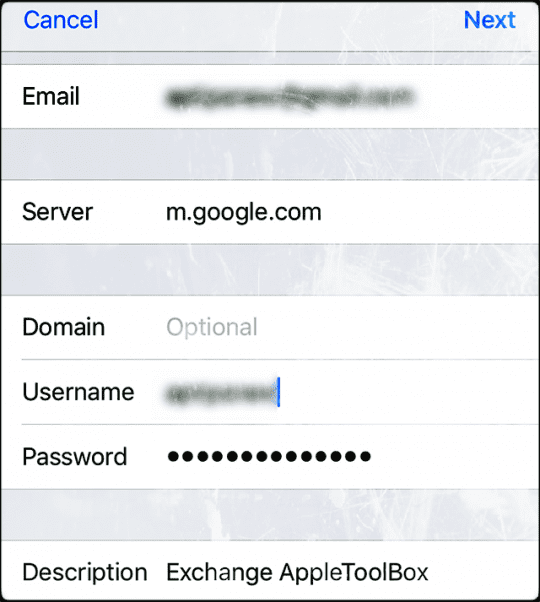
- Type in your username (your full email address)
- Choose preferred options to sync (email, calendar, contacts, notes)
- Select Exchange
- Verify that your mail works as expected
No Time? Check Out Our Quick Video Tips
Tap or click on our quick tip video below. This video highlights some of the most common steps to fix these issues.
Reader Tips

- Try switching your account’s Advanced setting for Move Discarded Messages to the Archive mailbox, wait for a few minutes and close Settings, then return and change this setting for Move Discarded Messages back to Deleted Mailbox. Worked for me in iOS 12!
- I deleted the Mail app and reinstalled it, and I don’t get the Unable to Move Message anymore! Working on iOS 12
- Our reader Al found a different method for his iPhone 7. He KEPT the INBOX option and then switched the trash default from Server to Phone. And it worked! Al then deleted all the emails that could not previously be removed. After deleting, he went back to his email’s settings and switched the trash default back to Server. And all those messages no reappeared in his mailbox!
- Todd found the following worked for his Outlook account: short of deleting the account, this is the only resolution that worked for me.Settings / accounts & passwords / outlook (email acct having issues) / account / advanced settings and turn off S/MIME
- Another reader was having this same issue on his iPhone. He solved it by going to Settings > Mail > Accounts > Hotmail. Finally, he tapped on “Mail Folders to Push,” and added Trash by tapping that line. For him, this solved his problem with his Hotmail email account.