Are you having trouble getting iTunes Home Sharing to work? Don’t understand on to turn on home sharing in iTunes? Or don’t even know what iTunes Home Sharing is? If so, you are not alone! Quite a few of our readers have problems getting iTunes Home Sharing to work!
Contents
Quick Tips 
- Use the same WiFi Network for all devices you want to share iTunes Libraries with
- Check that iTunes is open and the computer(s) hosting the libraries are awake
- Sign in with the same Apple ID on all the devices you want to share with
- Restart all devices, including your WiFi router
- Turn off any firewalls or whitelist these incoming connections
Related Articles
- How To Set Up Home Sharing and Family Sharing with Apple TV
- Setting Up Home Sharing on Your iPad, iPhone, or iPod–it’s easy!
- How To Authorize a Computer on iTunes
What is iTunes Home Sharing Anyway?
Simply put, iTunes Home Sharing lets you share and stream your entire iTunes library (music, movies, TV shows, Podcasts, and Audiobooks and even Photos for AppleTVs ) wirelessly over your home network with another computer, Apple TV, or any iOS device like an iPad, iPod Touch, or iPhone. 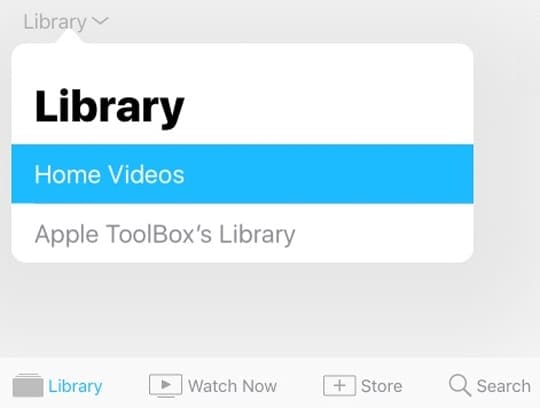
In some cases, users have experienced issues with Home Sharing (e.g. Home Sharing not showing up in iTunes).
iTunes Home Sharing Specs and Requirements
- iPhones, iPads, and iPod Touch using iOS 4.3 and above
- Mac and Windows PC with iTunes 9 and above
- Apple TV 2nd generation using tvOS 4.2.1 or later OR an AppleTV 3rd generation or later
- Devices all connected to the same WiFi network
- Use the same Apple ID on all devices
- Devices must be awake, with iTunes open
How Do I Turn on Home Sharing in iTunes?
It’s a good idea to check how you set-up iTunes Home Sharing, in case you missed something!
1. Update iTunes and your Devices
First, make sure that you have the latest version of iTunes installed on each Mac or PC using Home Sharing.
And don’t forget to update your Apple TV(s), iPhones, iPads, and iPod Touch as well to their latest iOS or tvOS.
2. Connect All Devices to the Same WiFi Network
Home Sharing works when all of your devices are on the same WiFi network. So quickly check your devices and make sure they connect to the exact same WiFi network. 
For folks with dual-band or tri-band WiFi routers, take note of which bandwidth you want to use–for example the 5 GHz or the 2.4 GHz.
Look for Guest Networks
If you also set up a guest network on your router, check that you are not inadvertently connecting to the guest network instead of your home network. 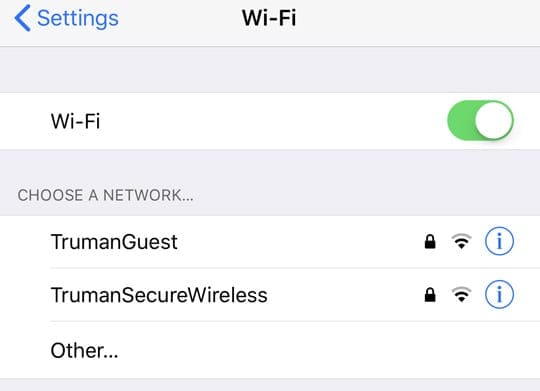
No VPN Support
Home Sharing does not work with VPNs, so check that one or more of your devices are not currently connected to a VPN. And if so, toggle your VPN off.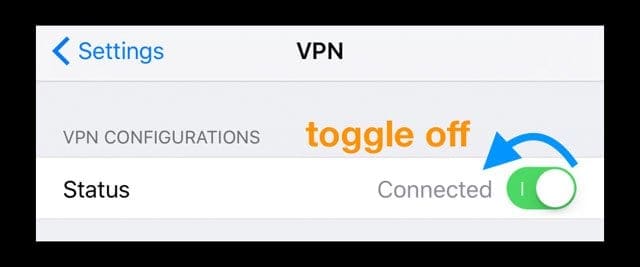
3. Use the Same Apple ID on All Devices
Every computer or device on your Home Sharing network needs to have the same Apple ID signed in.
Home Sharing On Your Mac or PC
- Open iTunes
- From the menu bar, choose File > Home Sharing > Turn on Home Sharing
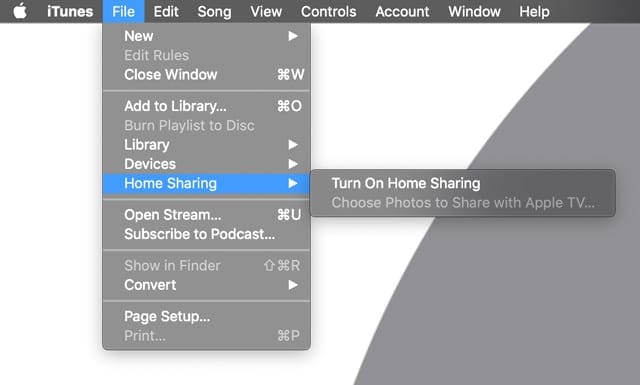
- If you’re not signed in, sign in with your Apple ID at the prompt
- A pop-up indicates that Home Sharing is now on
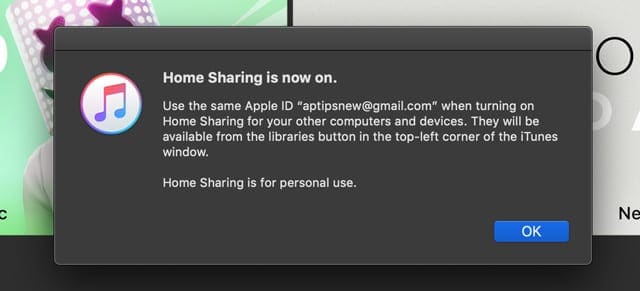
- To add additional computers, follow steps 1-2 and sign in with the same Apple ID
- Use Home Sharing with up to five computers on your home network
- The computers need to be on and awake, and iTunes needs to be open for Home Sharing to work
- To see your shared iTunes Libraries, click Music in the upper-left corner and in the drop-down look for the home icon for the shared libraries
Home Sharing On Your iPhone, iPad, or iPod
- Go to Settings > Music or Settings > TV > iTunes Videos (for older iOS, in the TV App Settings it’s listed as Home Sharing)
- Scroll until you find the Home Sharing setting
- If you see Sign in, tap it, then enter your Apple ID and password
- If you see an Apple ID, confirm it is correct or tap it to sign out and sign back in using a different Apple ID

- To see your shared iTunes Libraries, tap the Music or TV App and choose Library, then tap Home Sharing or the name of the Shared Library
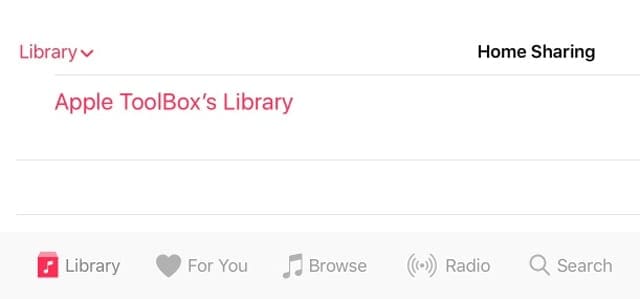
- To see the content, tap the name of the shared library
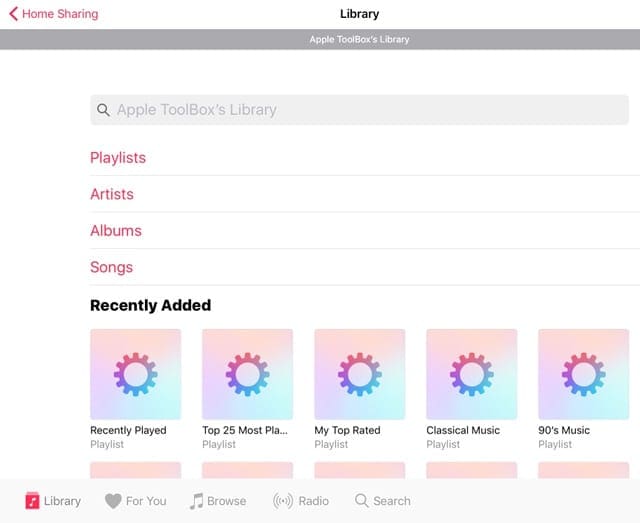
- If you don’t see Home Sharing as an option in the Music App’s Library, tap Edit and select Home Sharing and tap Done
Home Sharing on Your Apple TV
- Home Sharing for AppleTV requires that you have an active iTunes Store account
- From the Home screen, choose Settings > Accounts > iTunes and App Store
- Select Sign In, then sign in with your Apple ID and password
- Go to Settings > Accounts > Home Sharing
- For older model Apple TVs, go to Settings > Computers
- Select Turn on Home Sharing
- Enter your Apple ID and password if requested
- To see your shared iTunes Libraries, go to the main menu, choose Computers, and select a shared library
iTunes Home Sharing Not Working on Macs and PCs?
- Check that your computer is open and not asleep and that iTunes is open
- Try closing iTunes and restarting it
- Make sure you authorized iTunes for use on your computer
- For Macs, from the menu bar at the top of your computer screen, choose Account > Authorizations > Authorize This Computer
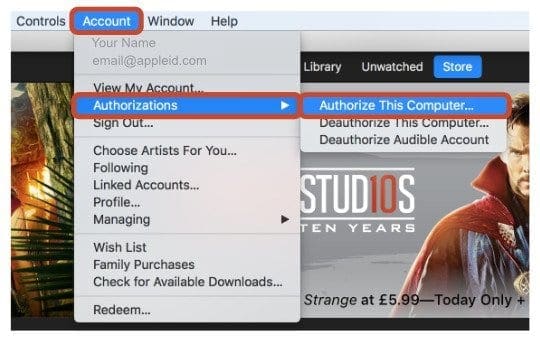
- From the menu bar at the top of the iTunes window, select Account > Authorizations > Authorize This Computer.
- If you don’t see the menu bar, press Control + B on your keyboard
- For Macs, from the menu bar at the top of your computer screen, choose Account > Authorizations > Authorize This Computer
- From the menu bar at the top of your computer screen or at the top of the iTunes window, choose File > Home Sharing > Turn on Home Sharing
- Try turning off Home Sharing in iTunes (File > Home Sharing > Turn Off Home Sharing) wait 20-30 seconds and then turn it back on to fix issues
- Restart your Mac or PC AND your WiFi Router
- Using a firewall?
- Check that you’ve not blocked Home Sharing
- Home Sharing uses TCP port 3689 and UDP port 5342. Make sure these are open and accessible on your router
- If your Mac’s firewall is blocking all incoming connections or allowing only essential services, go to System Preferences > Security & Privacy > Firewall and edit these settings
- If you’re using a PC, or you have another firewall set up on your computer or router, make sure TCP port 3689 and UDP port 5342 aren’t closed or blocked
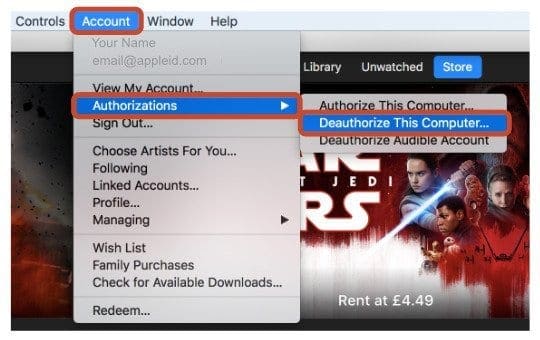
- You can only authorize a maximum of 5 computers (Mac & PC combined) at any one time. If needed, deauthorize a computer to add in another
iTunes Home Sharing Tips for iDevices & Apple TVs
- Sign into Home Sharing on your device
- For iDevices, go to Settings > Music or Setting > TV (or for iOS 10.1 and below, Settings > Videos)
- Locate Home Sharing and sign in with your Apple ID, if needed
- For Apple TV 4K or Apple TV (4th generation), go to Settings > Accounts > Home Sharing and Select Turn on Home Sharing
- On earlier models of Apple TV, go to Settings > Computers and Select Turn on Home Sharing
- Log in to the same Apple ID on iTunes, and all iDevice and Apple TVs that you want to use with Home Sharing
- Connect all devices to the same WiFi network
- Restart all devices, including Apple TVs
- Try downloading a movie or show onto one of your devices (any show or movie)
- Once the download is complete, folks report that Home Sharing finally pops up as an option. This workaround seems to fix the problem for many folks!
- Open iTunes on your computer
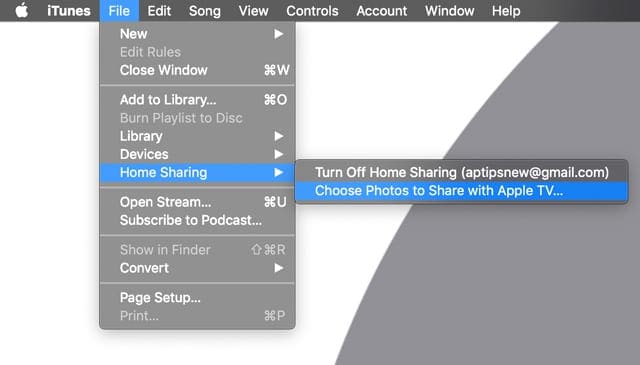
- Go to File > Home Sharing > and make sure Home Sharing is On
- If not follow the instructions above to turn Home Sharing on for your computer
- With Home Sharing On, go back to File > Home Sharing > and select Choose Photos to Share with Apple TV
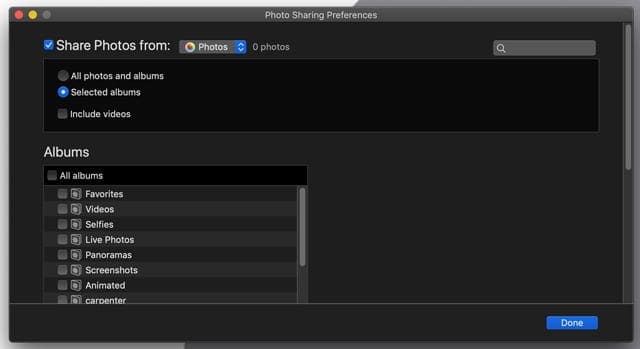
- Tick the box for Share Photos From and choose where (the Photos App or pick somewhere else, like your pictures folder)
- Make additional selections like choosing all photos and albums or selecting specific albums
- If you want videos too, tick the box for include videos
Want to Turn Off iTunes Home Sharing?
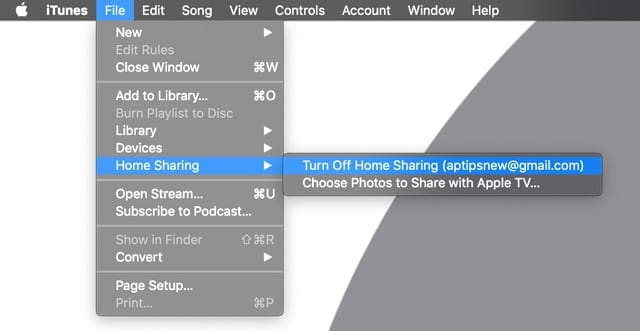
- In iTunes, go to the top menu and choose File > Home Sharing
- Select Turn Off Home Sharing from the options
Additional Troubleshooting tips for Home Sharing
- Check if both the iTunes Store is working on both your computer and AppleTV, as it’s needed for successful authentication.
- For Macs, use Discovery (previously called Bonjour Browser) to troubleshoot the Bonjour service discovery
- For iDevices, like iPhones and iPad, use Discovery for iOS
- Turn off Home Sharing on all devices, wait about one minute and turn them back on
- Restart or reset your network router—this often fixes the problem when other things did not!
- Quit and restart iTunes and then close and open all apps on your iOS devices
- Update your router’s firmware
- If you are using a PC, try disabling IPv6 on your PC. See this article for more info