If your family is anything like mine, there’s a ton of old photos tucked away in boxes, trunks, and bags in your attic, basement, garage, or rented storage unit. And there’s probably little to no organization. Since these were most likely all taken in the pre-digital days, the task of digitizing them is arduous and lengthy.
For those of us with Mac and iPhones, iPads, or some other iDevice, we’d like to get some of those old photos into our digital photo library for safe-keeping. And that’s where both our Photos app and scanning comes in.

Contents
Related Articles
- What to do if you can’t transfer photos from iPhone to your PC?
- Photos Disappeared After iOS Update? How to fix
- How To Delete Selected Photos from All Apple Devices in One Shot!
- iPhoto or Photos App Not Recognizing iPhone or another iDevice?
Photos App and Scanners, Not a Great Pair!
Photos and the now obsolete iPhoto are part of the Apple suite of applications included with any Mac purchase. This combination of programs contains things like Garageband, iMovie, Messages, FaceTime, Photo Booth, and the productivity software package iWork.
Although Photos (or the elder iPhoto) has many great features to organize and edit your complete photo library, scanning directly into Photos or iPhoto is not one of them. But as always with Macs, there are workarounds for that!
How-To Scan on a Mac Computer
Software Check to Scan photos / images by using iPhoto or Photos
Before we move on, check that your scanner is installed correctly. First, connect your scanner to your Mac and power up the scanner if not already on. Then open the application Image Capture from your main Applications folder.
If your scanner appears in the left column, everything is ok. If your scanner does not appear, you must (re)install the driver that is specifically for your scanner. Check the manufacturer’s website for the drivers if your Mac is unable to locate them.
Scan normally using Image Capture and then import the file into Photos
- Open Image Capture
- Select Your Scanner in the Left Column
- Look in Shared for WiFi and Ethernet Connected Printers
- To change DPI and other settings, select the Show Details button
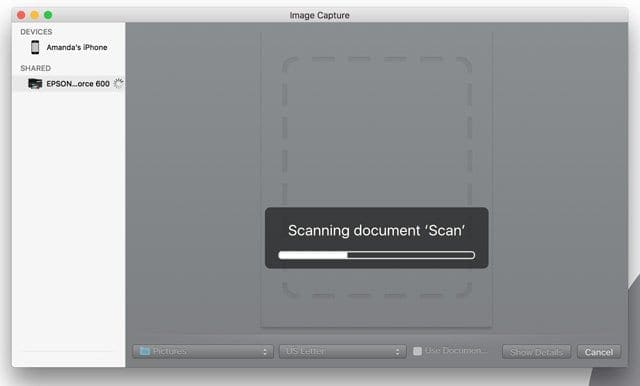
- Place the photo or content you want to scan face down on the glass in the scanner and choose the Scan button
- Once completed, a Scan Results Window pops-up with your current scan

- Tap the magnifying glass to locate the scanned image, then rename and open it
- Image Capture works with your System Photo Library
- Check if the scan is performed as intended
- Check file details, dimensions, and the pixels (DPI)
- If not acceptable, delete the current scan and rescan with any revised settings
- Tap the magnifying glass to locate the scanned image, then rename and open it
- To change the location of scans, select the Show Details button and change the Scan To Folder to your desktop or location of choice or create a Scanned Photos folder
- Open Photos from your dock or your Applications folder
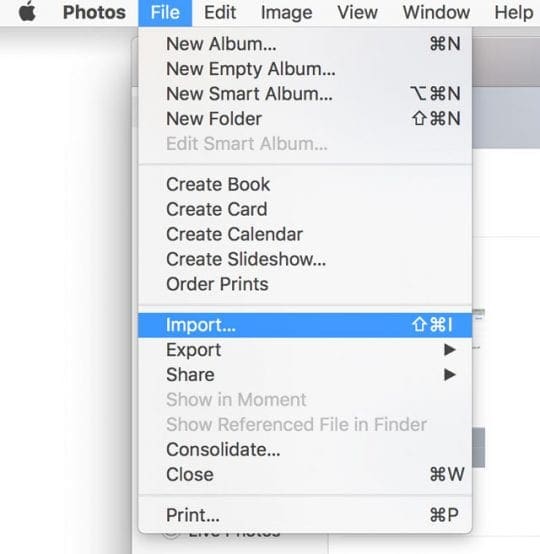
- Click on the Photos menu File > Import, select the image(s) you want to import and click Review for Import
- Your scanned Photo is now in your Photos Library
Want Another Method to scan photos / images?
Another way is to drag and drop the files onto the Photos directly. Find your picture(s) in Photos in the left column of Photos under the heading Last Import. 
Dragging and dropping follows whatever import preferences you set in your Photos App. So if you set your Photos Library to Copy when importing, moving your scans follows this same rule. 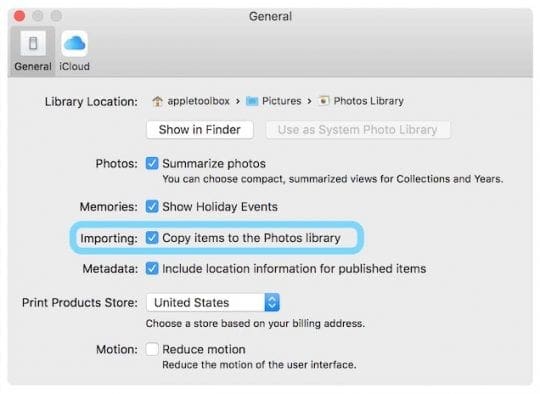
Use Image Capture to scan images directly into iPhoto
- Open Image Capture from your dock or the Applications folder.
- Select Show Details and change the Scan To: to Photos
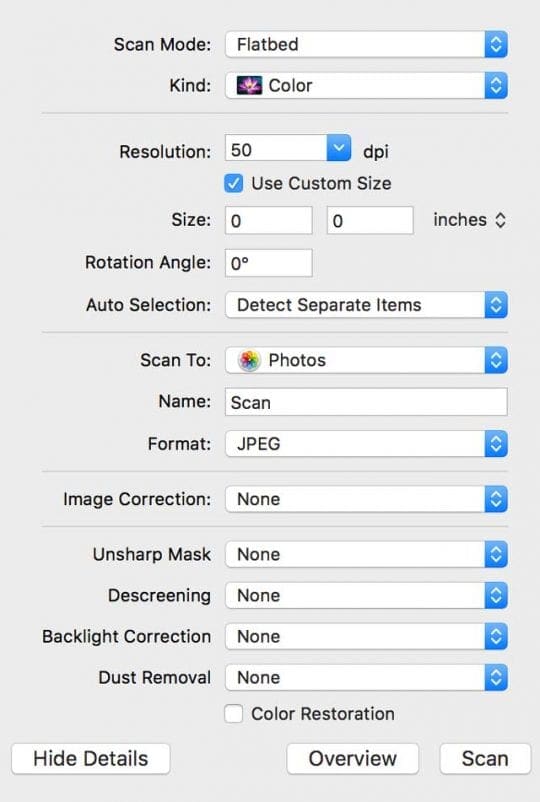
- Place the photo you want to scan face down on the glass in the scanner
- If you want to adjust the settings like DPI, size, and format, hit the button ‘Show Details.’ The scanner shows you a preview, and you adjust the settings as you wish
- Hit the button Scan
- After the scanner is finished, the image is automatically imported into Photos
- Find your picture(s) by clicking on Last Import (Left column in Photos)
Scans are Imported, Now What?
After your pictures are imported into Photos, take advantage of the helpful tools like the slideshow tool (Photos > File > Create Slideshow.) Or quickly create a slideshow by clicking the arrow in the upper-right corner. With Slideshow, you get to customize the theme and music. And adjust the settings for display time and transitions.
The Photos editing tools are also great to enhance your images. You can resize, rotate and crop the photo.
Other features are red-eye-reduction, aligning the horizontal position and improve the color balance of the picture. Just try and experiment with all the awesome Photo tools. Don’t be afraid, because you can always return to the original image!
iCloud Photo Library
Another feature to take advantage of is iCloud Photo Library. This feature securely stores your entire photo collection so you can access it from anywhere, including all your devices and on iCloud.com. To turn on iCloud Photo Library, go to Photos > Preferences > and select the iCloud tab. Tick the box for iCloud Photo Library.
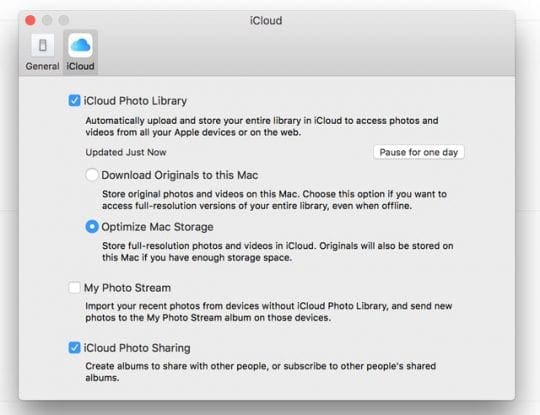
The beauty of an iCloud photo library is that when you edit and organize images in the Photos app on any device, your changes are kept up to date and visible on all devices including icloud.com. Just make sure that you’re signed in with the same Apple ID on all of your devices.
The only downside is that your photos count towards your total iCloud storage, so if you have the free 5GB plan, you may need to upgrade to a larger capacity plan to accommodate your photo library.
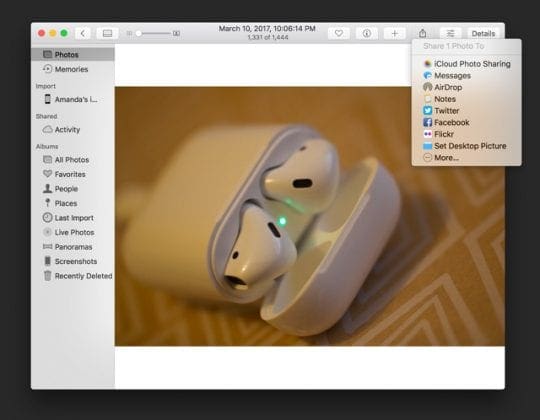
Use the Share Button to send your photos to friends, family, and social media via Messages, Facebook, Twitter, iCloud Photo Sharing, Mail, and more.