This guide explains exactly how to restore an iPad to factory settings, also known as a factory reset. An iPad restore is useful if you are planning to sell the device or if a software error is stopping you from using it. Follow our step-by-step instructions to find out everything you need to know!
Quick Tips
- Make a backup of your device
- Go to Settings > General > Reset
- Tap Erase All Content and Settings
Contents
What Does a Restore Do?
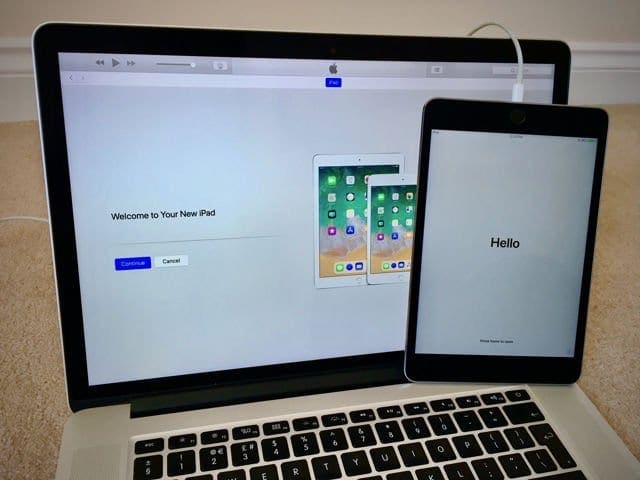
Restoring a device erases all content and takes it back to default settings, it is sometimes also called a factory reset. An iPad restore effectively returns the software to the state it was when brand new, the only difference being that it may be running newer operating software than when purchased. After this process an iPad will display the Hello page; it can then be set up as new or restored from an existing backup.
Why Restore an iPad?
The most common reason to restore an iPad to factory settings is to prepare it for a new owner. Whether being sold or given away, restoring an iPad removes any personal information and allows it to be set up as new.
You may need to restore an iPad as a troubleshooting step to resolve software issues. These could include slow performance, graphical errors, or unexpected behavior. Restores are usually suggested as the last resort since they can be time-consuming and require erasing your data.
Finally, multiple security states can only be resolved using a restore.
Reasons restore might be needed:
- Passcode is lost or forgotten
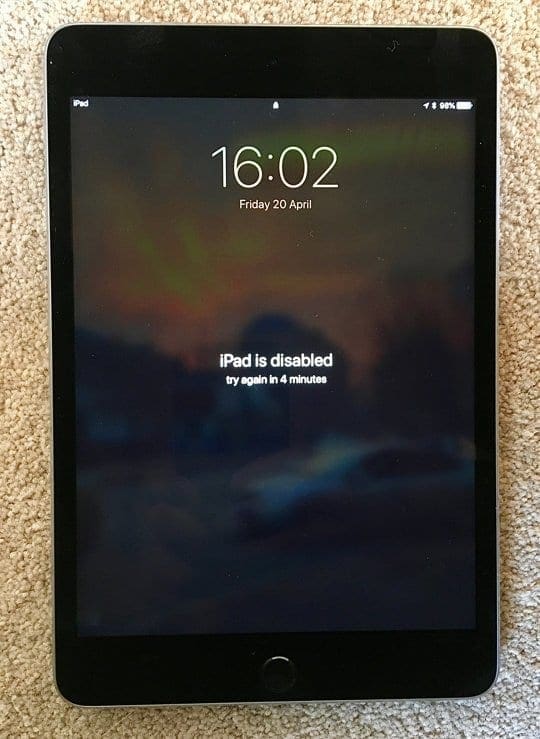
- Device is disabled
- Restrictions passcode is lost or forgotten
- iPad is in Recovery Mode
Each of these scenarios requires the device to be restored using iTunes.
What Is Needed to Restore an iPad?
There are two ways to restore an iPad to factory settings: using the device itself or using iTunes.
To restore an iPad on the device itself you need the device passcode and Apple ID password for Find My iPad (if it is turned on).
To restore using iTunes, you need a computer running the latest version of iTunes and a USB-to-lightning cable to connect the iPad. Preferably, you’ll also have the passcode and Apple ID password for Find My iPad. However, if you don’t have this information it is still possible to restore the iPad using Recovery Mode.
If you wish to recover your data after restoring an iPad, you must make a backup first. Once the iPad is restored, you cannot recover the data from it without a backup.
You also need time. A basic restore can take as little as ten minutes, but if you need to make a backup first and recover it after the restore the entire process could take several hours. The exact amount of time varies greatly depending on how much data is on the iPad and the quality of your internet connection.
How to Make an iPad Backup
A restore is irreversible and deletes everything on the iPad. Unless you don’t care about your data, you should make a backup before starting the restore process. iPad backups are made using either iCloud or iTunes, both allowing you to recover almost all of your data once the restore has completed. We’ve summarised the difference between iCloud and iTunes backups in the FAQ below.
iCloud Backups
iCloud offers the most convenient method for making a backup. All iCloud backups are encrypted and available to you anywhere with a reliable Wi-Fi connection. The main downside to making an iCloud backup is that can take much longer than iTunes and requires enough storage in your iCloud account.
What Is Needed to Make an iCloud Backup?
To complete an iCloud backup you’ll need a reliable Wi-Fi connection and plenty of battery power or a power supply for the iPad. iCloud backups are saved to your iCloud account meaning you’ll also need enough iCloud storage — the exact amount varies depending on what content is on the iPad. If you don’t have enough iCloud storage you can purchase more for a relatively low cost.
How to Make an iCloud Backup
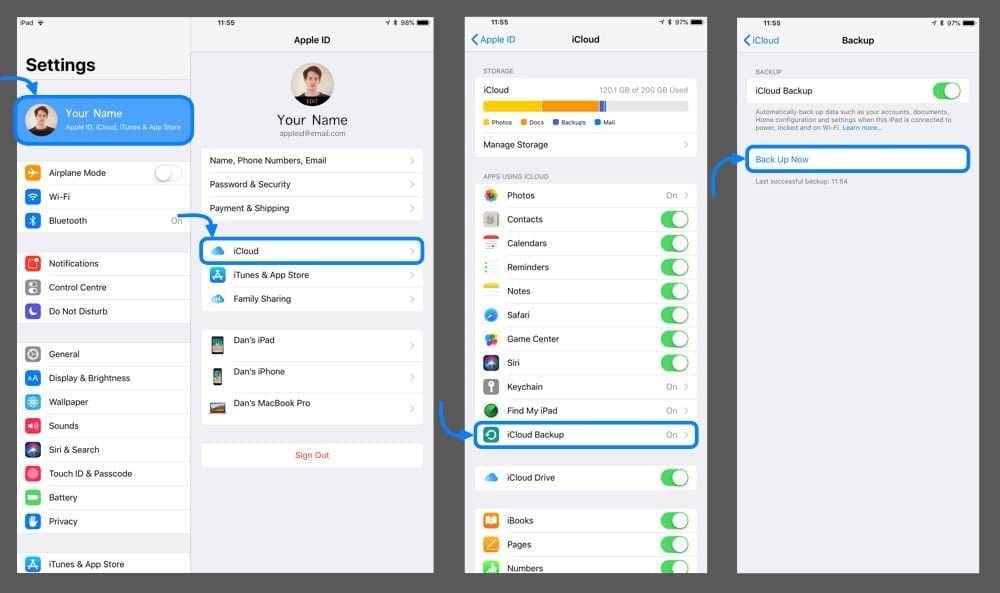
If plugged-in and connected to Wi-Fi, an iPad will automatically create iCloud backups overnight. However, you can also start a new backup anytime in the settings.
- Go to Settings > Your Name > iCloud
- Tap iCloud Backup > Back Up Now
- Stay connected to Wi-Fi until backup is complete
iTunes Backups
Making a backup on iTunes can be faster than iCloud and is a good option if you don’t have a Wi-Fi connection available. iTunes allows encrypted or unencrypted backups: encrypted backups require you to create an additional password but unencrypted backups don’t save your health or keychain information. When recovering an iTunes backup you’ll need access to the same computer the backup was made on.
What Is Needed to Make an iTunes Backup?
To complete an iTunes backup you’ll need a computer running the latest version of iTunes and enough free storage for your backup. You’ll also need a lightning or 30-pin cable depending on your iPad model. You won’t need an internet connection unless a software update is required for iTunes or the iPad.
How to Make an iTunes Backup
iTunes backups can only be created when the iPad is connected to the computer using the relevant cable.
- Open iTunes and connect the iPad to the computer
- Unlock the iPad and tap Trust This Computer
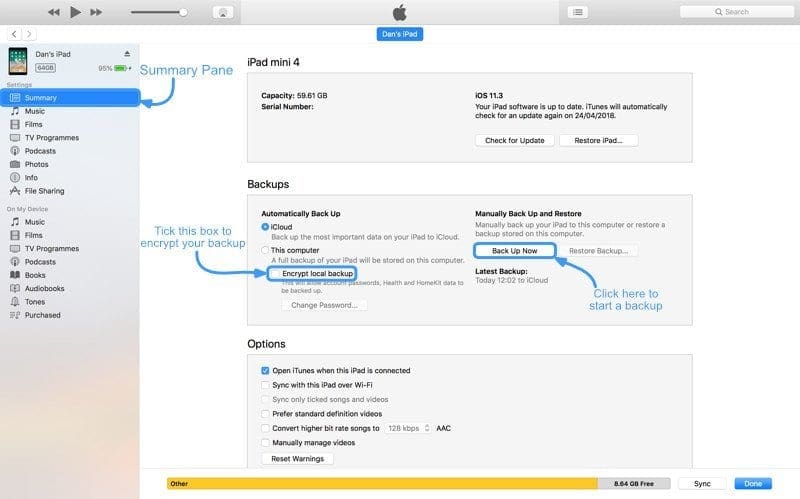
- Select the iPad when it appears in iTunes
- Open the Summary pane and choose whether to Encrypt iPad Backup [recommended]
- If encrypting, create a memorable password when prompted
- Click Back Up Now and keep iPad connected until the backup is complete

How to Restore an iPad
There are two ways to restore an iPad: using the device itself or using iTunes. Using the device itself is easiest as it simply requires tapping a button in the settings. However, an iTunes restore is useful if the iPad isn’t functioning correctly or is locked in a security state, such as Recovery Mode.
It is strongly recommended to make a backup of the iPad before starting the restore process — since doing so will erase all content from the device. See the previous section for details on making a backup.
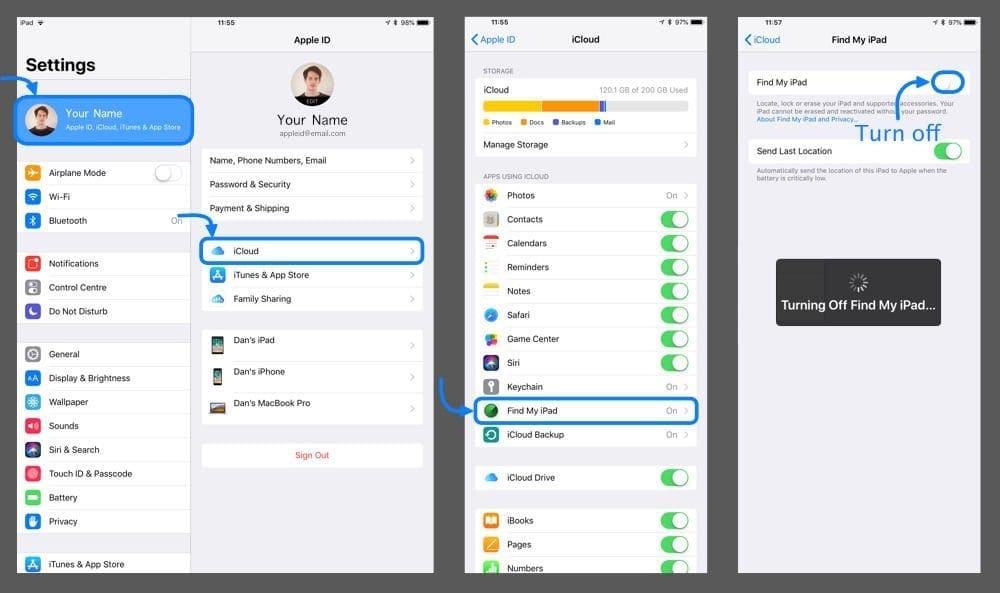
Turn off Find My iPad
Before restoring the iPad, you must ensure Find My iPad is turned off. This is done using your Apple ID password.
- Go to Settings > Your Name > iCloud > Find My iPad
- Tap to turn off Find My iPad
- Enter your Apple ID Password
If you don’t know your password, you can reset it here. If a someone else is signed in, you can request them to remove the device from their iCloud account. If none of the above options are possible, you will need to restore the iPad using Recovery Mode.
Restore Using the iPad
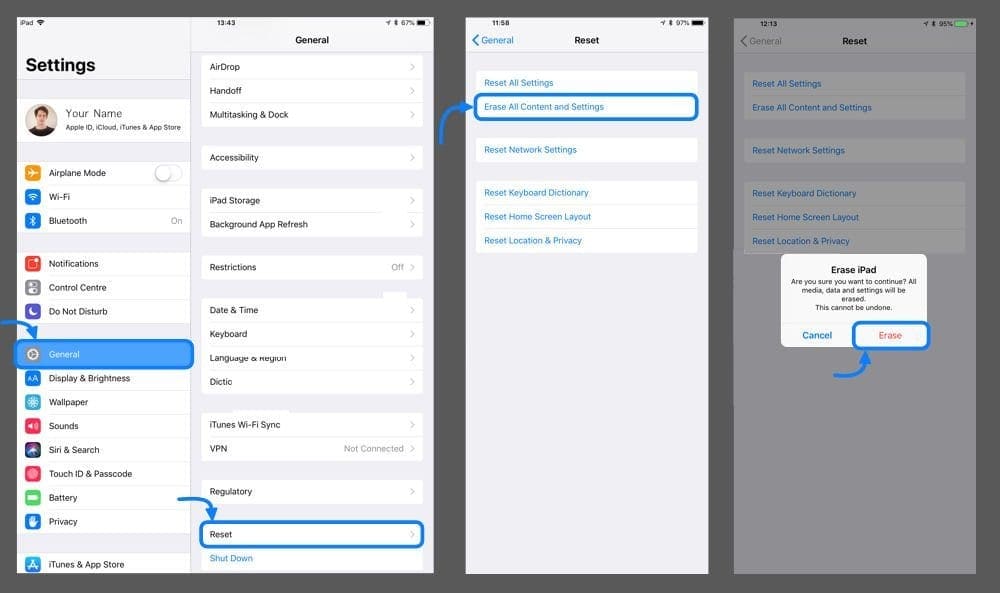
With Find My iPad turned off, the easiest method to restore an iPad is on the device itself.
- Go to Settings > General > Reset
- Tap Erase All Content and Settings
- Enter your Passcode or Apple ID password if prompted
- The iPad will restart when the restore is complete
Restore Using iTunes
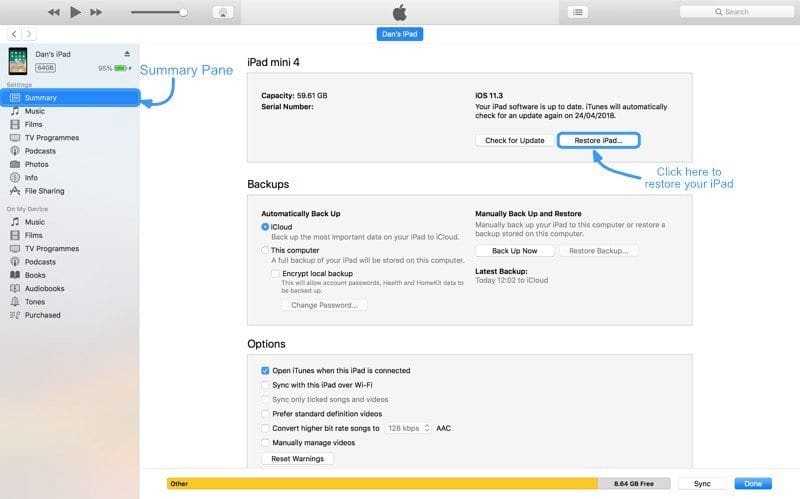
With Find My iPad turned off, you should also make sure that the computer is running the latest version of iTunes. You will need a lighting or 30-pin cable, depending on your iPad model, to connect it to the computer.
- Open iTunes and connect the iPad using the relevant cable
- If prompted, enter the iPad passcode and tap Trust This Computer
- Select the iPad icon when it appears in iTunes
- Under the Summary pane, click Restore iPad
- Confirm that you wish to Restore the device
- Keep the iPad connected until the restore is complete
If you are unable to unlock the iPad to Trust This Computer, you will need to restore the iPad using Recovery Mode.
Restore Using Recovery Mode
Recovery Mode is used when a restore cannot be completed. This could be for any of the following reasons:
- Passcode is lost or forgotten
- Device is disabled
- Restrictions passcode is lost or forgotten
- Find My iPad cannot be turned off
- Software is corrupted
Occasionally, placing an iPad in Recovery Mode makes it completely unusable until it has been restored. That means that the data on an iPad in Recovery Mode cannot be recovered if a backup was not already made. Follow the steps below to restore an iPad using Recovery Mode.
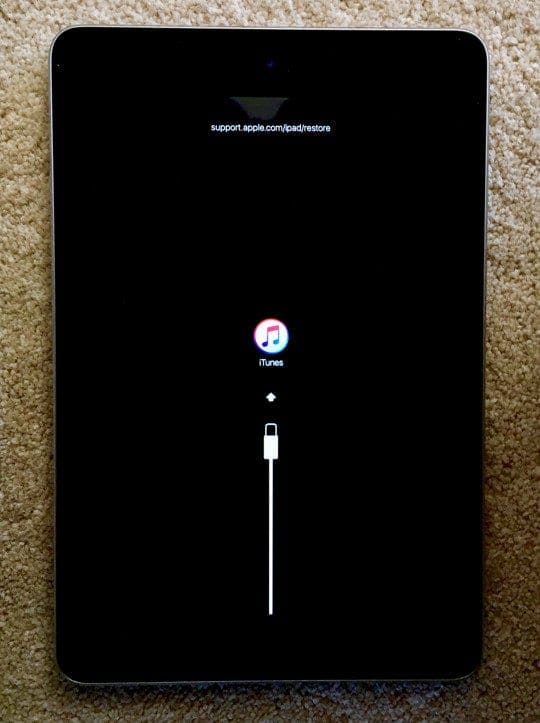
- Open iTunes and connect the iPad using the relevant cable
- Press and hold the Home and Power buttons at the same time
- Keep holding until an iTunes logo appears on the iPad
- On the computer, iTunes will present you with the options to Update or Restore
- Click Restore and allow time for the process to complete
- If it takes longer than 15 minutes, the iPad will restart and you will need to repeat from step 2
How to Recover a Backup
A restored iPad will have nothing on it, as though brand new. To get your data back you’ll need to recover a backup using iCloud or iTunes, depending on how the backup was made.
Recover an iCloud Backup
To recover an iCloud backup you will need a reliable Wi-Fi connection.
- Swipe across from the Hello screen
- Follow the onscreen prompts until you reach Apps & Data
- Tap Restore from iCloud Backup
- Enter your Apple ID details
- Select the appropriate backup (based on size and date)
- Follow the prompts to complete a software update if required
- Stay connected to Wi-Fi until recovery is complete
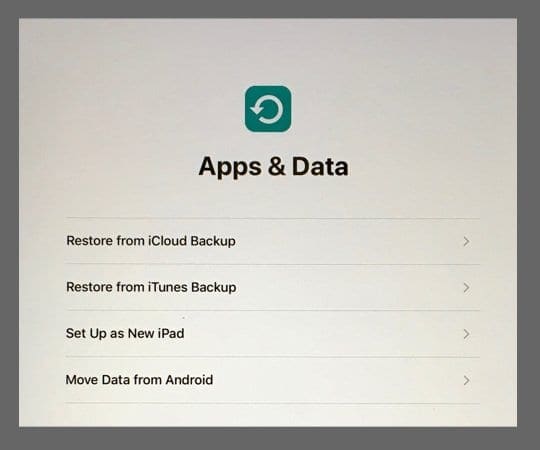
If a software update was required but could not be completed, return to the Apps & Data page and choose to Set Up as New iPad. Once the iPad is set up you can complete a software update in the settings. You can then restore the device again and recover the backup.
You may need to enter Apple ID passwords to authorize apps and purchases. If you do not know the passwords tap Skip this Step, allowing you to sign in later. The apps and purchases will be unavailable until the password is entered.
iCloud backup recovery can take anywhere from five minutes to several hours depending on backup size and internet speed. Once initial recovery is complete the iPad will restart and be available for use. Additional content such as apps, photos, and music will continue to download in the background whenever the iPad is connected to Wi-Fi.
Recover an iTunes Backup
To recover a backup using iTunes you need to connect to the computer the backup was made on.
- Open iTunes and connect the iPad using the relevant cable
- If prompted, enter the iPad passcode and tap Trust This Computer
- Select the iPad icon when it appears in iTunes
- In the summary panel, click Restore Backup…
- Select an appropriate backup (based on size and date)
- Click Restore and enter the encryption password if required
- Enter your Apple ID details if prompted
- Keep the iPad connected until recovery is complete
If a software update was required but could not be completed, follow the onscreen prompts to Set Up as New iPad. Once the iPad is set up you can complete a software update in settings. You can then restore the device again and recover the backup.
Ensure the iPad stays connected for the duration of the recovery. Once completed, the iPad will restart and can be ejected from iTunes. It may continue to download media such as apps, photos, and music in the background whenever connected to Wi-Fi. You may also be required to enter Apple ID passwords to authorize apps and purchases.
Troubleshooting
Common Backup Problems
Not Enough Storage
Whether using iCloud or iTunes, you cannot complete a backup without sufficient storage. If this is the case you can either increase your available storage, by purchasing more or deleting existing files or delete content from your iPad to minimize the backup size. The worst culprits are usually photos and videos.
Backup Is Taking Too Long
A slow backup could be due to an unreliable connection — whether Wi-Fi to iCloud or USB to iTunes. However, if you have a lot of content it may just take a long time to complete the backup. You can reduce this by deleting large content from your iPad, but it may not be worth it.
Can’t Make a Backup
If the iPad is not working, disabled, or in recovery mode then you may find that you’re unable to make a backup. If this is the case, try both iCloud and iTunes backups to make sure. If you have made a relatively recent backup, it is still possible to recover from that. Alternatively, you may want to seek out a data recovery specialist — although it can be pricey.
Common Restore Problems
Can’t Turn Off Find My iPad
If you don’t know your Apple ID password to turn off Find My iPad, you can reset it here. If someone else is signed in, you can request them to remove the iPad from the iCloud devices. If those options aren’t available to you, it is still possible to restore the iPad by using Recovery Mode and a computer running iTunes.
Unknown Passcode or Disabled iPad
If the passcode is unknown or the iPad is disabled, you can still restore the device using Recovery Mode. Doing so requires the use of a computer running iTunes.
Restrictions Are Turned On
When restrictions are turned on they may get in the way of a restore. If you know the restrictions passcode, you can turn them off in Settings > General > Restrictions. Otherwise, you will need to restore the iPad using Recovery Mode and a computer running iTunes.
Don’t Have a Computer
Without a computer, the only option is to complete a restore the iPad itself. If that isn’t possible you will need to borrow a computer or book a visit to an Apple Service Provider.
Common Recovery Problems
Backup Is Unavailable
You may not be able to see your backup if the iPad requires a software update. In this circumstance, you should Set Up as New iPad to complete a software update and then restore the device again. If you still can’t find the backup, ensure that you are using the same iCloud account or computer login that the original backup was made with.
Multiple Apple ID Passwords
During the recovery process, you may be prompted to enter multiple Apple ID passwords. Each of these is to authorize an app or purchase in the backup — they may have been purchased by a different account. If you don’t know the password you can choose to Skip this Step, but the relevant media won’t be available until the password is entered at a later stage.
Incomplete Backup Recovery
Once the initial backup recovery has completed the iPad will restart and be available for use. At this point, you may find it’s still missing media such as apps, photos, or music. This media takes a long time to recover and will continue downloading in the background whenever the iPad is connected to Wi-Fi.
FAQ
What’s the Difference Between a Restore, a Reset, and a Reboot?
These terms are frequently used interchangeably to mean the same thing. For this article, we’ve simplified the matter by sticking to the below definitions.
Restore: the process of erasing all content and settings on a device to restore it to its factory default.
Reset: the process of returning settings to their default state, without affecting content.
Reboot: the act of turning off and on a device, without affecting settings or content.
Recover: the act of using a backup to put your content back on a device. Also known as restoring from a backup.
Should I Use iTunes to Restore My iPad?
The simplest method is to restore the iPad using the device itself. However, on occasion that is not possible due to problems with the iPad or the lack of an Apple ID password. In such cases, iTunes is the only route for a restore.
Can I Restore My iPad if I Don’t Have a Computer?
Yes, you can restore the iPad using the device itself. However, if the iPad is disabled, restricted, locked with Find My iPad, or stuck in Recovery Mode then you will need a computer running iTunes. If you don’t own on, consider borrowing a computer from a friend, going to a public library, or visiting an Apple Service Provider.
P.S. Be very careful what personal data you leave on public computers!
What Is Recovery Mode?
Recovery Mode is when the iPad shows a blank screen with an iTunes logo. The device cannot be used until it is connected to iTunes and restored. Recovery Mode is often used to resolve software or security issues with the device since it prohibits access to personal data on the iPad.
Will I Lose All My Content if I Restore My iPad?
Restoring an iPad erases everything from the device, including photos, messages, apps, and settings. Without a backup, all of this could be lost. However, if you use iCloud some data is saved live to your account, such as:
- Contacts
- Calendars
- Reminders
- Notes
- My Photo Stream and iCloud Photo Library
Should I Use iCloud or iTunes to Make a Backup?
iCloud is the most convenient option provided you have reliable Wi-Fi and plenty of iCloud storage. Backups are made automatically and available to you everywhere. With iTunes, you can only make or recover a backup when connected to the same computer. If that computer is lost or damaged you will lose your backup with it.
What Is Not Saved in an iCloud Backup?
For security and privacy purposes iCloud backups don’t include Apple Pay or Touch ID data.
Additionally, to reduce the backup size, iCloud backups don’t include content that is available elsewhere. However, the device will automatically start to download these items once backup recovery is complete. They include:
- iCloud Account Content (Contacts, Calendars, Reminders, Notes)
- iCloud Photo Library and iCloud Music Library
- iTunes and App Store Content
- Third-Party Cloud Content (Dropbox, Google Drive, etc.)
What Is Not Saved in an iTunes Backup?
For security and privacy purposes iTunes backups don’t include Apple Pay or Touch ID data.
If unencrypted, an iTunes backup also won’t include Health, Activity, or Keychain data.
What If I Need a Software Update?
During the recovery process, the iPad may require a software update to proceed. In this circumstance, you should Set Up as New iPad and complete a software update in the settings. Once complete, restore the device again.
What if My WiFi Is Too Slow?
When a Wi-Fi connection is poor to complete a backup, recovery, or software update, you will be limited to using iTunes.
What If I Don’t Know the Apple ID Password?
An iPad cannot be restored if Find My iPad is turned on. If your Apple ID password is forgotten or lost you can reset it here. Otherwise, you will need to complete a restore using Recovery Mode.
What if I Don’t Know the Encryption Password?
Without the encryption password, it is impossible to recover an encrypted iTunes backup.