The Contacts App for iOS has come a long way since the introduction of iPhone. What started as a simple contact list feature on the iPhone has evolved into the backbone of smart communication on an iDevice and a Mac.
Ever since the introduction of Siri, Contacts continues to get dressed up with additional bells and whistles to make life easier. Here are seven simple tips to make the most out of your iPhone contacts.
Related Articles
- iPhone Favorite Contacts Not Working? Fixes
- Apple Watch Not Importing or Syncing Contacts? Fix for Good!
- Transfer Contacts from iPhone to Android
Contents
- 1 Tip # 1 Help Siri Out with your iPhone Contacts
- 2 Tip # 2 Set up ‘Read Receipts’ for Selected Contacts
- 3 Tip # 3 Recovering Missing Contacts after an iOS Update
- 4 Tip # 4 Use Related Names for Defining Relationships in Contacts
- 5 Tip # 5 Customize Your Favorite Contacts on Your iPhone into Widgets
- 6 Tip # 6 Set up Emergency Bypass for critical contacts in Do-Not-Disturb
- 7 Tip # 7 Third Party Apps to the Rescue
- 8 Final Word
Tip # 1 Help Siri Out with your iPhone Contacts
Siri is maturing with every iOS release and now it works with your Mac as well as your Apple Watch. Sometimes, Siri just needs a little nudge to work more efficiently on your behalf. “Nicknames” are a great feature on your contact cards. Assign a nickname to a contact and Siri knows exactly how to reach that contact. Getting Siri to call your “Doctor” or “Dentist” ’s office is as easy when you designate that nickname in the contact list.
Let’s get started:
Step – 1 Tap on the Contacts tab in your Phone App. Next, tap on a name to add more information and press “Edit” on the top corner.
Step – 2 Scroll down and choose “Add Field” and tap. This section is towards the bottom of the screen.
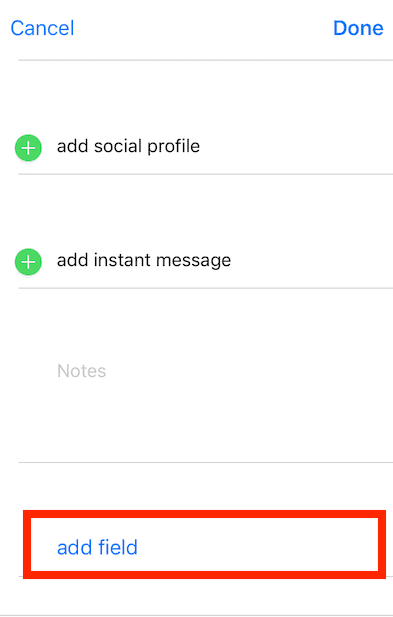
Step – 3 On the Edit field selections screen, you can add as much information as you like to make the contact feature more intelligent. For our example, we add a Nickname so that Siri quickly picks it up.
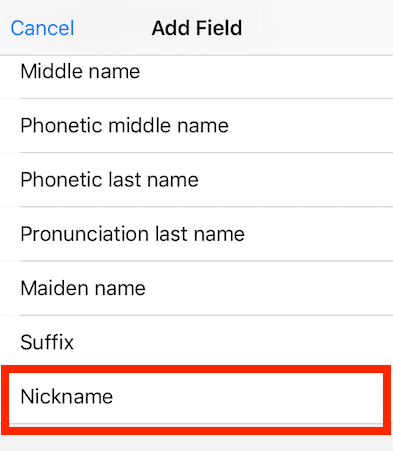
Step – 4 Assign the Nickname and tap done. Start up Siri and test “Siri Call Lawyer’s office please.”
Step – 5 With your contacts synced via iCloud, Activate Siri on your Mac and try “Siri Set up an appointment with Lawyer for Next Tuesday”
Tip # 2 Set up ‘Read Receipts’ for Selected Contacts
With iOS 10, you set up selective read receipts for your messages. iOS 10 lets you decide who sees if you’ve read their messages. By default, read receipts are turned off, but if you’d like to send them, you enable them for specific contacts. You do not have to enable this feature for all your contacts.
To enable read receipts in iOS 10
- Open the iMessages app and open up a message
- Tap the “i” icon in the top-right corner to bring up Message options for that contact
- Hit the Send Read Receipts option to turn them on for that contact. This action enables the feature for just this contact
Tip # 3 Recovering Missing Contacts after an iOS Update
This is a very annoying problem that happens to many people following an iOS update. Your update goes through but you find that your contacts are missing or duplicated etc. on the list. The best course of action is to use your iCloud and reload the contacts back into your device.
To restore your contacts back into your iPhone or iPad
a) Tap on Settings > followed by iCloud
b) Turn ON the contacts field. If it s set to ON, toggle it back to OFF and then ON. Delete Existing Contacts on the iPhone when asked as you are using iCloud to re-load your contacts. You can also Merge contacts if asked.
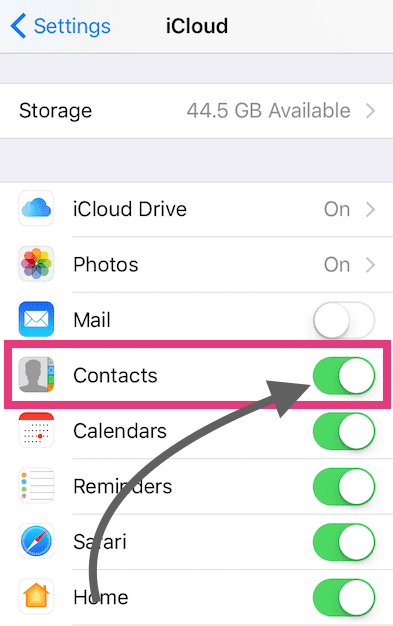
c) This takes a little bit of time to reload your contacts. Please tap on your Contacts app and check if your contacts are all back on your iPhone.
Tip # 4 Use Related Names for Defining Relationships in Contacts
Siri Call My Mom… is very easy if you set up the contacts with appropriate tags. In Tip 1, we showed you how to use the Nicknames field.
You use the Nickname field for contacts that are not your relatives such as your dentist or your doctor. Use the ‘Related Name’ feature to call your relatives such as your dad, mom, sister, etc.
- To set up the Related Name, go to your contacts and find yourself in the contact list
- Tap edit in the top right corner. Scroll down and choose ‘Add Related Name.’
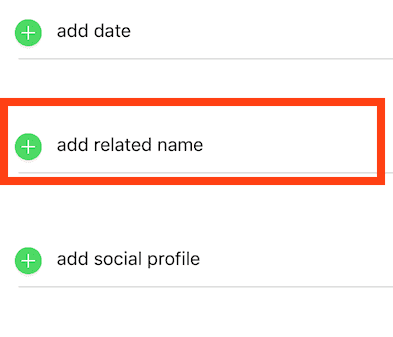
- Tap on the red dash, and you decide the type of relationship from the list available. Even create custom labels by scrolling down here all the way to the bottom and choosing ‘Add a custom label.’
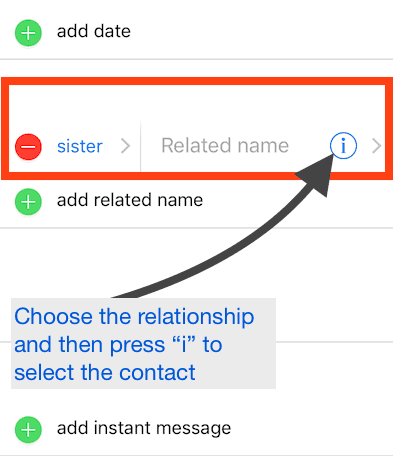
- Once you have defined the relationship, tap on the ‘i’ button and choose the contact from your list identifying the relationship.
- Tap on ‘Done’ on top right corner, and you have set up the Related name feature
So next time, with Siri on, just say “Siri, Call My Sister, ” and Siri does the rest!
Tip # 5 Customize Your Favorite Contacts on Your iPhone into Widgets
Between the new widgets app and a snappier interface, iOS 10 provides you with various options to customize your favorite contacts on your iPhone.
- Tap on Phone > Favorites
- Tap on the ‘+’ button on the left side of the screen
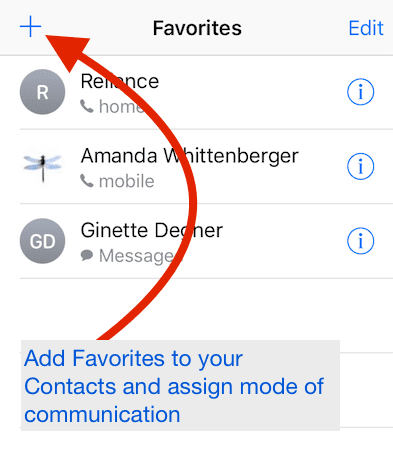
- Search for the contact from your list and then add it to your favorites
- You can customize here between Mail, Call, Message as your options for the contact so that your preferred mode of communication for that contact is saved into your favorites
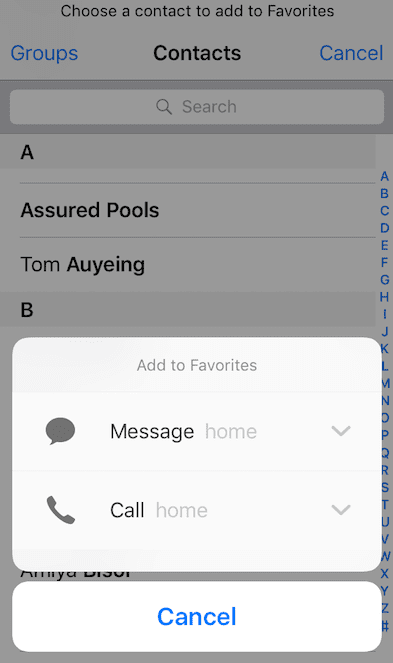
- You can change the default number/mail shown for your contact by tapping on the small down arrow on the right of message, call, mail and choose another number stored for the contact
- Tapping Edit on the top right corner will allow you to add/edit/re-prioritize a contact in your favorite list
Add to Widgets Screen
iOS 10 also lets you add your favorite contacts into your Widget screen so that you can access them easily from your lock screen. Head on over to your widgets screen and scroll down to the bottom and tap on ‘Edit.’ Scroll down and choose the favorites widget from the widget list. Click Done and exit.

This favorite widget allows you to access the top 4 favorite contacts directly from the Favorites widget on your lock screen.
Tip # 6 Set up Emergency Bypass for critical contacts in Do-Not-Disturb
In iOS 10, when you set up the Do-Not-Disturb mode on your iPhone, you also have the choice of setting up the emergency bypass details. This lets your contacts reach you when there is an emergency. This feature definitely affords peace of mind to millions of parents who like to switch on their iPhone to Do-Not-Distrub mode in the night but want to make sure that they are reachable by their kids, parents, and family members in the case of an emergency.
To Set this feature, Tap on the Phone app and open up the contacts
- Select the contact that you want to allow to reach you in the case of an emergency.
- Tap on the ‘Edit’ button in the top right corner for the shown contact
- Choose ‘Ringtone’ and set it up so that you can hear the ringer even in DND mode
- Tap on ‘Emergency Bypass’ and switch it to ON for this contact
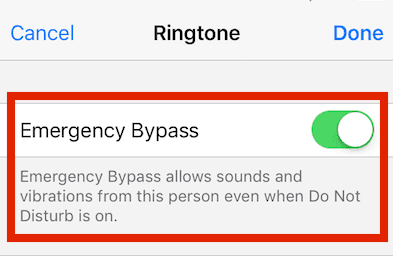
That’s it! You can rest with peace of mind knowing that your favorite contacts can reach you even when you turn on your Do-Not-Disturb mode on your iPhone in the case of emergencies.
Tip # 7 Third Party Apps to the Rescue
iOS 10 Contact features are pretty intuitive, well integrated and work well for the most part. There are however times when taking advantage of some third party apps helps to get the best out of your iPhone experience. That’s true especially if you have a large number of contacts from various apps includGmailmail, Exchange, etc.
With these third-party apps, this is the potential in creating duplicate contacts on your contact list. One of the apps out there that provide excellent contact management options is Full Contact. This free app provides you the ability to discover contacts from various sources and merge them in a smart way. The App also allows you to add social media details for your contacts, helpful for many users.
Final Word
We hope that you found some of these refresher tips useful in making the best out of your iPhone contacts. We would love to hear from you if you would like to share some of your favorite tips that make your iPhone use very productive and easy.