Some readers experienced problems related to Wi-Fi Not Working with macOS Sierra after upgrading their Macbook. Their Wi-fi on their Mac and Macbook either stops working completely or slows down considerably. If your wi-fi connection is showing issues following the upgrade to macOS Sierra, please check out the steps below to help resolve this issue. Using the Finder App and reseting some of the network related files gets you all squared up.

Please make sure that you are in fact using a Macbook or Mac that is compatible with macOS Sierra by visiting Apple’s compatibility guidelines.
5 Steps to Fix macOS Sierra Wi-Fi Issues
Step – 1 Close All Your Apps on your Macbook and Turn off Wi-Fi. You can turn off your Wi-Fi by clicking on the Wi-fi icon on the top right hand corner and choosing ‘Turn Wi-fi Off’.
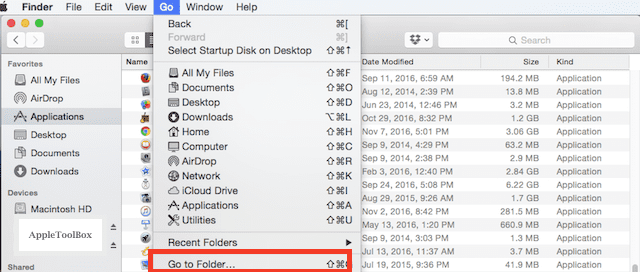
Step – 2 Open your Finder app. Click on Go and choose ‘Go To folder’ from the drop down.

Step – 3 Type ‘/Library/Preferences/SystemConfiguration/’ and click Go

Step – 4 This action will take you to the SystemConfiguration folder, which will list a few files. Once in this folder, choose the following files and drag them to your trash.
Preferences.plistcom.apple.wifi.message-tracer.plistNetworkInterfaces.plistcom.apple.airport.preferences.plist
Step – 4 Once You have moved the above plist files to trash, reboot your wi-fi router. You can also disconnect the power from the router unit, wait for 5 minutes and then plug it back on. Reboot your Macbook or Mac.
Step – 5 Turn on your Wi-fi on Your Mac and check out your connection. With this simple reset, things should go back to normal.
If you were experiencing a slow Wi-fi connection after the update to macOS Sierra, you should test out your speed. Use a free service like Fast.com to check out the speed both before and after the fix. And go ahead and verify that you now get the baseline speed. If your wi-fi connection is working but you are still having speed issues, you may want to check out the DNS Settings on your wi-fi and test out by changing it to 8.8.8.8 or OpenDNS setting. Click on > System Preferences > Network. Choose your wi-fi from the left hand panel and click on Advanced. Next, click on DNS tab and make the changes.
If your speed increases after changing the DNS setting, your wi-fi issues are most likely related to your internet service provider and not your macOS Sierra update or your router. We are hopeful that resetting the plist files as illustrated in Steps 1 through 5 should fix your Wi-Fi issues.
if you are having other macOS Sierra related problems, please feel free to check out your detailed macOS Troubleshooting guide.