Ever try to read a long text or email on your phone, only to get cut short by your lock screen dimming? Maybe you’re at work, busy typing away on your computer with your phone sitting nearby, when a long text arrives. You want to read it but don’t want to interrupt what you’re doing by having to pick up the phone. You start reading but the darn thing won’t stay lit long enough for you to finish. Ugh!! Houston, we have iPhone display problems….

These iPhone display problems are an oldie but goodie! We periodically receive reader questions about how to adjust an iPhone’s, iPad’s, or other iDevice’s screen brightness, color, and so forth. So we thought, let’s get all these screen and display tips and tricks down once and for all!
Contents
Stay Bright and Long
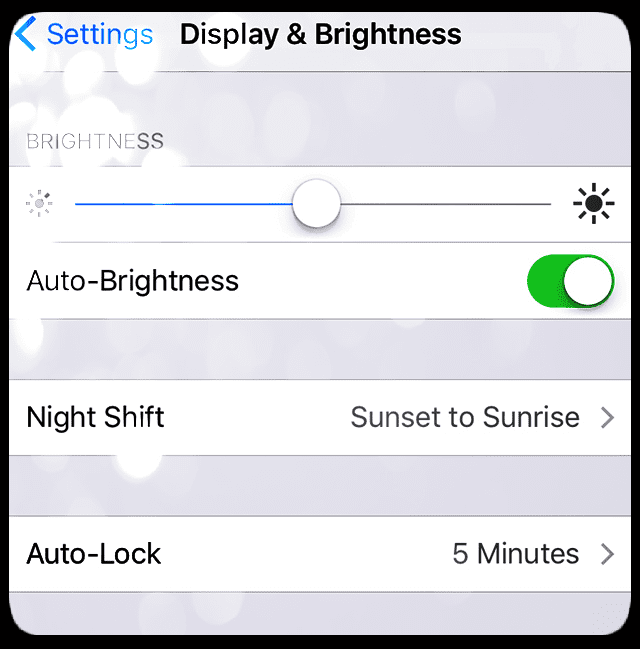
First, we get a lot of questions around screens going dark too fast and iFolks wanting to keep their iDevice displays lit longer. Luckily, this particular display problem is usually easy to correct. Go to Settings > Display & Brightness > Auto-Lock and set this to “Never.”
This setting programs how many minutes it takes for your screen to darken when you’re not actively using the iDevice. Be warned that changing this to Never does indeed reduce battery performance. So consider changing this to 5 minutes rather than Never. But if this screen on and off is really bothersome, then go for it and change it to Never. Just watch your battery. And remember to charge frequently.
A Strange But True Tip
One reader discovered an interesting solution when his new iPhone 7 Plus’s screen dimmed way too soon. Instead of setting auto-lock to Never, use your power button to save the day. Specifically, when your iPhone’s or other iDevice’s lock screen starts to activate (this is important–it should just start to dim,) hit the power button and your screen stays lit indefinitely.
Certainly, you need to stay mindful when discovering that sweet spot of auto-lock initiating and your screen dimming. But once you do, it rewards you with a lit screen for as long as you desire. All without any need of changing settings.
Don’t Dim With the Times
If you notice that your iPhone’s or other iDevice’s display changes or dims with your environment and the lighting available, chances are auto-brightness is set on. One thing many readers comment on is how bright the screen displays are in the Apple Store or other retailer. And when they bring their new device home, it just never looks the same.
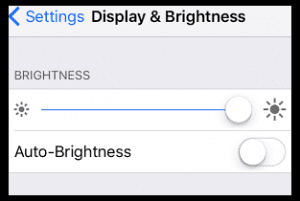
That’s because Apple Stores and other retailers ALWAYS keep screen brightness all the way up and never turn on auto-brightness. There’s no secret here, it’s easy to replicate. Head to Settings > Display&Brightness > Auto-Brightness and slide OFF.
Then adjust the brightness scale to your liking. Moving right increases brightness (towards large and bold icon) and moving left reduces it (towards small icon.)
Recalibrate your Auto-Brightness Setting
Ultimately, iOS’s auto-brightness option is on our side. It’s meant to save battery life and extend the time between charges. Sometimes, the light sensors that brighten and dim our iDevice’s screens get a little lost. The good news is that recalibrating these sensors is relatively simple.
First, go to Settings>Display&Brightness and toggle auto-brightness OFF. Once off, move into a dark room or place and drag the brightness slider all the way to the left and dimmest setting. Now, turn auto-brightness back ON. An immediate adjustment should happen. Next, go to a very bright place and see if your phone properly adjusts to the ambient light.
If you don’t notice a difference, try the reverse. Stay in the very bright place, turn OFF auto-brightness. Next, slide the brightness slider all the way to the right and brightest setting. Now turn auto-brightness back ON. Hopefully, your iDevice adjusts accordingly. Now, go to a dark room or place and see if your phone or other iDevice adjusts to the new light situation.
iPhone Display Problems: Yellow is NOT Mellow
Some of our readers report that their iDevices’ screens are yellow or warm toned. When they fire up their iPads and other iDevices, their wonderfully clean, brilliant, and bright white screen suddenly and disheartedly appears as a warm shade of yellow. Most of these particular iPhone display problems occur over time with use and normal wear and tear. However, some iPad Pro users describe this yellowing occurring immediately upon purchase and first time use.
How-To Check for Screen Yellowing
The easiest way to identify this problem is looking at the way whites are displayed. Open an Apple stock app that’s primarily white, like calendar, notes, or reminders and take a look at how white is represented. Does it look bluish or cool or warmish and yellow/orange?
If you or your family own multiple Apple iDevices, the easiest way to check is to open the same Apple stock app (calendar, notes, reminders, etc) and compare your iDevices side-by-side. Do they look the same or different?
One very basic reason our iDevices’ screen look different is that they are manufactured by different companies. So your iPhone screen isn’t necessarily made by the same company as your iPad screen. So color temperature variations are often due to different screen suppliers. Unfortunately, finding out what company created your iDevice screen is not as simple as you’d think. Currently Sharp, Samsung, and LG all create screens for iDevices.
It’s in the Glue
Unfortunately, these types of iDevices and iPhone display problems are nothing new. When Apple first introduced Retina screens to the iPad, many users complained about yellowish displays. Apparently a type of adhesive used to bond the many layers of screen glass together led to yellowish screens when not given sufficient time to dry in production.
In cases where the yellow tint is caused by adhesives, the problem goes away as the solvents in the adhesives evaporate by drying or heating up. So the theory here is that the longer you use the iDevice, the less yellow it becomes over time.
Tips For a Better Looking Screen
Some of us iFolks, me included, actually prefer warmer tones (yellowish or orangish.) I like the warmer screen color on my iPad Pro 12.9 for creating graphics, artwork, and watching movies. But there are plenty of users out there that truly detest these warmer tones and want their iDevices to retain that beautiful cool, clean, and bluish tonality.
Adjust your screen brightness
- Go to Settings > Display & Brightness
- Turn OFF Auto-Brightness
- Adjust Brightness Slider to your preference (Right for brighter and Left for dimmer)
- Greater brightnesses reduces battery life
- At 80% to 100% full screen brightness, screens tend to look more uniformly blue (cooler)
- At anything lower than 50% brightness, displays tend to appear tinged with yellows (warmer)
Turn True Tone and Night Shift On or Off
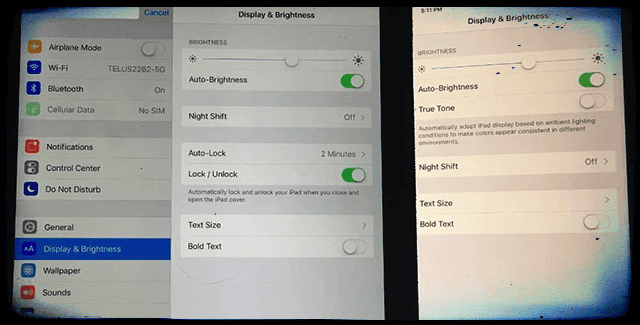
Introduced with the iPad Pro 9.7, the True Tone feature utilizes four ambient light sensors that measure light color and brightness to automatically adjust the display. True Tone adapts the color and intensity of your display to match the light in your environment, basically correcting your screen’s white point to acceptable ranges of white under any light source. True Tone intends to make your display act like paper, reflecting ambient light and taking on that color.

Adjust True Tone
- Go to Settings > Display & Brightness
- Toggle True Tone ON or OFF
Night Shift shifts the color temperature of your screen to a warmer tone at night after sunset, making the display easier on your eyes. You manually adjust how much warmer or cooler by using the Night Sift slider. Both True Tone and Night Shift change the color temperature of the display.
Adjust Night Shift
- Go to Settings > Display & Brightness
- Select Night Shift
- Slide Color Temperature between Less Warm and More Warm
Take Control Over Your iDevice’s Color Temperature
Okay, here’s our reality check on screens and displays. Currently, no device (yup, NO DEVICE) is capable of reproducing the full spectrum of colors visible to the human eye. Consequently, our screens and displays output only a subset of those visible to human colors. That range of reproducible color is known as the device’s color space or color gamut. Each new model of iPhone, iPad, and mac touts its color reproducibility, with each model reproducing a wider and wider color space. So when you hear Apple (and iFolks & iFans) promote things color accuracy, screen reflectance, peak brightness, contrast rating in ambient light, and color variation with viewing angle, they are talking about the sophisticated technologies of color reproduction.
Recently, Apple adopted what’s called Wide Color, available on products starting 2016 (iPhone 7, iPad Pro 9.7,MacBook Pro.) Wide color support allows more lush and vibrant greens and vivid reds that previous displays are unable to reproduce. This wide color technology displays more accurate reproductions of real world color in our photographs, videos, and other graphics.
But nothing comes easy. These technologies, including the new kids on the block True Tone and Wide Color, require a lot of hardware and software integration to work. And it’s this very same tech that gives us (users) the opportunity to make adjustments to our individual screens and create a customizable display experiences.
Fix Yellow With iOS Color Filters
Starting with iOS 10, we finally have some advanced color temperature controls. So if you get that yellow tint on your iPad, iPhone, or other iDevice and you’re not feeling very mellow about it, it’s now adjustable! So now you manually calibrate your screen color to your liking.
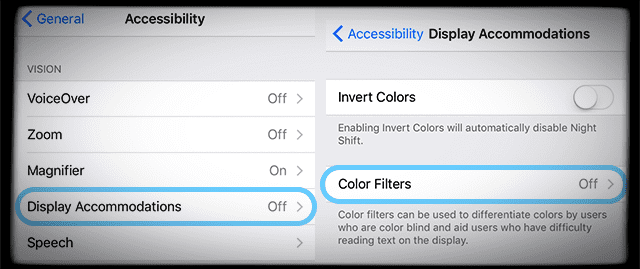
This handy feature is a bit hidden. Apple consider this feature a display accommodation, so they’ve placed it inside Accessibility. Apple designed Color Filters to help differentiate between colors for iFolks with color blindness or other vision challenges. But it works for all of us and fixes your screen’s color display issues, particularly a yellow or warm toned screen (or vise-versa–a blue toned screen.) Though somewhat obscure, this feature is very sophisticated and makes minor to major color adjustments to your screen. For quick access, set Color Filters as your Accessibility Shortcut, so a triple click of the home button brings it up.
Adjust Your Screen with iOS Color Filters
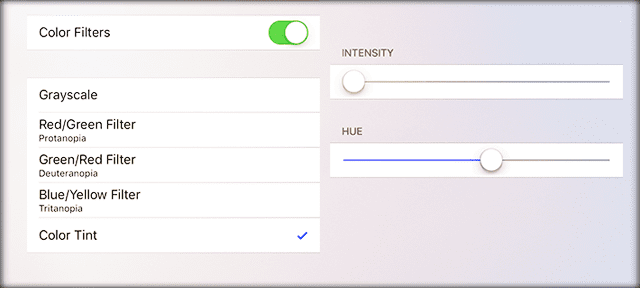
- General > Accessibility > Display Accommodations > Color Filters > Toggle Color Filters > Select Color Tint
- When you turn on Color Filters, there are four preset filters plus color tint to choose from
- Grayscale
- Red/Green for Protanopia Color Blindness
- Green/Red for Deuteranopia Color Blindness
- Blue/Yellow for Tritanopia Color Blindness
- Color Tint (this is the one we use)
To fix your iPad and iPhone display problems, choose Color Tint. Adjusting Color Tint changes the hue of the entire display on your iPhone, iPad or iPod Touch. Adjust both the Hue and the Intensity sliders to customize a color filter to fit your unique screen preference.
Finding the right color balance takes some time and patience. So experiment until you find that place that just seems “right” to you. For those wanting a cooler and bluer screen, manually adjusting Color Filters allows you to achieve that slightly bluer display seen at the Apple Store and on your other iDevices. This color calibration is a good option for iFolks unhappy with the yellow tint of their iPad Pros and other iDevice displays. Using Color Filters, our readers report that they successfully matched their iPad Pros and iPhone 7s to the coolness of their older iDevices.
Set Up Accessibility Shortcut
- General > Accessibility
- Scroll Down to Learning
- Select Accessibility Shortcut
- Tap Color Filters
Once you set-up Color Filters, quickly turn them on or off, just by triple-clicking the Home button on your iDevice.
Wrap-Up
It’s no fun getting an new iDevice and discovering that your screen is yellow, warm toned, or just doesn’t look right. Luckily, iOS 10 and above have tools tucked away inside Accessibility to customize the color and tone of our screens to what we uniquely prefer and enjoy. Adding Color Filters as an on-screen shortcut makes changing between screen display preferences easy–it’s all just a triple click of home away. As our iDevice screen continue to improve, we get increasing access to a wider range of colors, also called its color gamut. Consequently, our iDevices now accommodate our personal preferences for individual screen and display comfort, so each of us evaluates and adjusts screen tone (Color Tint) accordingly.
Technologies like True Tone automatically updates the display’s white point and color balance using real-time measurements of ambient light falling on the iDevice’s screen. Night Shift changes color balance to reduce the amount of blue light in accordance with some recent research indicating that a screen’s blue light affects how well we sleep.