So you, your child, your grandmother, friends, or any number of loved ones upgraded to the latest version of iOS and all of the sudden it’s asking for a six-digit (or in some cases a four digit) security code to unlock the iPhone or another iDevice.
But you never even had a six-digit security iPhone passcode, and now you just cannot get past this screen. Or maybe you followed a “set it and forget it” strategy the last time you updated your iDevice. And now, after this recent update, your iPhone or other iDevice is bricked!
If you or your loved one never had an iPhone passcode, forgot the passcode, entered the wrong passcode six times in a row, or for any number of other reasons find yourself locked out with your iDevice disabled, there are a couple of things to try before we hit the recovery and restore options.
If your device is asking for a Screen Time passcode that you never set-up or don’t remember, please check out this article on Screen Time passcodes.
Contents
Quick Tips 
Follow These Quick Tips To Help When Your iPhone Asks for a Passcode You Don’t Know or Can’t Remember
- Try entering the default settings of 1234 or 123456
- Restore your device to a backup before the device asked for the passcode
- Use iTunes Recovery Mode
Related Articles
- Forgot iPhone or iPad Passcode? How To Reset It!
- How-To Reset Apple Watch Passcode
- Reset Your Screen Time Passcode
Never Set-Up an iPhone Passcode, Try This First!
If you never set-up a passcode, some readers report that typing in “1234” for a four-digit passcode request or “123456” for a six-digit passcode request worked for them. So try this out first–it just may work for you!
Apparently, the restriction code is set by the latest iOS update. When asked, enter in restriction code 123456 for six digit requests and 1234 for four-digit requests–it appears these are the default settings.
Then make sure you reset the iPhone passcode to something else and take note of that passcode. A reader reported that she tried this on two devices and it worked for her. We have not been able to verify this, but it’s worth a try! 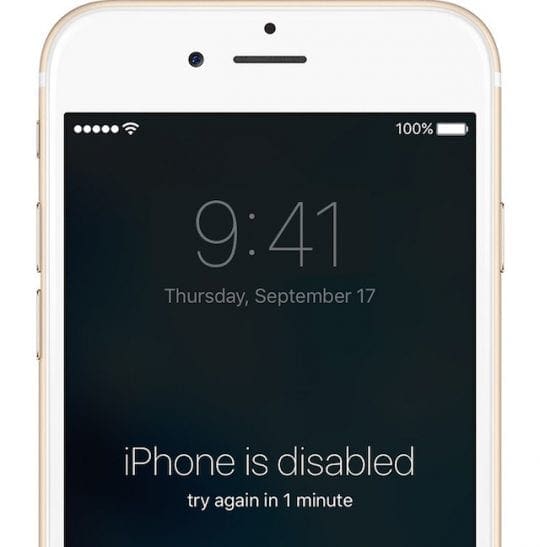
If Nothing Worked Thus Far
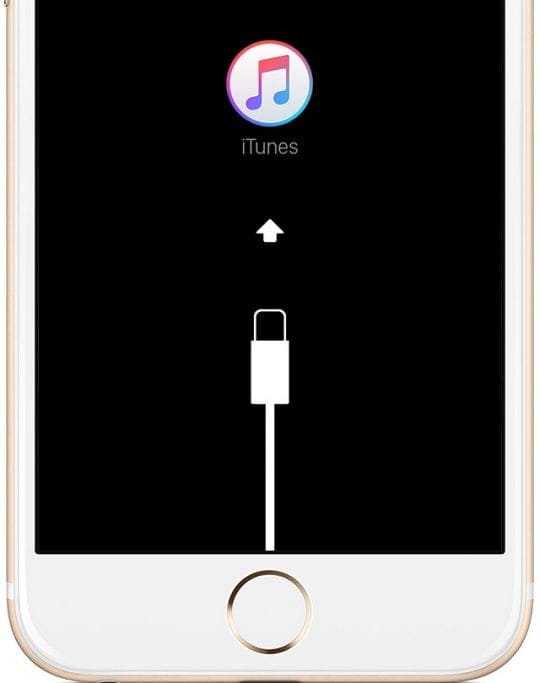
If you tried and failed, the only current way to salvage your iDevice is a full erase using iOS Recovery Mode. I’m so sorry to report this news.
Is a Previous Backup is Available?
Hopefully, a backup was made via iTunes or iCloud before the update or forgotten passcode. If you have a backup, restore the iDevice using that backup on iTunes or iCloud. Once you restore your backup, make sure you set up a new six-digit iPhone passcode, so future updates go smoothly.
What if There is No Backup?
If you do not have a backup, you need to restore the iPhone as New to remove the iPhone security passcode. Sadly, at this point, there isn’t any way to save your iDevice’s data, including photos, videos, texts, and other personal files.
At this stage, when you erase your device, the process deletes all of your data and settings. When you see the options to restore as New or from a backup, be sure to choose New. And make sure you set up a new six-digit iPhone passcode, so you don’t run into this problem on the next update.
Recover Your iDevice
First, you need to erase your iDevice. How you erase depends on where your backup (if applicable) is located.
Before you begin, locate your backup. Please refer to these articles if you need assistance locating your backups.
Locate iDevice Backups
- How to Find iTunes Backup on Windows & Mac
- How to restore iOS devices from older (archived) iTunes backups
Recover With iTunes
If you synced and backed up with iTunes OR if you do not have a backup available before the update or forgotten passcode, use iTunes’ recovery mode.
Using iTunes
- Disconnect your iDevice to your computer
- Restart your device to recovery mode
- iPad with Face ID, iPhone X or later, and iPhone 8 and iPhone 8 Plus: Press and hold the Side/Top button and one of the volume buttons until the power off slider appears. Drag the slider to turn off your device. Connect your device to your computer while holding the Side button. Keep holding the Side button until you see the recovery mode screen.
- iPhone 7 and iPhone 7 Plus: Press and hold the Side button until the power off slider appears. Drag the slider to turn off your device. Connect your device to your computer while holding the Volume down button. Keep holding the Volume down button until you see the recovery mode screen.
- iPhone 6s or earlier, iPod touch, or iPad with Home button: Press and hold the Side (or Top) button until the power off slider appears. Drag the slider to turn off your device. Connect your device to your computer while holding the Home button. Keep holding the Home button until you see the recovery mode screen.
- Don’t let go when you see the Apple logo and keep holding until you see the recovery mode screen
- Now connect your device to iTunes
- Wait for iTunes to “see” your device
- In iTunes on your computer, look for an on-screen message to Restore or Update, choose Restore

- iTunes downloads the software for your device
- If it takes more than 15 minutes, your device exits recovery mode, and you need to repeat steps 2-6
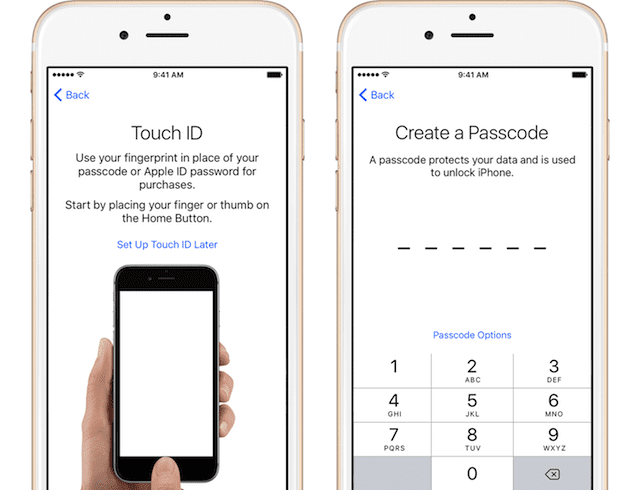
- Once finished, set-up initiates with the “Hello” screen
- Follow the on-screen instructions
- Make sure you set-up a six-digit passcode
- Write this down to remember
- Once the passcode is set-up, restore your data from your iTunes backup or iCloud backup
- Make sure to choose a backup made before the update or forgotten passcode
- If no backup is available, set-up as NEW

Once you set up your iDevice as new, you then sync your iPhone back to your iTunes and app store accounts. Linking to these places back all your iTunes and Apple purchased music, apps, videos and any other content synced with iTunes.
Any content that you stored only on the iDevice and did not sync with iTunes or iCloud is lost during this process.
Take note that this is a long process and may even take a couple of hours or more to complete. Yes, it’s painful, but it is also necessary to prevent someone else from working around the security settings–like if you lost your iPhone.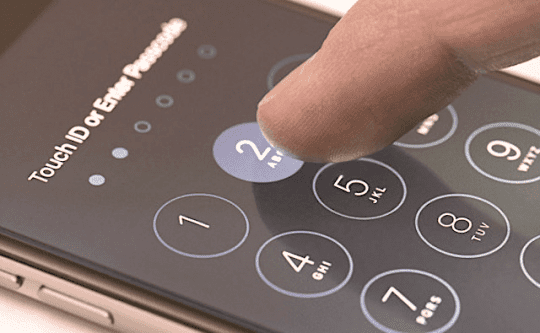
After your restore is complete, set up your new six-digit iPhone passcode along with Touch ID or Face ID, and make a note of the passcode to avoid this situation in the future.
Recover with iCloud
If signed into iCloud and Find My iPhone is ON, use iCloud. Make sure you are connected to a WiFi (preferred) or cellular network.
Using iCloud
- From another iDevice or computer, go to icloud.com/find
- Learn how to sign onto icloud.com from an iPad or iPhone
- Sign in with your Apple ID and password
- Click Find iPhone
- Select the iDevice you want to erase
- Click Erase to erase that iDevice and its passcode
- Once finished, set-up initiates with the “Hello” screen
- Follow the on-screen instructions
- Make sure you set-up a six-digit passcode
- Write this down to remember
- Once the passcode is set-up, restore your data from your iCloud backup
- Make sure to choose a backup made before the update or forgotten passcode
- If no backup is available, set-up as NEW
Check out this article for more information on restoring your iDevices via iCloud.
Once you set up your iDevice as new, you then sync your iPhone back to your iTunes and app store accounts. Linking to these places back all your iTunes and Apple purchased music, apps, videos and any other content synced with iTunes. Any content that you stored only on the iDevice and did not sync with iTunes or iCloud is lost during this process.
Take note that this is a long process and may even take a couple of hours or more to complete. Yes, it’s painful, but it is also necessary to prevent someone else from working around the security settings–like if you lost your iPhone.
After your restore is complete, set up your new six-digit iPhone passcode. And make a note of this passcode to avoid this situation in the future.
Nothing Works, Now What???
If none of these options work or are available to you, try recovering in DFU Mode—this must be done via iTunes. Check out our comprehensive article on DFU and Recovery Mode.
Always Remember to Backup
We really hope a backup was available, so you didn’t lose any of your data and precious personal information, photos, texts, videos, etc. If you are one of the unlucky few who did not have a backup available or a suitable backup made before the update or forgotten passcode, please remember to always backup. Turning on iCloud is the easiest way, requiring no work just an internet connection and power.
For more information on how to backup and where check out our comprehensive article on backing up all your iOS data!
Turning Passcode On AND OFF
Okay, you know that we really, really recommend having your passcode ON. Remember that your passcode is on your iDevice to help protect your data. But just in case, for whatever reason, you need to turn your passcode off, here’s how you do it.
Passcode OFF
- Go to Settings > Touch ID / Face ID & Passcode
- On devices without Touch ID/Face ID, go to Settings > Passcode
- Enter your passcode if requested
- Scroll down to “Turn Passcode Off” and Tap
- A message confirms appears confirming your request to turn passcode lock off
- Tap “Turn Off”
- Enter your passcode to verify the request
Once your passcode is off, when you press the Home Button to unlock your iPhone, the lock screen no longer asks you to enter in your passcode before unlocking your iDevice.
If Turn Off Passcode is Greyed Out
Check if you have a profile in effect that requires a passcode. Look under Settings > General > Profile 
If there’s a profile you don’t need or use anymore, then delete it. You need to enter your passcode several more times. After doing these steps, you should find Turn Passcode Off is no longer greyed out.
You still need a passcode for the following:
- Turn on or restart your iDevice
- Update iOS
- Erase your iDevice
- View or change passcode settings
- Install iOS Configuration profiles
Change Passcode
Changing your passcode is also easy.
- Go to Settings > Touch ID / Face ID & Passcode
- On devices without Touch ID/Face ID, go to Settings > Passcode
- Enter your passcode if requested and then scroll down to Change Passcode
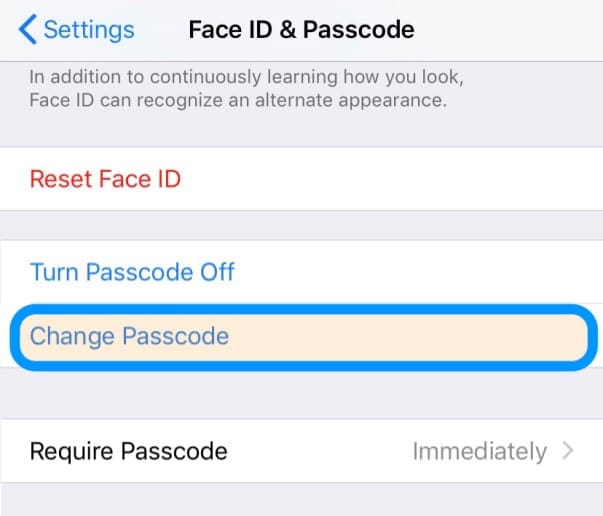
it’s easy to change your iPhone or iPad passcode in Settings - Enter your old passcode and then enter a new six-digit passcode.
- Or tap Passcode Options to switch to a four-digit numeric code, a custom numeric code, or a custom alphanumeric code.
If an alert says to change your passcode or you can’t adjust your passcode settings
Configuration profiles and email accounts using Microsoft Exchange often have passcode policies that cause issues such as:
- You can’t turn off your passcode
- Your passcode settings are unavailable, gray, or dimmed
- You see an alert about a Passcode Requirement.
- For example, you see a message that you must change your iPhone unlock passcode within 60 minutes
For these common Microsoft Exchange problems contact your company’s IT administrator for help.
If you don’t use a configuration profile or Microsoft Exchange account or if your device is personally owned, make sure you update your iDevice to the latest iOS.
And if that doesn’t solve your problems, it’s time to call Apple Support or visit a nearby Apple Store for assistance.
A Final Word
There are a number of reasons why you choose to turn your iDevice’s passcode OFF. Say, for example, the iDevice is your (very young) child’s iPad or maybe your elderly father or grandfather’s iPhone–and it’s just plain easier not to have a passcode getting in the way.
We understand that there are times when turning the passcode off just makes the most sense based on use, efficiency, and perhaps a bit of your sanity!
Passcodes are there to help protect data and protect who is actually using the iDevice. If your device supports Touch ID/Face ID, try this out and see if your child, parent, grandparent, or whoever can comfortably use Touch ID/Face ID.
If not, before you consider turning passcode off, make sure any personal and private information such as credit and debit card numbers, saved passwords for Safari, and any other important data is removed from the iDevice.

Another option is to lock your iDevice into Kids Mode. This allows your children (or anyone else in the family) access to a single app (like a game, Netflix, or a reading app.)
You could also turn on Restrictions or if using iOS 12 and above, use Screen Time to set up restrictions and limits.
So your loved one still gets the experience, and you get peace of mind that your personal data and credit card information is protected. It’s a win-win especially for those of us with toddlers (personal experience here folks!)