If there was one item that a lot of messaging fans were waiting upon during WWDC, it was the ability to use iMessage across diverse platforms.
That didn’t quite happen although Apple showcased a few neat VOIP features during the conference that will let you integrate your WhatsApp contacts and Skype contacts into your iMessage so that you can call them easily. These integration features will be made available via the phonekit feature hopefully in the upcoming iOS 10 releases.
For those of us that use MacBook for our communication, you can still use WhatsApp on your MacBook. With end-to-end encryption now made available for WhatsApp, it is a good and safe tool to consider.
The idea behind the end-to-end encryption is simple: when you send a message, the only person who can read it is the person or group chat that you send that message to. No one can see inside that message. Not cybercriminals. Not hackers. End-to-end encryption helps make communication via WhatsApp private – sort of like a face-to-face conversation.
Earlier, you could only use the web version of WhatsApp on your Mac using a non-Apple browser, but now you can download the app onto your MacBook and get started.
It is fairly easy to set this up on your MacBook with a few simple steps and get it working. The main caveat is that you should already be using WhatsApp on your phone otherwise this will not work. You will also need OS X 10.9 and higher on your MacBook.
Step – 1. Go To WhatsApp.com/download and download the official WhatsApp software for your Mac. When you launch the software it will display a QR Code that needs to be used in step-2.
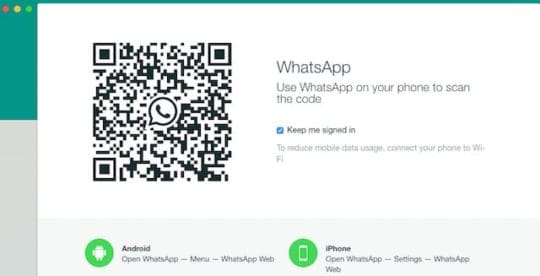
Step – 2. Next, open WhatsApp on your iPhone and go to settings. Tap on WhatsApp Web and use the camera to scan the QR code that you see on your Mac. WhatsApp will immediately log you into its messaging service once the QR code is validated.
Step – 3. Remember to keep your iPhone handy and close by as the Mac app is essentially using the phone app for using WhatsApp.
Step – 4. You can compose a message just like you would in iMessage and also attach media files. When you click the paperclip icon, you will see three icons. The top icon is there for sending photos, the midde icon allows you to take a photo with the MacBook camera and the bottom one is for sending a document.
On your MacBook, you can also access your WhatsApp profile settings and keep it up to date.
Although it is really simple to use the messaging service on your MacBook, it is handicapped in that it requires your iPhone to be set up and be available in order to use WhatsApp.
In spite of this limitation, those of us who use their MacBook on a day-to-day basis can take advantage of this feature since the messaging interface of WhatsApp on the Mac is really simple and it is easy to type as opposed to switching back and forth between your iPhone and Mac.
The messaging features such as emojis, links etc that you have access to on your iPhone are also available to you on your MacBook. If you are used to using this app on your iPhone you will find the Mac features very familiar.
So Go ahead and give it a try and let us know what you think!