Imagine you are filling out a form or application online or via an app. You need a copy, so you have a record of what you wrote. But the site/app doesn’t offer a way for you to save the form or send it to your inbox. What can you do?
Maybe you want to share your latest creation or score from your favorite iPhone or iPad game (like Minecraft!). Perhaps you want to screen capture for posterity that message that melted your heart, surprised you when you least expected or destroyed your world.
Or for times when your iDevice is just plain buggy, and you need screenshots to prove to the genius bar (and your friends) that yes, this really did happen.
For all these reasons (and more), we find capturing screenshots is an excellent option to save that moment in time and all the information that moment holds.
But if you find that you are one of those people like me that manage to get Siri instead of capturing a screenshot when pressing the Sleep/Wake and Home buttons together, this article is an answer for you.
Contents
Related Articles
- How To Use macOS Or OS X Grab Utility To Take Awesome Screenshots!
- Change The Default Folder for Screenshots on Macs
- When Using 3D Touch on Your iPhone Makes Sense: 12 Tips
Using Just One Hand?
Maybe you only have one hand free to take a screenshot, or you simply want a one-tap method to capture screenshots, the good news is Apple is there to help. Using the AssistiveTouch function allows a one-handed opportunity! 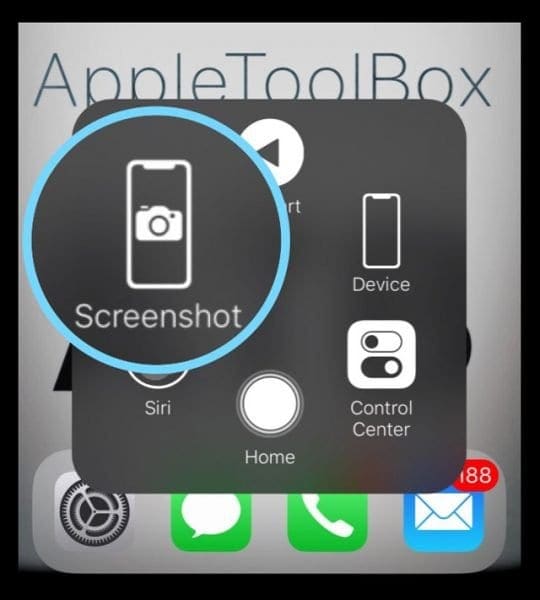
Assistive Touch has been around since iOS5, created to allow people who may be at a physical disadvantage an automated replica for the quick gesturing needed to use an iPhone/iPad. AssistiveTouch once set up, gives users quick access to specific commands via an overlay menu that follows you screen to screen.
We will take advantage of AssistiveTouch to give us access to quick and easy screenshots on all our iDevices.
First, you will need to perform a one-time set-up so that you can use this function on demand.
So let’s get to it!
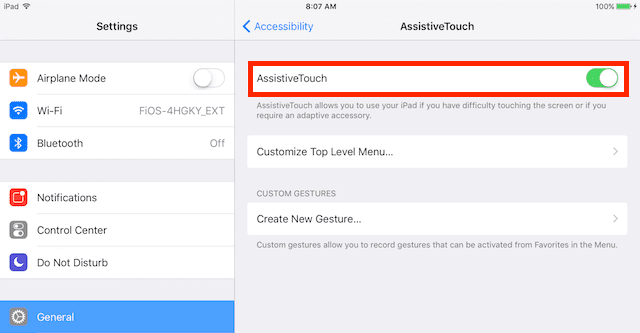
To Set-Up AssistiveTouch Screenshots Settings
- Go to Settings
- Tap General
- Select Accessibility
- Tap Assistive Touch and Toggle it ON by sliding to the RIGHT
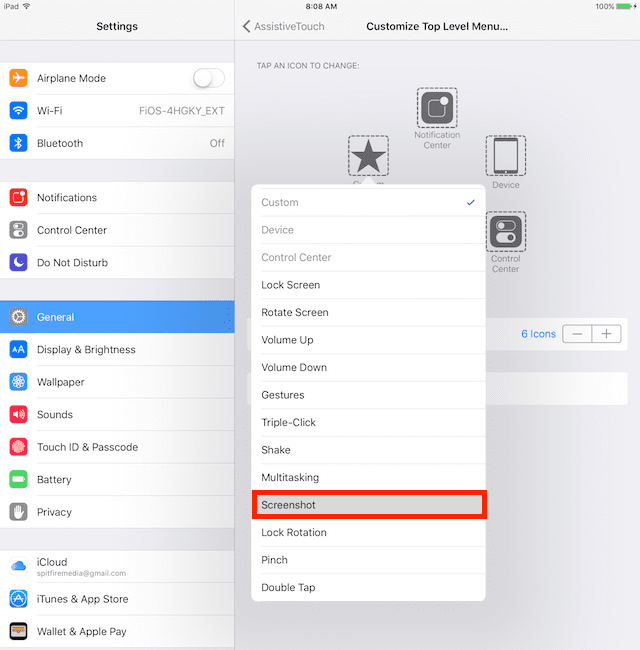
- Choose Customize Top Level Menu
- Tap the Custom Icon
- Choose Screenshot from the menu
- You should now see a small gray circular icon on the lower right side of your screen (you can move that icon to any part of the screen by press and drag)
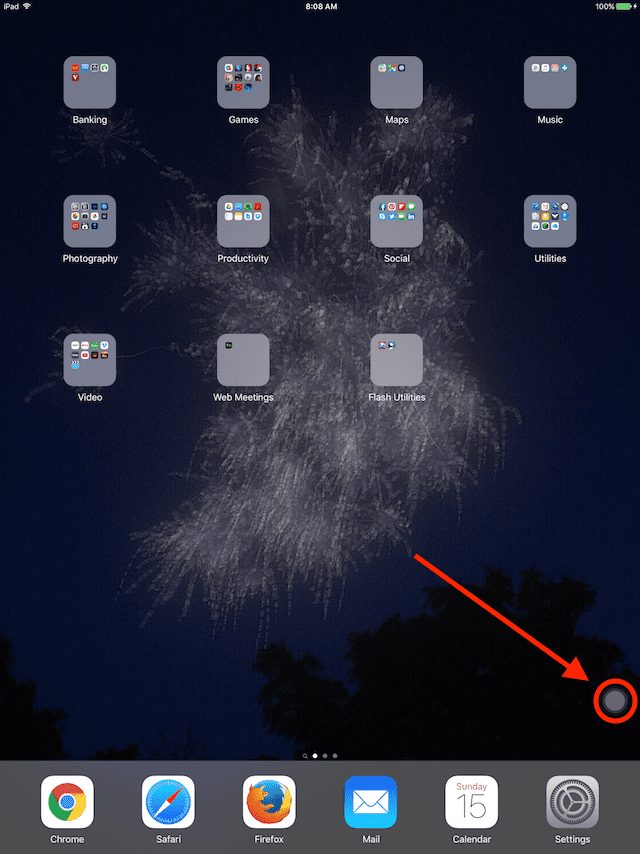
Now you are all set-up to take as many screenshots as you desire with just one hand.
Taking Screenshots Using Assistive Touch
- Tap AssistiveTouch Icon
- Tap Screenshot
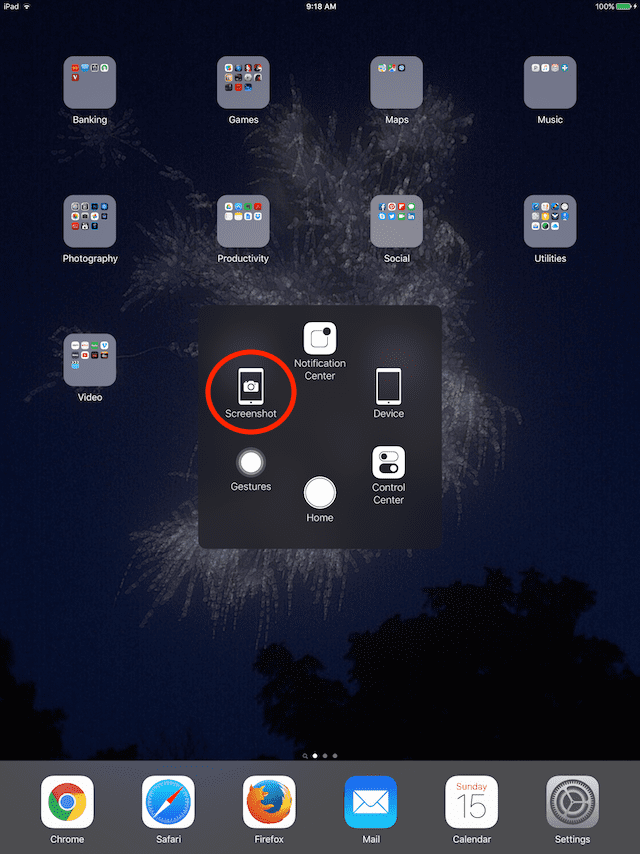
- The screen flashes white and makes a camera shutter sound
- That screenshot is saved to your Screenshots album on the Photos app (this album is auto-created; all your screenshots are added to this automatically)
 Need Screenshot Alternatives?
Apple includes some custom actions within AssistiveTouch to make things even easier
- Open Settings > General > Accessibility > AssistiveTouch
- Scroll to Custom Actions
- Select a quick action from the available options like Single-Tap, Double-Tap, Long Press, or 3D Touch
- Set at least one of them to Screenshot for even more convenience
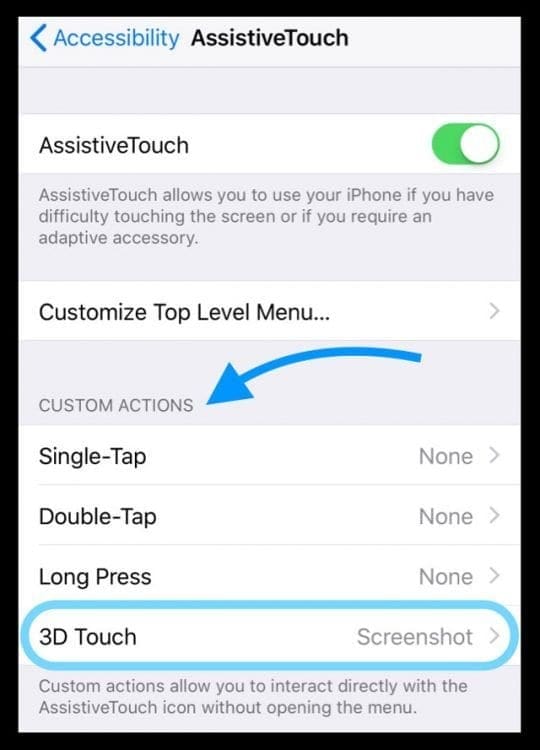
- Whenever you want to take a screenshot, just perform your quick action on the AssitiveTouch button itself
Want to Get Rid of the AssistiveTouch On-Screen Button?
If you find that the Assistive Touch icon takes up too much room on your screen or if it merely annoys you after awhile, you have a couple of options.
The simplest option is to toggle AssistiveTouch off through the Accessibility Menu (General > Accessibility > AssistiveTouch > Off.) This results in it being permanently off your screen until you turn it back on.
Set Assistive Touch as Your Accessibility Shortcut
Another option is to set AssistiveTouch as a toggle so you can turn it on or off at will by using the Triple-Click Home Button or Triple-Click the Side Button option for your Accessibility Shortcut.
How to Toggle Assistive Touch On/Off
- Go to Settings
- Select General
- Tap Accessibility
- Scroll Down to Accessibility Shortcut
- Choose Accessibility Shortcut
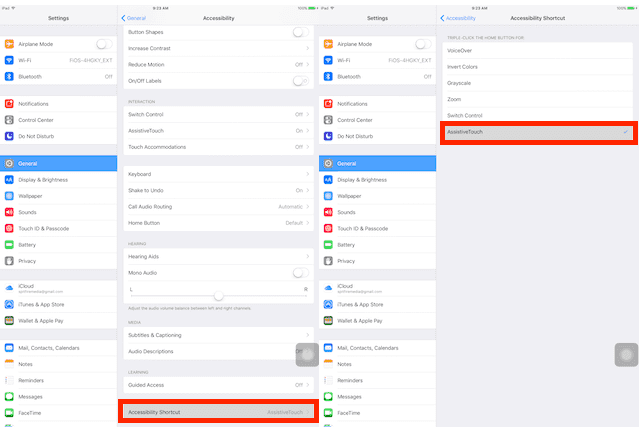
- Select Assistive Touch from the menu option
- That it! You should now be able to toggle Assistive Touch at will by rapidly clicking the Home button 3 times
AssistiveTouch has a lot of Options!
AssistiveTouch also provides one-step access to a bunch of other functions (including HOME, SIRI, CONTROL CENTER, and VOLUME buttons among many others). The Assistive Touch feature allows you to access up to 8 of these functions via that on-screen icon.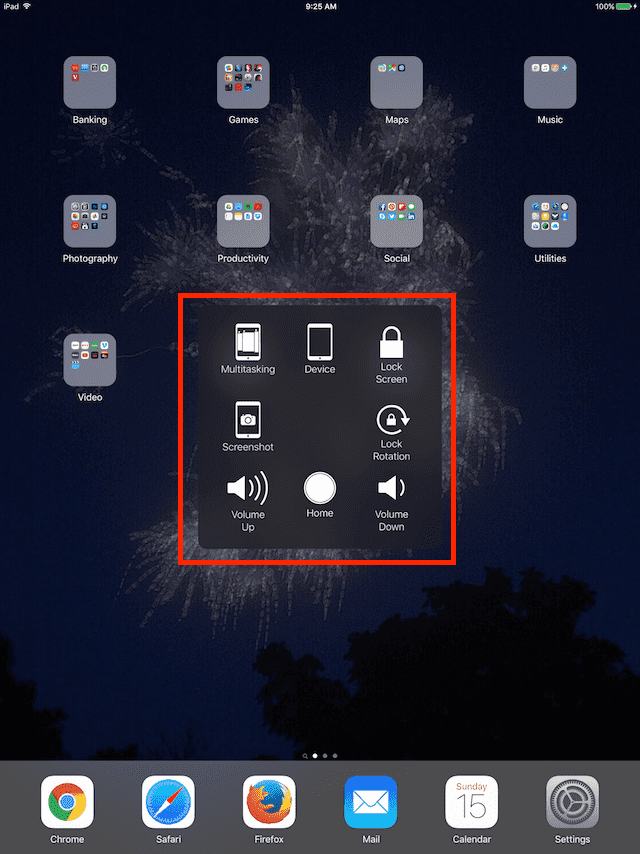
Assistive Touch for Users with Broken Hardware
For users with broken hardware such as volume or home button not working, AssistiveTouch is a phone-saver, allowing these users to take advantage of many iPhone/iPad features they lost when their hardware broke. These include functions like volume up/down, lock screen, lock rotation, and of course the home button.
For all of us iFolks with intact or broken hardware, we get to pick and choose which functions work best for us. Or we can just assign it one function (like Screenshot). This is all about customization, making our iDevice work best for us whatever our circumstances.
Since the inception of the iPhone and iPad, Apple has invested a lot of effort in developing and enhancing the features available through Accessibility. Apple’s commitment to accessibility is part of its DNA, apparently never looking at the return on investment but considering it “just and right.” Notably, the VoiceOver feature has proven itself very useful for people with impaired vision. Check out this heartwarming video story by James Rath on how these accessibility features improved his life:
Summary
At AppleToolBox, we love taking screenshots so using AssistiveTouch for capturing our iDevice screens is mighty handy. Using AssistiveTouch is an easy way to capture your iPhone/iPad’s screen and having the option to toggle it on/off maximizes screen space when needed.
There are always times when capturing our iPhone/iPad’s screen will save the day and that precious thing called INFORMATION. That’s why we at Apple ToolBox think screenshots are totally awesome. And luckily, it’s pretty darn easy to get a screenshot from your iDevice. In fact, it’s darn easy to get a screenshot from any device—iPhones, iPads, iMacs and even Androids and Windows. Screenshots are an excellent way for cross-platform communication. So let’s give this feature a try!
Final thoughts: If you found this article helpful, please share it with your iFolk friends and let us know if you have any comments or suggestions.