We have received quite a few comments from people in the iOS 9.3.1 articles, where they are experiencing issues with connecting to wi-fi on their iPhones and their iPads. From the comments, it appears that these issues with wi-fi connection are not co-related to a particular model of the device. Challenges described include not being able to connect to the wi-fi, wi-fi connection seems temporary as it drops off after a while and not being able to find the wi-fi connection at all on the device. Wi-Fi not working issue can be related to multiple factors but more often than not it can be easily fixed with a few common steps.
First thing first, we will try to isolate the problems and narrow down the issues. Check your wi-fi network with other devices that you have at home or work. Is the wi-fi problem related to only a specific Apple device running iOS 9.3.1 or is it happening with all the devices?
If you are experiencing the issue across multiple devices, this may indicate a problem in your router settings.
Reboot Router/Modem: Unplug from power for 2 minutes and plug again. Update Router Firmware (check manufacturer’s support website for a newer FW). Also try different bands (2.4 GHz and 5 GHz) and different bandwidths (20 MHz recommended for the 2.4 band). If your router comes with device prioritization feature, you may want to disable that feature. Chances are that by simply rebooting the router will fix the issue.
If you have isolated the problem to only the iPhone or iPad that is running iOS 9.3.1 and all your other devices are working well with your router, please proceed to this next step.
Test with Another Network: Take the iPhone or iPad over to a friend’s place and see if it can connect to the wi-fi. If your device is able to normally connect to the wi-fi and function well, then we can clearly rule out that what ever issues you are encountering are not related to iOS 9.3.1 upgrade. In order to fix this issue on the iPhone or iPad, try the Steps A and B when you get home and back to your wifi.
Please try the following steps :
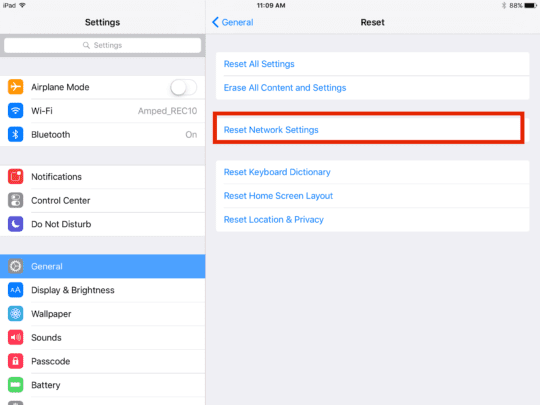
Step – 1 Reset your Network Settings on the device. go to Settings > General > Reset and Reset your Network Settings. Disable the wi-fi Assist function and then try to see if this solves your issue.
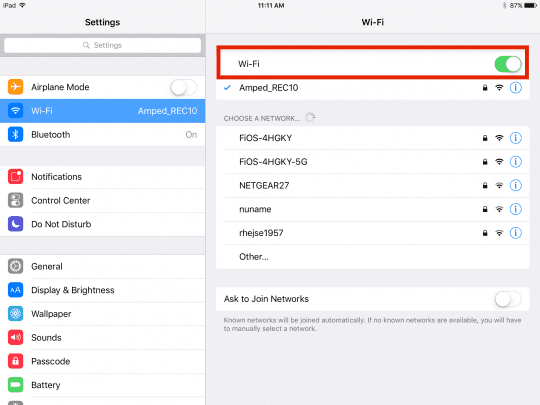
Step – 2 Please Tap on Settings >Wi-Fi. Ensure that your Wi-fi is “On”. Tap the Network you are having issues with. Tap on “Renew Lease” at the bottom. Check if this works for you. This will be helpful for those of you that are experiencing issues with dropped Wi-fi connection.
Renew Lease Setting

Step -3 If the steps above did not tackle the issue, Tap on Settings >Wi-fi > and choose the network that you are having issues with much like in prior step. Please tap on Forget This Network and confirm on the next screen. Before proceeding, Please note that you will be required to configure the network again on your iPhone or iPad, so you will need to know the wi-fi name and password. Once you have set up your network on iPhone try connecting to the wi-fi.
Step – 4 If you are still experiencing the wi-fi issues,
Perform a Forced Restart: Hold down the Home and Wake/Sleep buttons at the same time for about 15-20 seconds until the Apple logo appears. Allow device to restart. Once the device starts back again, Please try connecting to your wi-fi.
If you are experiencing the issue after the forced restart, please check to make sure that the DNS settings on your phone or iPad for the network are set properly. You can do this by Tapping on Settings > Wi-Fi > Click on the Network, Delete all numbers under DNS and enter 8.8.8.8 or alternatively 8.8.4.4. These are Google’s public DNS addresses and sometime help when your service provider’s servers are slow.
Step – 5 Try the following Sequence
- Turn on Airplane mode
- Turn on Do Not Disturb
- Power off your device for 5 minutes
- Power on your device and turn off Airplane mode and Do Not Disturb
Step – 6 If none of the above steps made a dent to fixing the problem, you may want to restore the device. in order to restore your device, please check Apple’s directions. For stubborn problems associated with your device following the upgrade to iOS 9.3.1, this may be the only way out before you decide to make an appointment at the Genius bar /Apple Store.
We have seen from the comments and feedback that for minor issues, Steps 1 and 2 go a long way in fixing the problem. When the problems are predominantly related to iOS upgrade issues on the device, then Steps 4 and 5 are most useful. Please feel free to check our guide on the common errors and associated fixes for iOS 9 problems.
Please let us know which step/s worked for you in the comments below and feel free to share the post with your tribe. Good luck!