OS X El Capitan is the twelfth major release of OS X for Mac computers. It was released on September 30, 2015. Some users have reported an issue where Mac refuses to finish booting after updating to OS X EL Capitan. If your Mac will not start up, stalls on a gray screen with an Apple logo, here is how you troubleshoot.

Contents
Fix Mac OS X El Capitan
Perform the steps below one-by-one until your problem resolves
- Press and hold the power button for a few seconds until your computer turns off, then release the power button. Wait a few seconds and then press the power button to turn on your computer.
- I previously wrote an article about how to fix Mac startup problems. Follow the tips in that article.
- Try starting up in Safe Mode. To do this, turn on your Mac, when you hear the start-up sound, press and hold the Shift key until you see the Apple logo. If your Mac can start up, the problem may be that your computer does not have enough space. Did you see any low disk space warnings before this problem? Your Mac should have at least 9 GB of free space. This article explains how to free up space on your Mac.
- Reset NVRAM: To do that, turn off your Mac, then turn on, when you hear the start-up sound, press and hold the Command-Option-P-R keys. Your computer will restart when you hear the second startup sound release the keys.
- Start-up in Recovery Mode by Restating or Powering Up and holding down both the Command (⌘) + R key combination immediately upon hearing the startup chime. Select Disk Utility and check your hard drive for errors.
- Restart in Recovery Mode and from the menu options, choose Reinstall OS X and click Continue. Reinstalling does not delete your files and settings.
This should solve most mac not booting issues. However, if you still experience problems, try some of the more advanced tips and reader suggestions listed below.
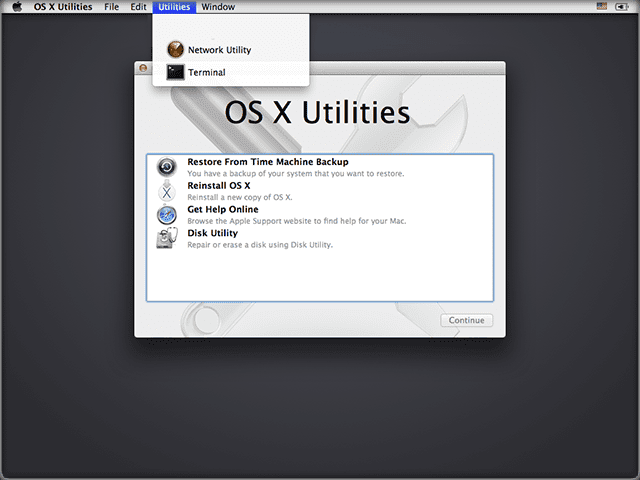
Use Terminal to fix the issue
- Open Terminal in /Applications/Utilities or Restart your mac in Recovery Mode and from the Utilities menu in the menu bar select Utilities > Terminal to open a terminal
- Enter “system_profiler SPExtensionsDataType > /Desktop/kextList.txt” without the quotes and hit return(this takes a while to run).
- There should now be a kextList.txt file on your desktop, open it and press both the “Apple(Command)” and “F” keys to bring up the find.
- In the find field insert “Obtained from: Not Signed” Copy the destination to the .kext file to a list for use later. (Click next to cycle through all of them.) Example: /System/Library/Extensions/JMicronATA.kext
- Browse your drive to /System/Library/Extensions and remove any of the unsigned kext files.
- Reboot and you should be all set.
Alternatively, some readers report success with Terminal using this command:
sudo rm -rf /System/Library/Extensions/EltimaAsync.kext
Once you paste that command into Terminal, you need to type in your admin password to process the command.
Disable FileVault
There’s speculation that FileVault (specifically, FileVault2 encryption) causes this particular problem. If your hard drive is encrypted via FileVault, you might try disabling FileVault using Terminal.

Restart your mac in Recovery Mode. From the Utilities menu in the menu bar select Utilities > Terminal to open a terminal. Type the following into Terminal:
sudo fdesetup disable
This disables FileVault. Be prepared as this process takes a few hours to decrypt your drive. So practice patience.
Reader Tips
- Thanks to Adam for submitting this tip. Many of us use our Mac and MacBooks for professional audio and video editing purposes. If you happen to use any of the AVID software on your machine
- Try Removing/Library/Audio/Plug-Ins/HAL/Avid CoreAudio.plugin/
OR
/Library/Audio/Plug-Ins/HAL/Digidesign CoreAudio.plugin/This was the cause of three of our computers not shutting down after the El Capitan upgrade. After removing the first shutdown will require “sudo shutdown -r now” from the terminal or press and hold the power button.
- Try Removing/Library/Audio/Plug-Ins/HAL/Avid CoreAudio.plugin/
- Another reader suggests adding the Option key ⌥ to Command ⌘ -R keys when entering Recovery Mode. This means pressing Command⌘+ Option⌥+R (using all three fingers pressed at the same time.) This brings up OS X Internet Recovery. And forces your Mac to download its originally installed OS from Apple’s Servers
- One reader provides a comprehensive fix for this particular issue.
- Shut down. Restart holding down SHIFT key. Release Keys when you see the apple logo. Login when requested. Your desktop should load. If it does not, shut down and repeat.
- When desktop loads, from Finder Menu, select Go and Go to Folder. Type /Library/ into the search bar. Locate the folders Caches, Cookies, Startup Assistants, Startup Daemons and move those to trash. Repeat this for your user files–from Finder Menu, select Go and Go to Folder. Type /Library/ into the search bar. Locate the folders Caches, Cookies, Startup Assistants, Startup Daemons and move those to trash. If you don’t see your Library, hold down the option key to reveal it.
- Now Shutdown and Restart holding down CMD+OPTION+P+R. Continue holding down until you hear two chimes. Login when requested. If all goes according to plan, your desktop should now load. If it does, empty your trash.
A Reader’s More Drastic Solution
This reader tip is pretty extreme, so perform it at your own risk. But if you need data that is on your mac AND don’t have it backed up elsewhere, this tip might be the best option if all else failed.
- Access your hard drive from target disk mode by holding T through the start up until you get the Target Disk Mode screen). This requires another mac and a FireWire, Thunderbolt 2, USB-C, or Thunderbolt 3 (USB-C) cable and ports. Turn off both macs and connect the two machine with a cable. Turn the good mac on before you turn on the bad machine. Once the bad mac starts up in Target Disk Mode, it appears as a disk icon on the desktop of the other good mac. Double-click the disk to open it and browse the files on that bad computer. Transfer your files by dragging them from the bad mac to the good mac.
- When completed, eject the bad mac disk by dragging its icon to the Trash
- The exit target disk mode by pressing and holding the power button on the bad mac (the one you just used as a disk.) Then disconnect the cable.
- Next, start up the bad mac in recovery mode by holding down both the Command (⌘) + R and use the disk utility to erase your disk. Make sure you select OS X journaled format. When erased, shut down.
- Now, start up in internet recovery mode (Command +Option + R) on restart. This allows you to re-install whatever version of OS X came installed on your computer when you purchased it
- Once the installation is complete, go to the App Store, select Purchased page, and download and install all your previously purchased apps. If some won’t install, call Apple and they should give you a code to redeem for a new version.
- Third-party apps require you to manually download. Check that you have all your product keys and other information for these applications.