While virtually everyone knows about Mac OS X’s easy-to-use basic applications, many people are unaware of one of its biggest assets: Automator. The application was introduced by Apple in 2005 as part of its Mac OS X 10.4 “Tiger” operating system, designed to bring a point-and-click interface to automating routine tasks. Whether it’s organizing files, putting pictures in certain albums, logging into certain areas of the operating system, or something else entirely, the various panels and controls within Automator can get it done in just a few seconds.
For those new to Mac OS X, or those simply new to how Automator works, this can be done by following a few simple steps. These steps will produce what is known in Mac OS X as a “workflow,” able to perform the same job identically each time.
Step 1: Open the Automator Application and Get Started
To begin creating a new Automator routine, open the Automator application by either browsing to it in the Finder’s “Applications” folder or performing a Spotlight search for the application.
As soon as Automator opens, it presents a dialog that allows users to pick the type of document they’re trying to create.

In this case, users will need to select the “workflow” option. This will create a simple script that performs a routine task. Other options, like creating an application or even a Mac OS X service, can be performed with Automator but will be covered in a different tutorial.
Selecting the option to create a workflow will eliminate the dialog box and reveal what is essentially a blank canvas full of available actions and procedures. This creates the starting ground for workflow creation.
Step 2: Determine What Needs to be Automated
Before getting into the actual creation of a workflow, it’s important for users to determine exactly what they want the workflow to do every time it’s invoked. For some people, this might consist of labeling iTunes songs with a year, genre, or artist name. For others, it might involve scaling photos up or down, and for still others, it might involve sending an email, adjusting a system setting, or some other routine task.
To get started, make a simple list of the desired action and its eventual outcomes. In this case, we’ll be creating an email with pre-selected recipients and a pre-written message that is sent automatically when the workflow is initiated. This is an excellent option for small business owners who regularly send email dispatches to clients in order to remind them of upcoming deadlines, payments due, or other information. Our step-by-step series of objectives would look something like the following example:
1. Open Mail.app
2. Create an email with pre-written content
3. Attach birthday-specific images
4. Send the content to contacts who are celebrating a birthday
This might seem rather advanced but, thanks to Automator’s pre-selected actions, it’s actually exceedingly easy to automatically help business contacts celebrate their birthday with a greeting from the company that uses an email template and includes a special promotion. With the goals listed at the outset, creating such a routine will be a breeze.
Step 3: Start Assembling the Routine Piece-by-Piece
Using the Automator sidebar, browse the library of pre-determined actions by selecting the “Mail” option (first choose the Workflow option).
This will reveal a list of available automation procedures already defined by Apple or other software developers for use with Automator. Those who have installed another email program, like Entourage or Outlook, will notice special actions for those applicants denoted by the app’s icon. In this case, we’re going to stick strictly to actions that work with Mail.app. For that reason, all actions selected should feature Apple’s Mail icon just to the left side of the label.
The first action that we’ll be selecting is labeled “New Mail Message” as of OS X 10.8 “Mountain Lion.”
This option will reveal what looks like a typical message composition form. Users will notice the typical fields used to address a message, as well as subject and body fields.
Since this message is going to be sent to contacts celebrating a birthday, on the day of their birthday, the action relies on the fact that each contact’s birthday has been defined in Contacts.app (Address Book). If it has been, add each contact with a defined birthday to the “BCC” field of the email. This will ensure that any messages sent to multiple contacts won’t sacrifice each contact’s email address privacy. It also ensures that the birthday email will only be sent to the selected contacts, which might be great for segmenting business and personal contacts as needed.
With the contacts listed in the “BCC” field, go ahead and write an email subject in the appropriate field. Leave the “Message” area blank, as this will be taken care of in a later step of the process. Select the account from which the message should be sent, ensuring that business mail is sent from a business email account and so on.
The routine can now be extended in new directions, including the addition of birthday greetings and a specific attachment. In the sidebar, click “Send Birthday Greetings” and drag it to the work area. This will add a new box with birthday-specific images and an area to write a message. Select a specific image, or request a random image for each recipient, and then write a birthday greeting in the box presented. Make sure the email contains a special promotional code or discount to celebrate the occasion.
Step 4 (Optional): Record Actions on Screen for More Advanced Automation
Astute observers of the Automator interface will notice a big “Record” button in the application’s toolbar. This is essentially a screen recording application that digs a bit deeper under the hood. When initiated, it will watch what the user does and replicate it in exact fashion as an Automator workflow. This is a great option if, in this example, the birthday template provided by Apple just didn’t cut it. What if the user wanted to attach an image of their own, with company branding themes and a bit more marketing-centric design?
That could be easily done by pressing record and then launching Mail. While recording is going on, users would compose a new message, create its birthday-themed content, attach birthday images, and then stop the recording. The birthday message would be adjusted accordingly, produced just like the screen recording tracked while the user made their customized email.
This also works really well for recording things like application filters, image resizing, PDF filtering, and a whole host of other tasks that might be more easily performed than dictated using drag-and-drop elements.
Step 5: Saving the Document and Running it When Needed
The workflow that was just created can generally be saved in one of two forms. If users elect to save it simply as a workflow, they’ll need to double-click its icon, open the workflow, and press the “Run” button each time they wish to perform its actions. In this case, those steps will be performed every time it’s someone’s birthday.
Another option is to save it as an application, eliminating the “Run” button from the equation entirely. If users elect to save the workflow as an app, double-clicking its icon and opening that application will perform all actions immediately and without further input.
In the case of something like a birthday email or a filtering task, it might actually be a great idea to save the workflow as an application and then add it as a startup item within System Preferences. This would run the application every time the computer starts up, automatically checking for the conditions specified in the workflow and performing the requested actions if necessary. With the document saved as either a workflow or an application, users are free to either create another automated task or simply enjoy the fruits of their labor. It couldn’t be easier to make Mac OS X perform a broad number of tasks in the background, all with minimal user input and often without any addition action required.
In conclusion, here is how you can easily create automated birthday greetings:
1. Set up your Address Book. Simple open Address Book and go to Preferences and click Template > Add Field and select Birthday.

Or you may also add a birthday to a specific contact. Simply, launch Address Book and go to a contact to which you’d like to add a birthday. Click the Card menu and choose Birthday from the Add Field option.
2. Open Automator, select Application and click Choose.

3. Click Contacts and Find People with Birthdays
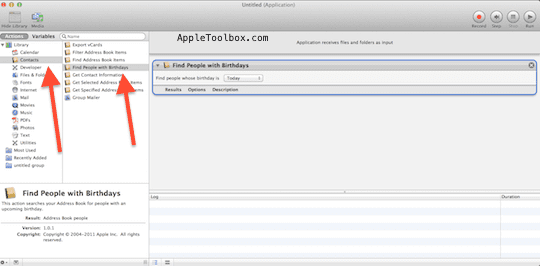
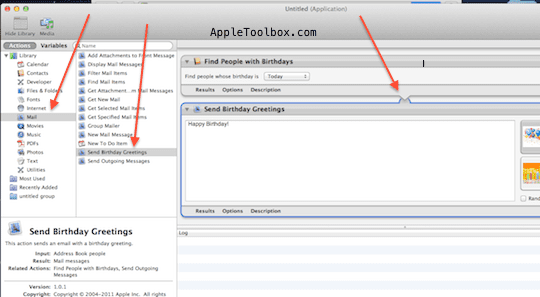
4. Now Click Mail and Send Birthday Greetings. Note that two actions in the workflow (see below) are linked together.
5. Save the workflow by choosing File > Save….
 6. Now to use this workflow, simple click the “birthday” icon (that you just saved). Automator will find the people with birthdays and let you send you a greeting.
Related:
Mac OS X: Dictation not working; how to fix